cci logo

Clipping Creations India

  • Home
  • Services
    • Background Remove
    • Clipping Path Service
    • Product Photo Editing
    • Image Masking
    • Drop Shadow
    • Ghost Mannequin Services
    • Color Changes
    • Photo Retouching
    • Car Photo Editing
    • Vector services
    • Color Change Service
    • Multi-Clipping Path
    • Photo Editing Service
    • Image Masking Service
  • About Us
  • Blog
  • Pricing
  • Contact Us
  • Free Trial
Home  »  Tutorial   »   How to Edit Senior Photos Like a Pro in 6 Simple Steps?

How to Edit Senior Photos Like a Pro in 6 Simple Steps?

  • Clipping Creations India
  • March 23, 2023
  •  
    • Tutorial

Whether you’re a professional photographer or just someone taking pictures of your own senior, editing your senior photos is an important part of the process. With the right tips and tricks, you can easily create stunning images that will last a lifetime. 

From choosing the right software to optimizing color and contrast, we got you covered that will help you take your photos to the next level. 

So, without further ado, let’s dive in and learn how to edit senior photos like a pro!

Table of Contents

Toggle
  • Challenges of Editing Senior Photos
    • Step 1: Open Adobe Photoshop
    • Step 2: Use the Healing Brush Tool for Blemishes
    • Step 3: Smoothen the Skin
    • Step 4: Select the Dodge Tool
    • Step 5: Add Some Color
    • Step 6: Save Your Results
  • Easy Way to Edit Senior Photos With GIMP
    • Download GIMP
    • Add Some Color
    • Smoothen Out Wrinkles
  • Frequently Asked Questions on How to Edit Senior Photos
  • Final Thought

Challenges of Editing Senior Photos

Editing photos of seniors can be a tricky endeavor. Older people often have more wrinkles and blemishes that need to be edited out, their skin tones are typically less vibrant, and their hair is often grayer than it used to be. 

Additionally, the lighting may not be ideal, which can lead to an overall dullness in the photo. It’s important to keep in mind that these challenges can be overcome with the right techniques and tools. 

With patience and attention to detail, you can create beautiful and flattering senior photos. But the concept of editing is to make the picture perfect, make its subject look better, and not completely change its authenticity. 

Therefore, senior photos should look like seniors.

How to Edit Senior Photos in Adobe Photoshop?

With this popular photoshop tool, you can edit senior photos like no other.

Before & After

However, you need to go with some trial and error to create stunning photos of your loved ones. 

Here is a simple step-by-step guide on how to edit senior photos in Adobe Photoshop.

Step 1: Open Adobe Photoshop

editing senior photos Step 1

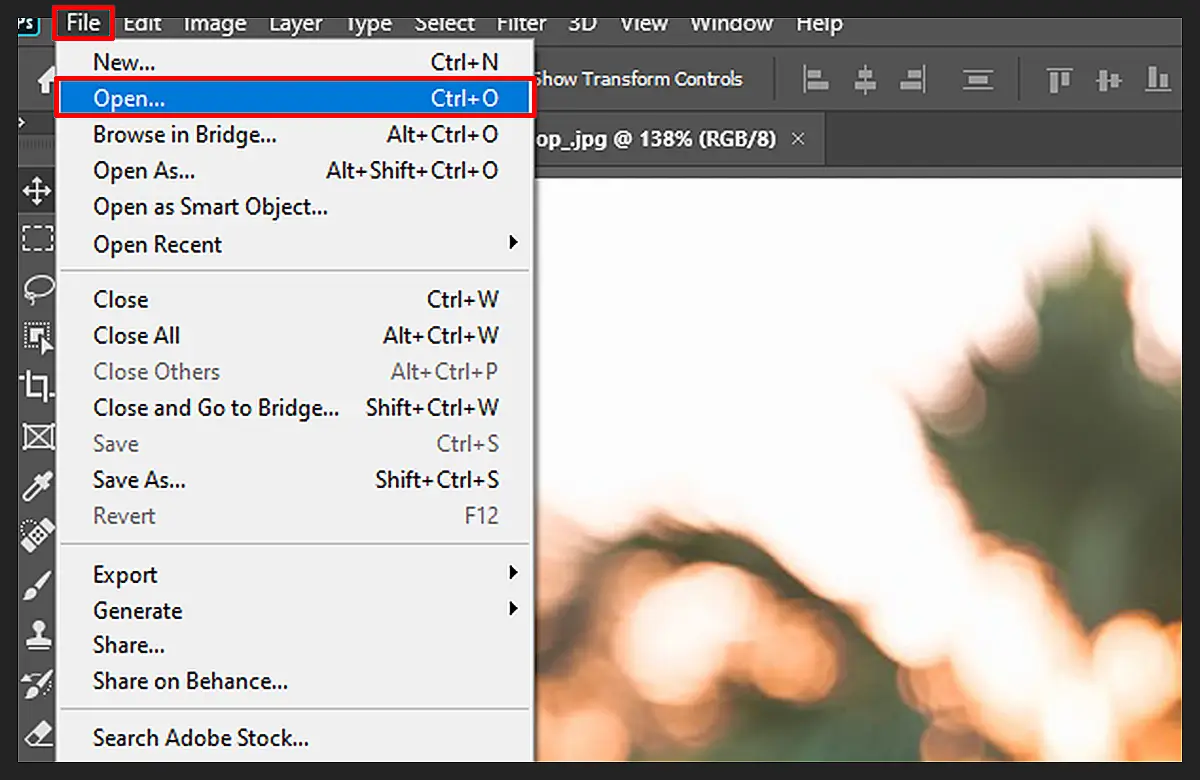
Start by opening the photo in Adobe Photoshop. You can do this by going to File > Open or simply dragging the photo into the program window. 

Step 2: Use the Healing Brush Tool for Blemishes

Editing senior photos Step 2

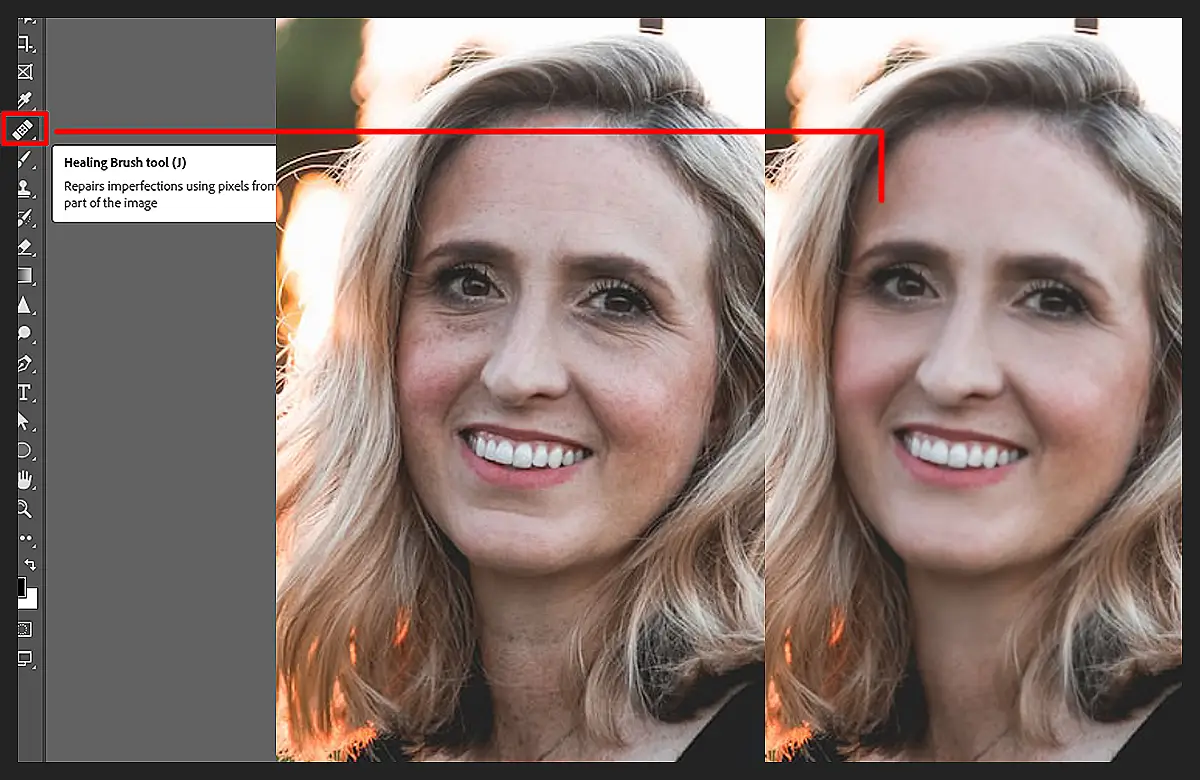
Smooth out wrinkles and blemishes with the help of the Healing Brush tool. Pick the tool from the toolbar on the left, then select the brush size and hardness to suit your needs. 

Next, start brushing away any wrinkles or blemishes you may see in the photo.

Step 3: Smoothen the Skin

Editing senior photos Step 3

Next, soften skin tones and give the subject a more even complexion using the Smudge tool. 

For that, select the Smudge tool from the toolbar, adjust the brush size and hardness accordingly, and begin softly smudging areas of the skin you want to soften.

However, make sure you don’t go too over the board with smoothening on senior photos, as it may look unnatural.

Step 4: Select the Dodge Tool

senior photos Step 4

To make the subject’s eyes look brighter and more vibrant, you can use the Dodge tool. 

Click on the Dodge tool from the toolbar, adjust the brush size and hardness accordingly, then begin brushing around the eyes to brighten them up.

Step 5: Add Some Color

photo editing Step 5

To add a bit of color to the photo, use the Hue/Saturation tool. Select this tool from the toolbar and adjust the settings according to your preference. Once you are done, click ‘OK‘ to save your changes.

Step 6: Save Your Results

senior editing Step 6

Finally, when you are happy with the results, go ahead and save your edited photo. You can do this by clicking on File > Save As. Give your photo a name and choose a format that you would like to save it in.

By following these simple steps, you can easily edit senior photos in Adobe Photoshop and create stunning results!

Easy Way to Edit Senior Photos With GIMP

Editing senior photos in Adobe Photoshop can be a daunting task, especially if you’re not familiar with the software. Luckily, by following this step-by-step guide, you will be able to edit senior photos in no time!

Download GIMP

First, you need to download the free photo editing software GIMP on your computer. Once it is installed, open the software and load the photo you want to edit.

Add Some Color

Then, use the brightness/contrast tool to make the subject brighter and more vibrant. You can also use the hue/saturation tool to add color to the photo if needed.

Smoothen Out Wrinkles

Next, use the clone stamp tool to help smooth out wrinkles and blemishes. Select the stamp and the source area you want to copy from, and then brush it over the wrinkles and blemishes. 

Experiment with different brush sizes, hardness, and opacity levels to find the best settings for your photo. This tool can be used to edit senior photos quickly and effectively.

Read more: Get Picture Perfect Hair: What are the Benefits of Hair Masking in Photoshop.

Frequently Asked Questions on How to Edit Senior Photos

Let’s have a look at some of the frequently asked questions by senior photo editors like you. 

Where can I get senior portrait edit inspiration?

For inspiration, check out Instagram and Pinterest for different portrait editing styles. Look at different photographers’ pages to get ideas on how they edit their photos. Alternatively, use online tutorials or books to learn new skills.

How to edit senior photos on mobile?

You can create stunning memories of seniors with their mobile phones using a photo editing app such as Snapseed. Apply filters to soften wrinkles and create a softer effect. Then, add subtle blurs and sharpness adjustments to make the subject stand out in the photo. 

Final Thought

Editing photos of seniors can be an enjoyable and rewarding experience. It is important to remember to take your time, be creative, and make adjustments with care. Keeping contrast and brightness levels in check and skin smoothening limited will help ensure that your photos look as good as possible. Following these steps will help you achieve amazing results when editing photos of older people.

(Visited 196 times, 10 visits today)

Post navigation

< Previous
Next >

Leave a Reply Cancel reply

You must be logged in to post a comment.

Top Services:

  • Clipping Path Service
  • Car Image Editing Service
  • Ghost Mannequin Service
  • Product Photo Editing Service
  • Multiple Clipping Path Service
  • Ghost Mannequin Service
  • Color Change Service
  • Drop Shadow Service
  • Color Change Service
  • Photo Editing Service
  • Image Masking Service

Popular posts:

  • How to Move Eyes in Photoshop and Online ToolsMove Eyes in Photoshop
  • See Through Cloth In Photoshop − Best PracticeSee Through Cloth in Photoshop Feature image
  • Easy Steps to Learn Clipping With Gimp [Easier Than…Clipping With Gimp
  • How to Create an Alpha Channel in Photoshop?clipping path service Feature
  • How to Reverse Video in Photoshop: Photoshop Hacks 2025How to Reverse Video in Photoshop
  • How to Export Photoshop Actions in 2025How to export Photoshop actions
  • How To Fix A Lazy Eye In Photoshop 2025Lazy Eye Problem Here’s What to Do,
  • 10 Professional Photo Manipulation Artists You Must FollowPhoto-Manipulation-Artists
  • How to Fix a Dark Polaroid Picture? Easy Solution to…How to Fix a Dark Polaroid Picture?
  • How to Swap Eyes in Photoshop? 2025 All-Inclusive Guide How to Swap Eyes in Photoshop

Recent Post

  • Car Background for Photo Editing – Tips and Tricks for Stunning Car Photos
  • The Benefits of Outsourcing Real Estate Image Editing USA: Smart Move
  • How to Swap Eyes in Photoshop? 2025 All-Inclusive Guide 
  • See Through Cloth In Photoshop − Best Practice
  • How Real Estate Photo Editing Increases Sales in the USA

Categories

  • Photo Editing
  • Tutorial

Archives

  • May 2025
  • December 2024
  • November 2024
  • October 2024
  • March 2024
  • February 2024
  • January 2024
  • December 2023
  • November 2023
  • October 2023
  • September 2023
  • August 2023
  • July 2023
  • April 2023
  • March 2023
  • February 2023
  • January 2023
  • December 2022
  • November 2022
  • October 2022
  • September 2022
  • August 2022
  • June 2022
  • April 2022
  • November 2021
  • October 2021
  • July 2018
  • May 2018
  • April 2018
  • December 2017
  • September 2017
  • August 2017
  • July 2017
  • June 2017
  • May 2017
  • March 2017

About CCI

Here, every pixel tells a story. We offer our unparalleled service and invest our most talented minds at your solution whether you are a photographer or an agency.
We are the gateway to exceptional photo editing services!

Get Your Quote

Quick Menu

  • About Us
  • Services
  • Blog
  • Terms and Conditions
  • Privacy & Policy

Payment Method


Get In Touch

+8801715-491890

hello@clippingcreationsindia.com

Canada Office: 1401-2900 Carling Ave. Ottawa, ON, K2B 7J6

+14168973175

India Office: C-20, Lajpat Nagar 3, New Delhi, Delhi 110024, India

Bangladesh Office: House 1, Main Road, Block G, Bnasree, Dhaka 1219

Copyright © 2012-2025 Clipping Creations India | All rights reserved.

  • Facebook
  • Twitter
  • Instagram
  • Pinterest
  • LinkedIn

Live Chat