Guide to Using Blood Brushes for Photoshop: Everything You Need to Know
- March 27, 2025
With all the shadows, lack of brightness, and low contrast, horror-themed images can be tiresome to edit. Especially when there’s blood involved. Using blood brushes in Photoshop may seem similar to stroking a paintbrush, but these brushes require extra attention.
Blood brushes have their own set of rules. They need to be downloaded in a specific way, used according to the type of content they’re intended for, and retouched after use. Fortunately, we have all this info compiled for you in the following article. Be sure to check out the FAQ section if you still have unanswered queries.
What Are Blood Brushes Used for in Photoshop?
Blood brushes are a set of brushes in Adobe Photoshop, downloaded as add-ons that replicate the colour, texture, and appearance of blood splatters, stains, or spills.
In Photoshop, there are numerous brush presets available to mimic patterns such as footprints, leaf trails, snowflakes, and even shadows. Blood splatters are another set that needs to be downloaded separately.
These blood brushes vary depending on the source from which they are downloaded and usually mimic realistic blood splashes. The brush tool itself helps the user carefully place the splash at its desired spot with minimal editing.
Blood brushes are often used for the following purposes in Photoshop −
- Making horror/crime-themed imagery
- Halloween content
- Horror/thriller cover art for books, music, movies, etc.
- Make-up looks
- Thumbnails for videos, documentaries, short films, etc. (found on YouTube)
How to Download the Blood Splatter Brush for Photoshop?
It’s unlikely to find a blood-splatter brush preset sitting in your Adobe Photoshop panel. As with other texture and pattern brushes, you’ll need to download and install them separately. Here is a step-by-step tutorial on how to get ahold of these brushes−
Step 1—Look for Blood Splatter Brushes Online
All you need to do for this step is to simply look up “blood splatter brushes for Photoshop,” and you’ll find a wide variety of sites to download different brush sets to choose from.
When downloading brushes, it’s recommended to keep the following in mind−
- Don’t download or install anything from an insecure site.
- The brush set should be applicable to your version of Photoshop.
- Most brush sets require payment, so keep your credit card and bank info safe.
- Make sure to run a security scan on your brush set file in case of malware.
- Download brush sets that are exclusively Photoshop brushes, as brush sets for Procreate or Ibispaint may also appear.
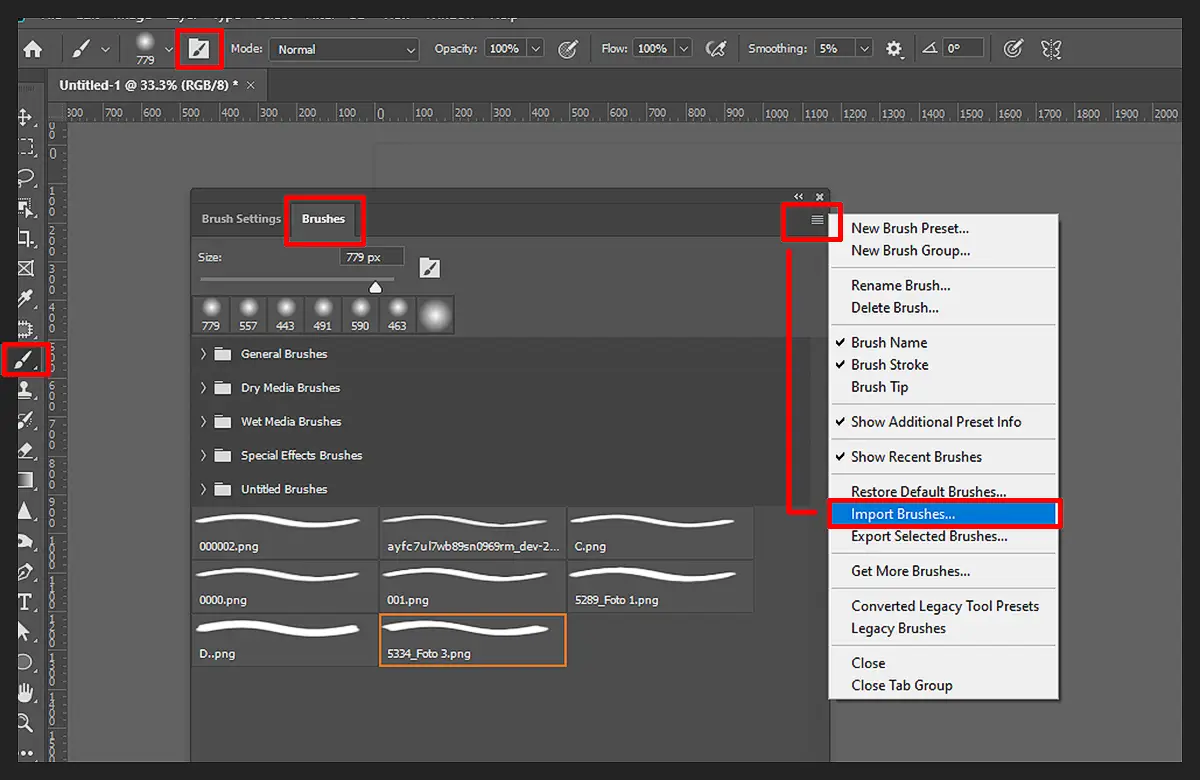
Step 2 – Install Your Brushes in Photoshop
Launch Photoshop and go to the Brushes panel. Click on the Hamburger menu and then click ‘Import Brushes.’ Now, you should be able to locate your downloaded ABR brush set file and open it.
There’s another way to do this if you skipped the first step, which is to go to the Brushes panel > Hamburger menu > ‘Get More ‘Brushes’. Here, you can install brush packs directly from Adobe, or you can create your own brush sets.
The second method is particularly useful if you haven’t found a set you’re satisfied with or if the set you’re looking for hasn’t ever been made. For example, as glossy blood brushes are common, you can create your own dried blood splatter brush.
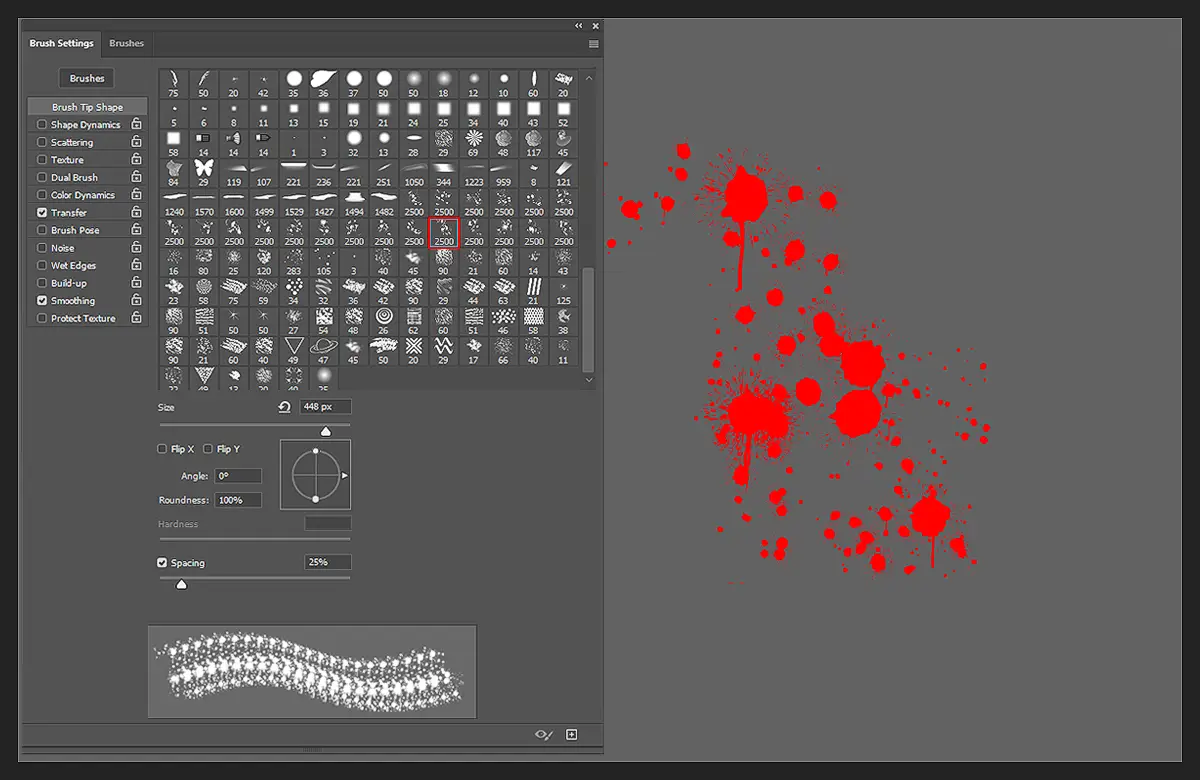
Step 3 – Try out the New Brushes
Once you have your brushes installed, load a new image into Photoshop and test them out. Click on your desired brush once and drag your cursor on the document window to make strokes.
To spot bad brushes, you need to look out for ‘Glitching‘ effects, such as the brush cutting off during strokes. There should also be no pixelated or discoloured edges. A good brush will run smoothly and look realistic to actual blood spills. Your brushes are now all set to use.
How to Use the Photoshop Blood Brush?
Other brushes in Photoshop are easier to use than blood brushes. While other brushes just need to be dragged around to make strokes, a few swipes of a blood brush won’t make much of a difference without making other adjustments.
Here’s how to use Photoshop blood brushes for maximum effect—

Adjust Hue and Saturation
Depending on the content you’re working on, it’s highly likely that you will need to make all blood effects look as real as possible. If your blood brush strokes look too cartoonish on your images, you can fix this by adjusting the hue and saturation.
Deepen or darken the colours of the blood strokes if the image is dimly lit, or make the strokes brighter and more transparent if it’s well lit. In addition, you can play around with the transparency and brightness toggles.
Try the Blurring Effect
For smudges and stains, adding a blurring effect can really bring your image together. First, put the blood brush strokes where you want them, then adjust the hue, saturation, and transparency to make them appear lighter. Then, blur the strokes to make them look like stains, smudges, prints, etc.

Add Shadows/Reflections
Still, blood puddles or spills are tricky to edit, as you have to edit shadows and reflections to make the splatters fit the rest of the image.
To ensure the blood splashes don’t look out of place, you first need to assess the light sources in your image. This will make you understand which areas of the spill need more shadows and/or reflections. Read more: How to Edit Senior Photos Like a Pro in 6 Simple Steps?
Conclusion
Using blood brushes for Photoshop is as easy as using any other brush pack. However, the only catch is that you need to put in work for the splashes to look real.
Hopefully, our guide has covered everything you need to know about these types of brush packs. Remember to safely browse brush sets before trying them out.