How to create marble text effect in Photoshop: A-Z Guide
- February 28, 2025
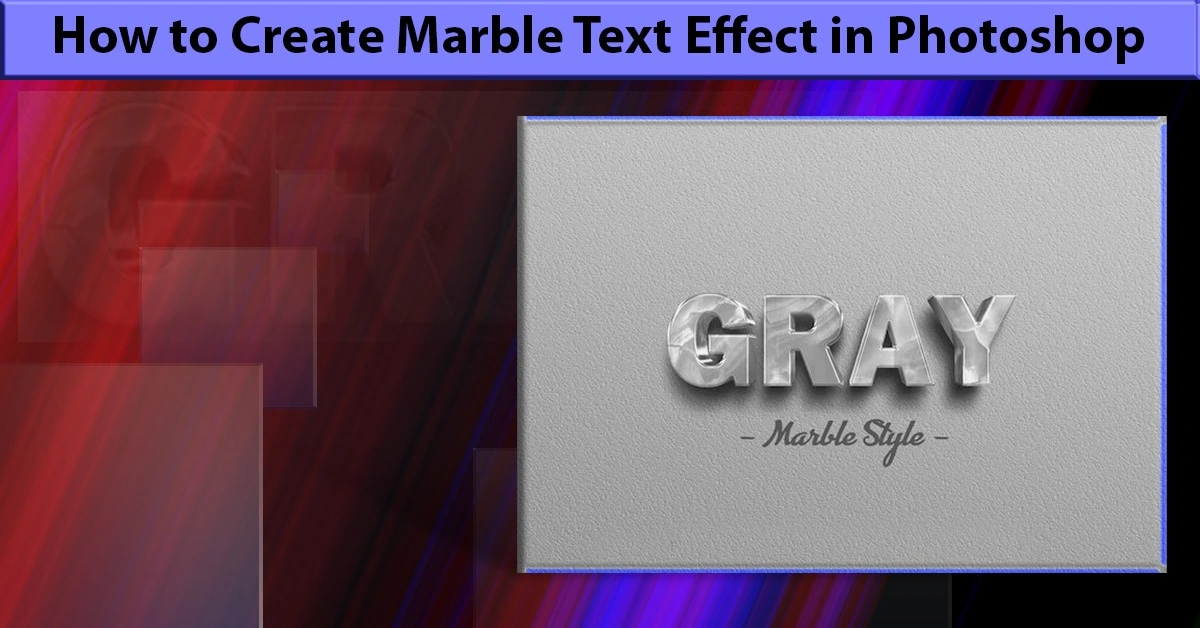
With its sleek design, the marble text effect is making its way into home decor and many other areas. You can also develop this design and customize it if you know how to create a marble text effect in Photoshop. In order to produce this effect, you will need to adjust various settings, including shadows, layers, and filters.
In the article, we begin with a brief discussion of the marble effect. Afterward, we will take you through a step-by-step guide to create an elegant marble text effect. Let’s jump right in!
What Is the Marble Text Effect?
Before discussing marble text, let’s clarify what the marble effect is. It refers to a visual effect reminiscent of marble or stone. You can create it by applying filters like clouds along with hue, saturation, and brightness adjustments.
On the other hand, the marble text effect is a typography technique used to add the marble effect to a text. To do this, you must utilize Photoshop’s layer styles, filters, and blending modes.

Method for Creating Marbled Text in Photoshop
You can generate marble text effects in Photoshop in a number of ways. However, we came up with the easiest one that even beginners could follow. Let’s take a look.
Required Materials
- Marble-textured background
- Script fonts

STEP – 1: Specify the Background Color
The first step is to match the background color with the marble texture. However, it is a bit of a hassle since identifying an image’s exact color takes time.
In that case, pick #534d39 as the color for the background. You may then add your textured image and blend it into the background using the Multiply Blend Mode. This eliminates the need for matching colors.
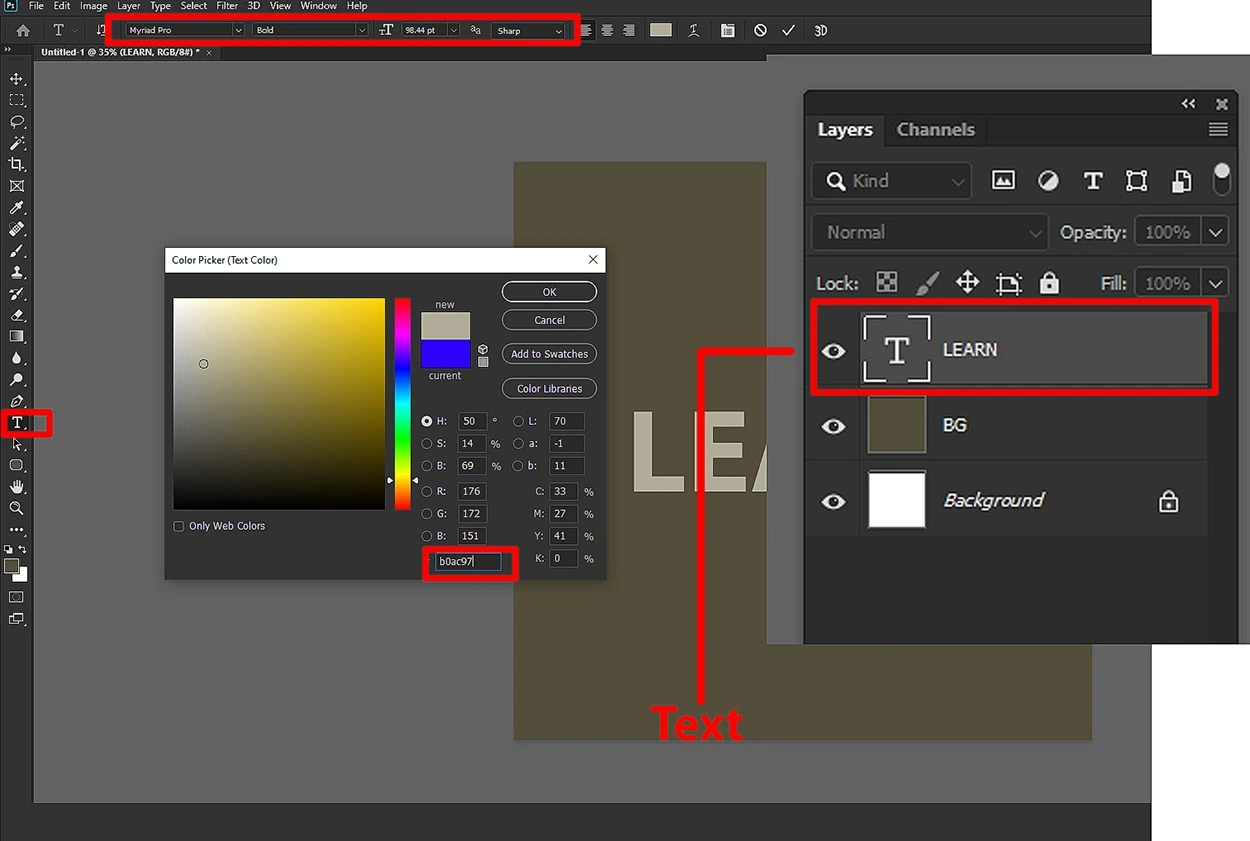
STEP – 2: Choose a Font
It is time to prepare the text in a good font. You are welcome to write whatever you want, as long as you use the color #b0ac97. Apply the font you decided upon earlier and size it at 377 pixels.
We must have two versions of the same text for two different purposes. Therefore, make a duplicate layer of the text. Ensure that the newly created layer has a Fill value of 0.
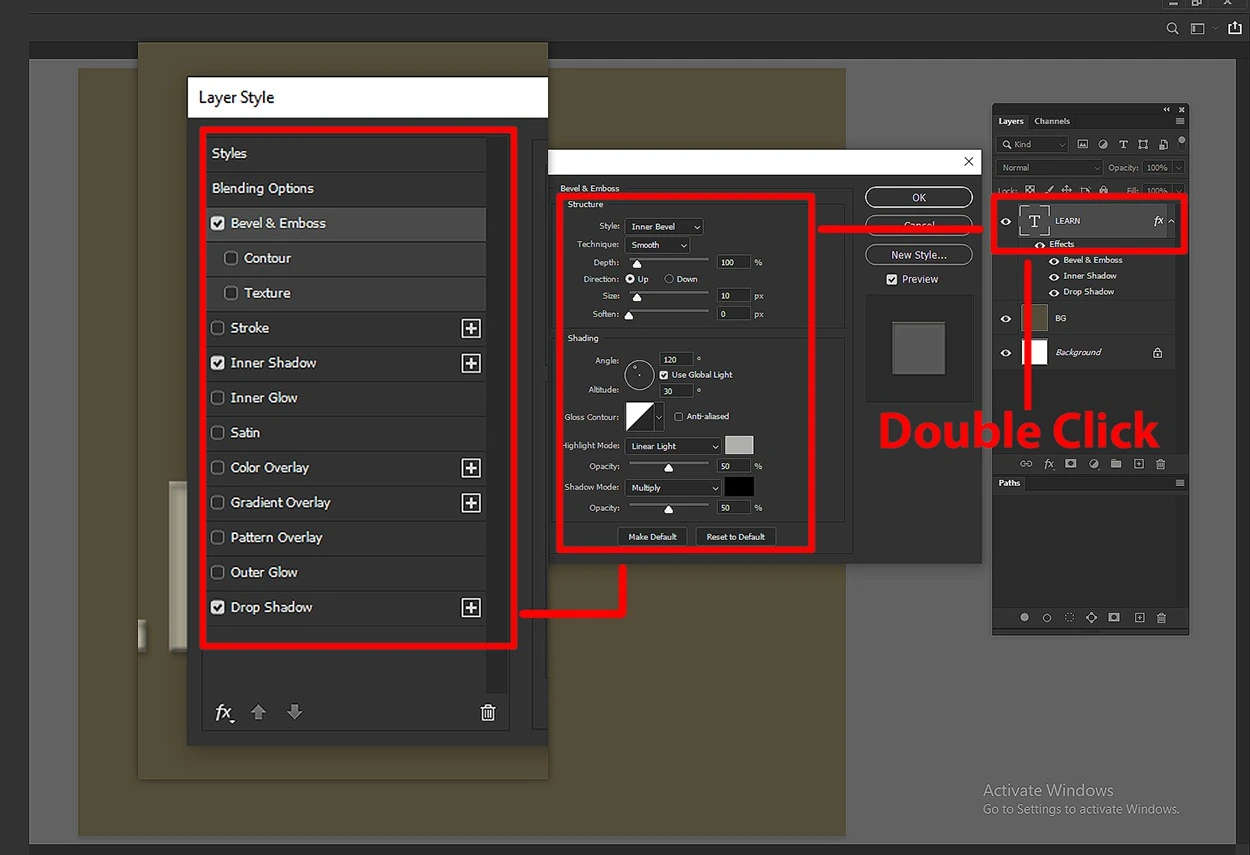
STEP – 3: Correct the Original Text
We will now update the original text with major changes in the drop shadow, inner shadow, and other areas. Simply click twice on it and perform the following adjustments—
Inner Shadow
Choose #908c78 for the color and 13px as the size. In terms of the contour, a half-round shape would be appropriate. Adding an inner shadow will enhance the depth and realistic appearance of your text.
Drop Shadow
Drop shadows simulate the text layer hovering above the background layer and casting a shadow. Simply put, they transform your image into 3D. To achieve the correct drop shadow, select #585858 as the color. Next, increase the distance to 6 and the size to 10 pixels.
Bevel and Emboss
We have to start by changing the Shadow Mode color to #6e6b5e with a size of 12. Since bevels and embosses stand out with depth, try upping the value to 300. Also, it’s a good idea to soften the depth by 3 or 4. In this way, the text has nicely rounded edges and shadows.
Inner Glow
Make sure the inner glow’s Blend Mode is Linear Light, and the Technique is set to Precise. Afterward, use #afafac color and a 10-size. This step adds a subtle glow to the inner edges and allows the text to be visible against the background.

STEP – 4: Use a Glass Effect
Remember earlier when you had duplicated the text layer? Let’s give it a glassy effect.
Double-click on the layer and modify the Bevel and Emboss as follows −
- Ensure the Use Global Light box is unchecked.
- Shadow Mode color – #d9d9d9
- Size – 7
- Depth – 250
- Altitude – 60
- Angle – 100
- Highlight Mode Opacity – 80%
Although it is not mandatory, you may tick the Anti-aliased box next to Gloss Contour. What it does is enhance the text’s smoothness.
STEP – 5: Apply Foreground Color
Did you think two layers were sufficient? They aren’t, as it turns out. Make a third one and label it “Texture.” Now create a selection by holding down the Control key while clicking on a text layer’s thumbnail.
In the foreground and background colors, enter #a77d31 and #fff8de, respectively. You are then ready to paint the “Texture” layer with the foreground color. The selection could cause issues later on, so hit Control and D at the same time to remove them.

STEP – 6: Work With Filters
This is perhaps the most crucial step because we will use filters here to achieve the marble texture you desire.
Click on Sponge from Artistic on the Filter tab and change these settings −
- Brush Size – 2
- Definition – 25
- Smoothness – 5
Continuing on the Filter menu, select Sketch, followed by Chalk and Charcoal. Make sure you adjust the following −
- Charcoal Area – 7
- Chalk Area – 10
- Stroke Pressure – 1
Now go back to Artistic and opt for Plastic Wrap instead. Below are the changes you need to carry out −
- Highlight Strength—17
- Detail – 14
- Smoothness – 5
Last but not least, choose Film Grain on Artistic and edit the following—
- Grain – 10
- Highlight Area – 15
- Intensity – 10

STEP – 7: Merge the New Layer
The time has finally arrived for the “Texture” layer’s Blend Mode to be switched to Multiply. Once you have done that, open the Image tab and select Adjustments. You should be able to locate Hue/Saturation there. Set Saturation to -80. And voila, you’ve got yourself a stunning marbled text effect!
Tips on Producing a Marble Effect in Photoshop
Here are a few tips to make marble effects more appealing in Photoshop.
Pick the Right Colors
People often fail to realize that marbles aren’t available in fancy colors such as red, yellow, or green. Their natural colors are common among white, gray, and black tones. Hence, try applying these colors to enhance the natural aesthetic.
Utilize Filters
When creating marbled text, filters are vital since they adjust the content of layers. Thus, test out filters like Cloud, Marble, etc., and find what works for you.
Explore the Blend Modes
Play around with the blend modes in Photoshop. For marble effects, Overlay or Soft Light are really good options. Keep in mind that the marble layer will blend seamlessly into the background with the right mode.
Intensify the Noise Level
As a result of all the effects and filters, the text may no longer seem realistic. In order to avoid this issue, cover the marble layer in noise.
Apply a Mask
Considering you will be adding text to the marble effect, make use of layer masks. They integrate the text smoothly into the design.
Experiment With Opacity
The marble effect is indeed lovely, eye-catching, and all that. But remember, nothing is good when it is overdone. So, if you feel the effect is too strong, modify the marble layer’s opacity to adjust how much effect is applied.
Final Words
As the article illustrates, generating a marble text effect is relatively simple if you understand how shadows, layers, and filters work. To let the effect shine even more, you can make use of tips like using the right colors and blending modes. This way, you can learn how to create a marble text effect in Photoshop in the most efficient way.