Road to Eye Catching Photos For Professional Car Photo Editing.
- March 1, 2023
Professional car photo editing is an essential part of the automotive industry. It enhances the look of cars, making them look presentable to potential buyers, and boosts sales.
You can use any editing software to do car photo editing. There are hundreds of them. Just remember to represent the car as it is, never misleading the customers.
This article will discuss the best software for car image editing and the dos and don’ts of editing.
The Dos and Don’ts to Getting a Professional Car Photo
Car photo editing is crucial to the sales of cars. So, as a photo editor, read the following dos and don’ts of professional car photo editing.
Dos
- Select the Right Image
If you want more options and flexibility, take multiple pictures of the car from different angles, exposure, and lighting. And select the best one to edit. Moreover, if you want an HDR image, taking images in multiple exposure settings is a must.
- Remove Obstacles and Crop Image
Remove any objects that are distracting or take away the focus from the car, such as litter, other vehicles, people, animals, etc. You can also crop the image to emphasize the vehicle, and make the image look better.
- Save Your Work
You should always save and back up your work, including any settings or presets that you use frequently. Make it a habit. This will save your time, you won’t lose your data due to any techinal problem.
- Make Virtual Copies
Let’s talk about a feature called Virtual Copies. It allows you to create a copy of the original photo. So, if you want to experiment with different editing options without losing the original picture, make multiple Virtual Copies of it. Do your edits on the copies until you get the best look.
Don’ts
- Don’t Over-edit an Image
While editing, beginners make a common mistake of over-editing the picture. They misuse the tools and eventually the image loses its originality and looks overdramatic. So, how would you know when to stop?
Well, there’s no solid answer. This requires experience and judgment. Also, preserve the original color of the car or the ads will become misleading and give the company a bad reputation.
- Don’t Make Multiple Copies Offline
If you move an offline file to a different location on your hard disk, the file becomes disconnected from the associated software. And once you try to open it from the software fro further edit, it will show unavailable. So, keep the file in its original location, or change the directory via the software.
- Don’t Change the Original Color
You shouldn’t alter the original color and look of the car. It’s given, isn’t it? Yet many editors make this mistake.
How to Edit Car Photos for Ads in GIMP for Free?
GIMP is free software that offers all the tools you need to edit a car photo. If you haven’t used this software, try this, as it’s completely free.
Anyway, after opening GIMP, you will notice that the looks of the menu and icons are very similar to photoshop.
You must keep 2 things in mind if you intend to use this free software.
- You have to additionally install a RAW file loader to use RAW images.
- Make your edits and experiments on a copy of the original image, as the modifications are destructive and permanent. This means you can’t revert back to the original one.
Now that we have mentioned all the technicalities let’s dive into the steps of editing a car photo in GIMP.
Step 1: Open the Car Photo
You can do it in GIMP by going to File and selecting Open.
Step 2: Adjust the BASICS
You start by fixing all the basics, such as exposure, saturation, white balance, shadow, white balance, and highlight.
Look for the exposure settings by opening the Colors menu. Pay with the slider to change the look of the image. And always keep the changes of exposure, shadow, and highlight to a minimum to avoid noise.
By adjusting the Levels, you can change the contrast – white or black. You can find the Levels option in the Colors menu.
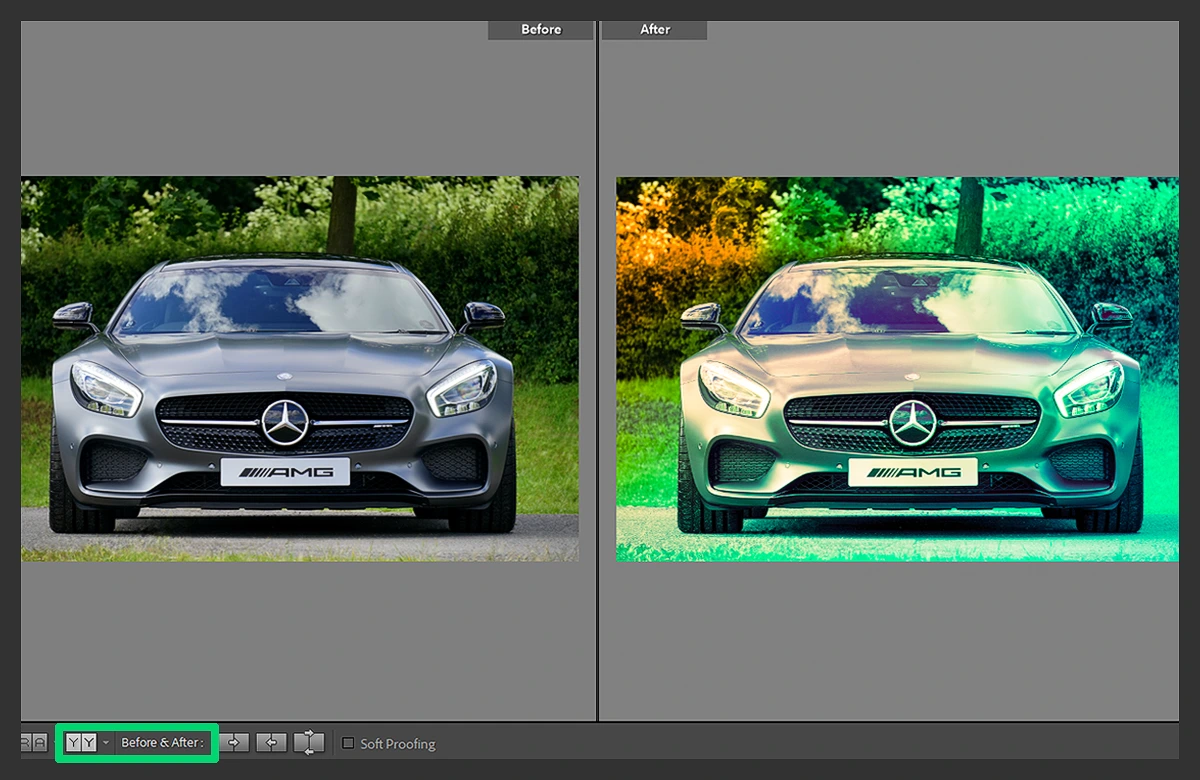
And you can see the before and after look of the image by checking the Split View option.
Step 3: Color Correction
You must correct all the colors in your image to enhance it. Go to the Colors menu and look for Color Balance Adjustment to fix the colors of these 3 ranges: shadows, midtones, and highlights.
Step 4: Remove Elements
It’s normal to have unwanted elements or objects in any image. You can remove them by using the Clone Tool or the Healing Brush.
Choose a tool and click on the item you want to remove. Look at the Tools panel on the left to find these.
Step 5: Resize
The RAW image is less likely to be in a perfect size. Use the Crop Tool to crop the image if needed. You crop your image to highlight the car to the viewers.
Step 6: Finishing Touch and Export
After all the adjustments, if your image still feels incomplete, you can use filters. You can find them in the Filters menu.
Once you’re done, save your edited image by selecting File first and then Export As. Choose your preferred format and select Export.
Steps on How to Edit Car Photos Using Lightroom
Since Adobe Lightroom is one of the most popular software amongst photographers, we will discuss the basics of editing car photos in Lightroom step-by-step.
Step 1: Import Your Photos
The first step is to import your car photos into Lightroom. Select File first and then Import Photos and Videos.
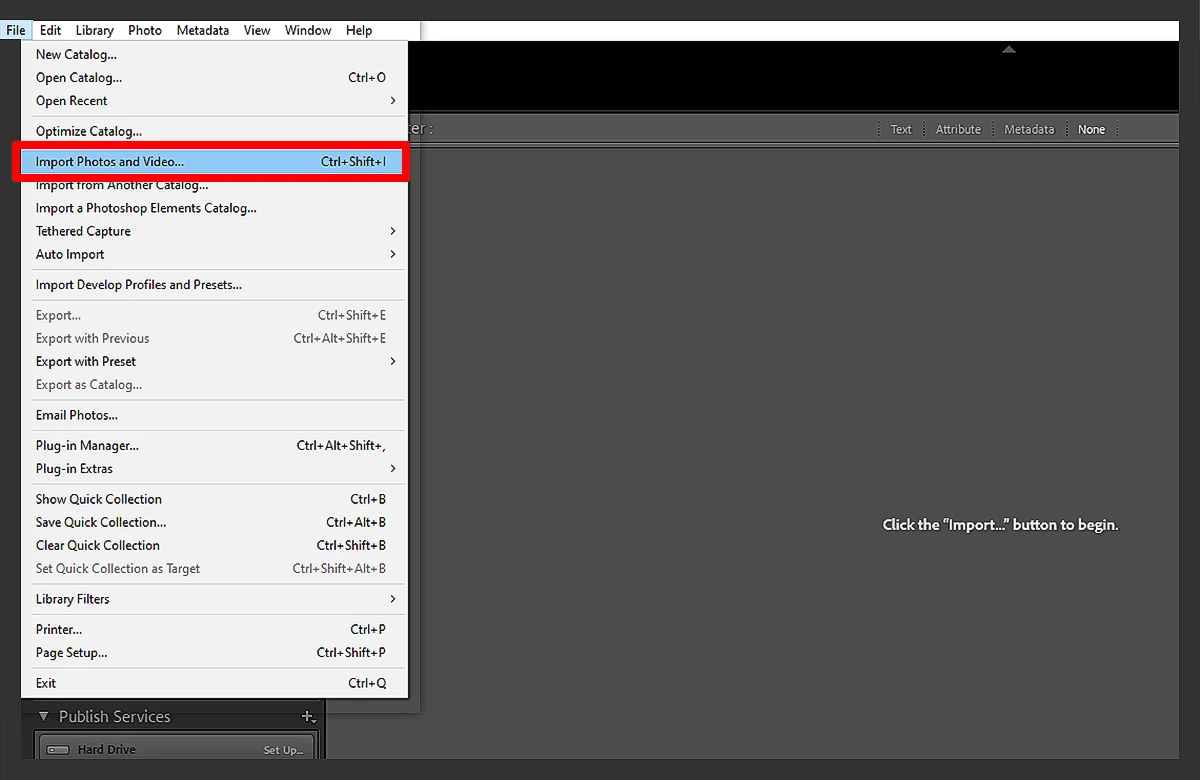
You can also use the Import button in the Library module.
Step 2: Basic Adjustments
The actual editing process starts with making some basic adjustments. In the Basic Panel of Develop Module, you begin with the exposure, then fix the white balance.
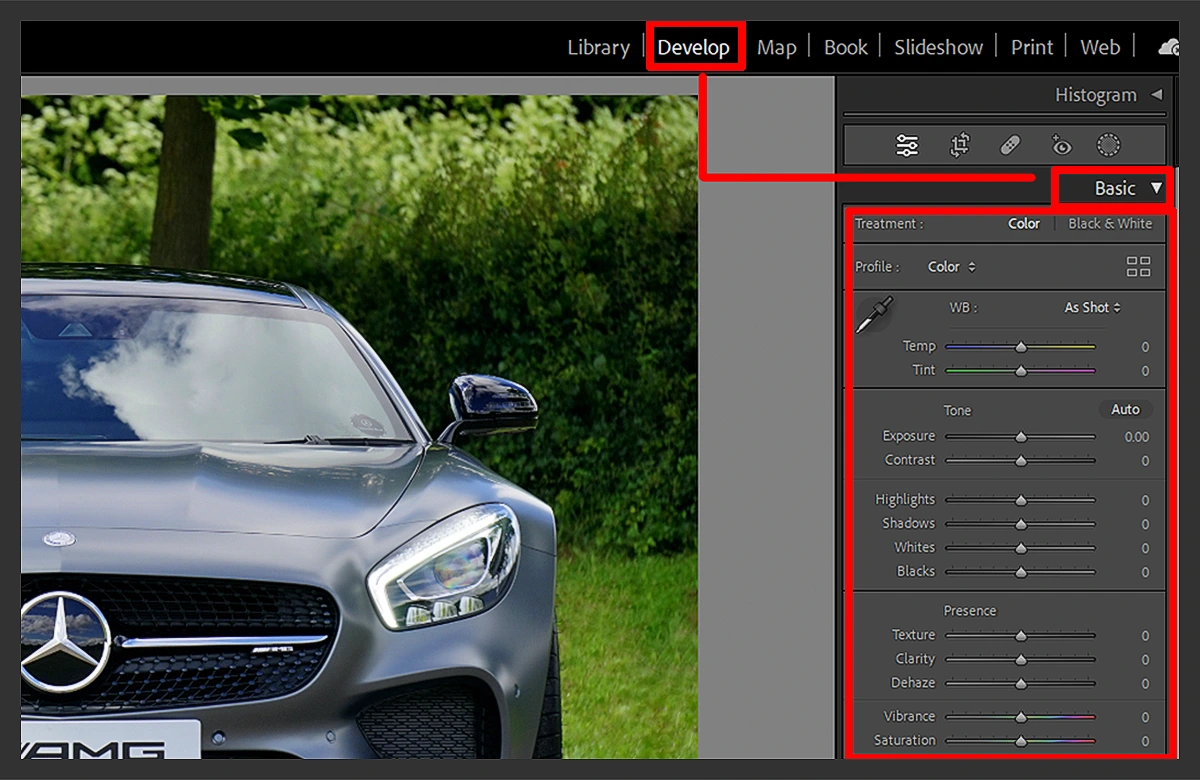
Then gradually, you alter the highlights, shadows, saturation, and clarity settings to your preference.
You separately work on each tool and play with the slider until you get your preferred result. Never overdo the values of these tools. Otherwise, your picture will look unrealistic and overdramatic, and you don’t want that.
Step 3: Color Correction
In this step, we will correct the colors the image possesses. First, click on HSL/Color/B&W and select All to see all the colors.
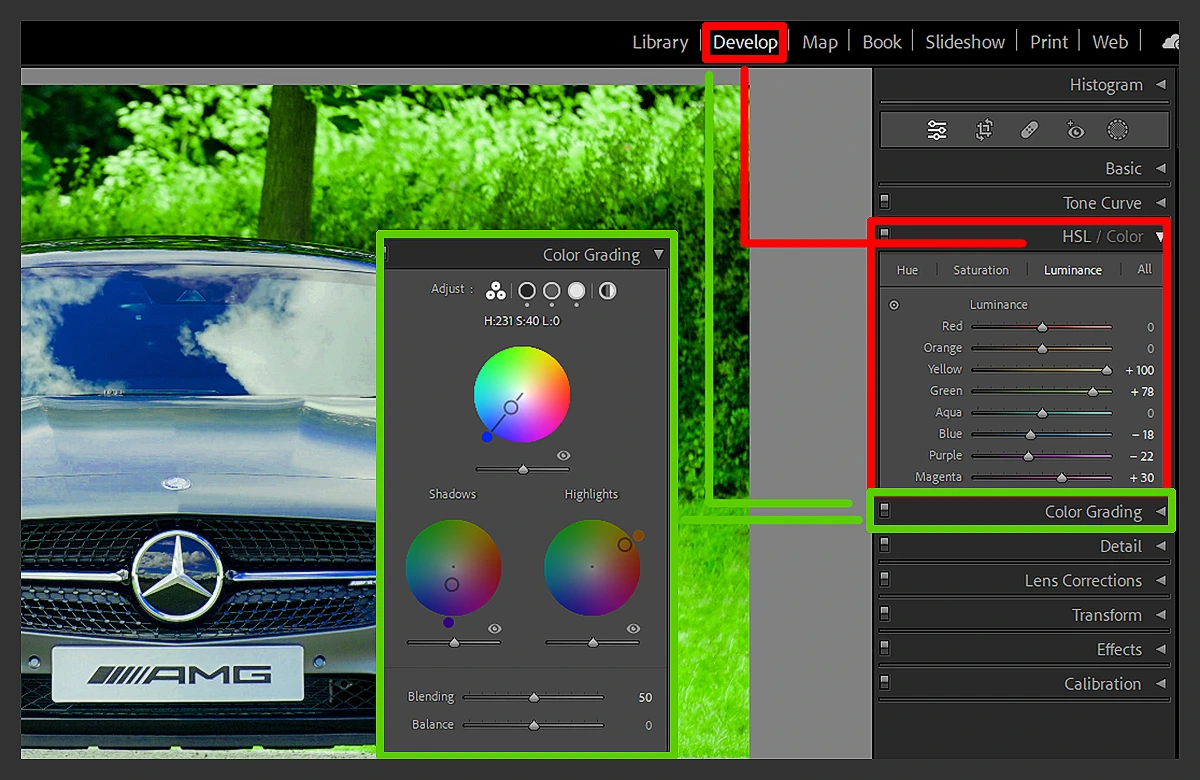
Start working on each color and adjust the hue, saturation, and luminance of specific colors in your image. You will find the sliders in the HSL/Color/B&W panel.
Next, use the Color Grading Panel to improve the picture further. Play with the highlights, mid-tones, and shadows tools and give your image the best look.
Step 4: Use the Linear Gradient Tool
Once you have made all the adjustments, it’s time to give the image’s background a darker, more cinematic look.
Select the Linear Gradient tool from the Mask Panel, and three white lines will appear. Drag and shift them, and place them where you want to edit.
You can also change the length and intensity of the edit. The options can be found in left panel of the software.
Step 5: Edit Specific Areas
Use the Brush Tool to make changes in specific areas of the image. You can change the look of only the wheels, the windows, or maybe the windshield.
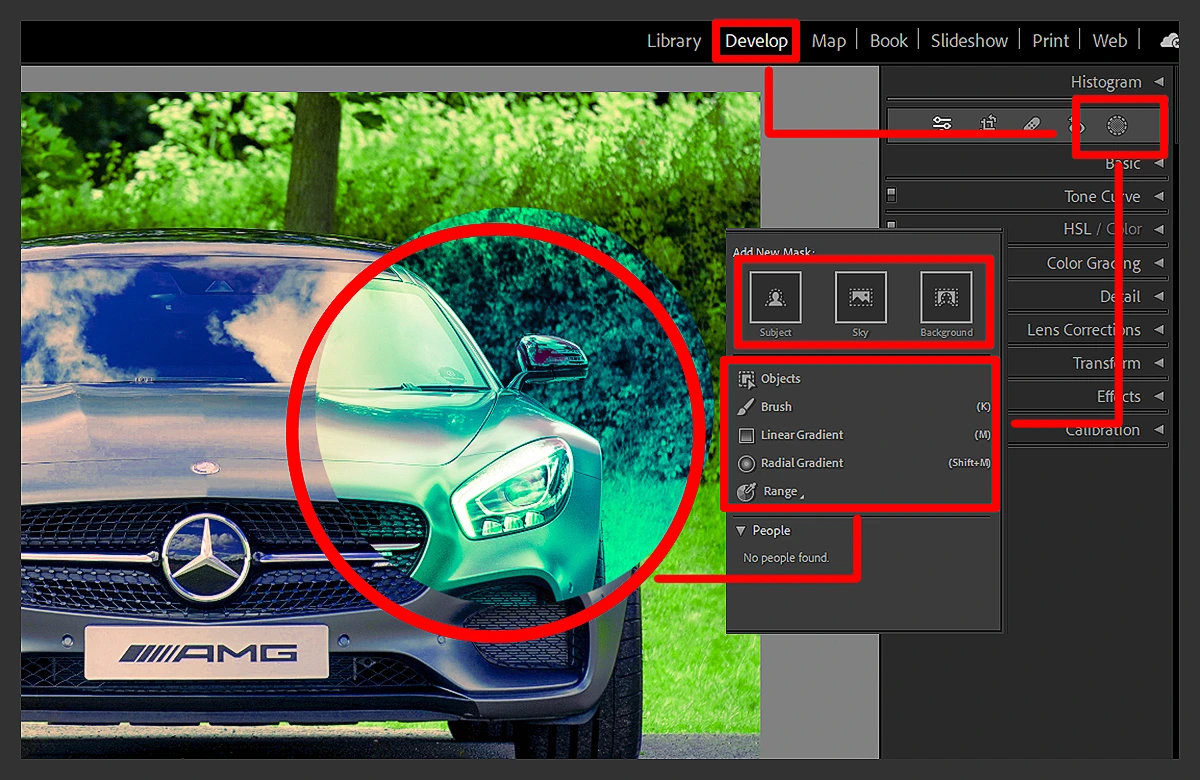
The point is you choose any region of the image using the Brush Tool and make adjustments to them.
Once you’re done, save the picture. Click on File, then Export to save the file in your preferred format.
Learn more: A Definitive Guide on How to Edit Car Photos on Lightroom.
FAQs About Professional Car Photo Editing
We face many common questions regarding this topic. In this section, you will get answers to some of the questions.
Can I take a great car photo?
First, you must have a decent camera and other accessories to accommodate the photo shoot. Always choose a proper background that would elevate the image. You must select the right angle to perfectly capture the car. Also, the lighting should be good.
How to Choose the Best Car Picture for editing?
Choose the image that has good lighting, proper composition, and is taken from the right angle. Make sure you choose an image where the car looks good, and its features are noticeable. It should also have enough resolution to allow for editing without losing quality.
How can HDR be used for car photo editing?
You take multiple pictures of the vehicle at a different exposure and then merge them into an HDR image using any software. Make sure to use the editing tools such as saturation, white balance, and contrast carefully, as it’s easy to make an HDR image look unrealistic and over-processed.
Conclusion
We hope our article on professional car photo editing helped you learn about the best editing software, its convenience, price, and features. You choose one that fulfills your conditions.
Moreover, now you know what to keep in mind while editing and the basics of editing a photo in Adobe Lightroom.
And never go overboard with your edits. Aim for subtlety, and always remember, less is more.