How to Take Professional Product Photos with iPhone
- November 6, 2024
You have to have visually appealing photos or striking images of your products, if you want to sell them online. The online marketing for ecommerce product promotion in affiliate or drop shipping business or small online shop, widely depends on captivating presentation of your product.
Now capturing a beautiful product photo has become so easy without investing a fortune. You will not need any expensive DSLR camera, while your personal iPhone can be quite enough for the resulting standard level of product photography.
Let us help you to show the easy step by step guide on the techniques and tips of iPhone Product Photography.
iPhone Photography- An easy approach
Hyper realistic images of famous Brand Products, with super graphics output, can only be possible with the highly configured DSLR camera as well as by experienced photographer.
In that case, the iPhone is not truly capable of competing with the DSLR output. But, it is able to achieve the qualities that are quite close to realistic visualization, when you have deep knowledge, skill and photo generic sense.
The easy and straightforward approach is to become a master by knowing it’s all settings and functionalities. Besides knowing technicalities in shooting, you have to conduct experiments to grab the killer photographic composition with your iPhone. It can be your one and only weapon to render a professional look into the product images.
Why? Because this is an iPhone.
The Apple iPhone has achieved global recognition for its exceptional brand value. It is acclaimed that iPhones generally have better cameras is often reviewed by both tech experts and users ; largely due to Apple’s consistent focus on optimizing hardware and software integration for superior photography.
The iPhone is incredibly user-friendly and unique. Even a beginner with minimal photography knowledge can capture professional-looking images with the help of this device.
Its default features and super intuitive functionality, combined with superior camera components, make it easy to produce high-quality photos effortlessly. Apple iPhone cameras are designed and manufactured to uphold the brand’s rigorous quality and performance benchmarks.
Key features of iPhone include precise, responsive autofocus, a sophisticated ‘Portrait mode’ offering enhanced bokeh effects and Depth Control, and specialized Portrait Lighting options.
The refined lenses, advanced sensors, and smart software work together to create images that often rival those taken with a DSLR used by a professional photographer. As it offers exceptional clarity, color accuracy, and detail with minimal input, many beginners cannot attain that quality of image even with a professional camera.
What is Product photography?
Product photography or commercial photography does not mean only snapping the product with just a few clicks. The term “Professional Product Photography,” in its superordinate sense, denotes with careful attention to critical elements such as lighting, measurement and post-production editing to enhance the final image.
Achieving exceptional product photography subjects to presenting the product in its most appealing composition. Though the ‘Image Composition’ is a matter of personal sense of taste and choices.
“Perfect Practice makes a Man Perfect”
Remember, success in photography demands continuous practice, an eye for detail, and a deep understanding of light, focus, and composition.
Just reading an article will never make you a professional photographer, rather help you keep performing the required practices perfectly.
Following this guide carefully and by leveraging the powerful camera features of your iPhone you can achieve an incredible result in targeting your audience.
Equipment and preparation needed for product photography with an iPhone.
Setting up a dedicated room as your DIY studio is romantic for working in a safe and comfortable environment, where you can focus on capturing high-quality images. Proper preparation will help you create a smooth workflow and allow you to produce professional results efficiently.
Before you begin snapping photos, it’s important to prepare all your equipment.
Preparation:
01. Ensure your iPhone is fully charged and updated to the latest software version. This ensures you have access to the latest camera features.
Next, check your camera settings
02. Be sure to check all relevant settings. Decide whether the extra lighting feature on your phone should remain on or off, depending on your lighting setup.
03. Choose any photo effects, you may want to apply and determine whether you’ll shoot in portrait or landscape mode. Adjust the image ratio according to your needs.
04. Ensure that your phone has enough available memory by cleaning up space in advance.
05. Last but not the least, always check that your iPhone lenses are clean and free from any spots or scratches. A dirty or scratched lens can affect image quality, causing blurriness or unwanted distortions in your photos.
Important Equipment
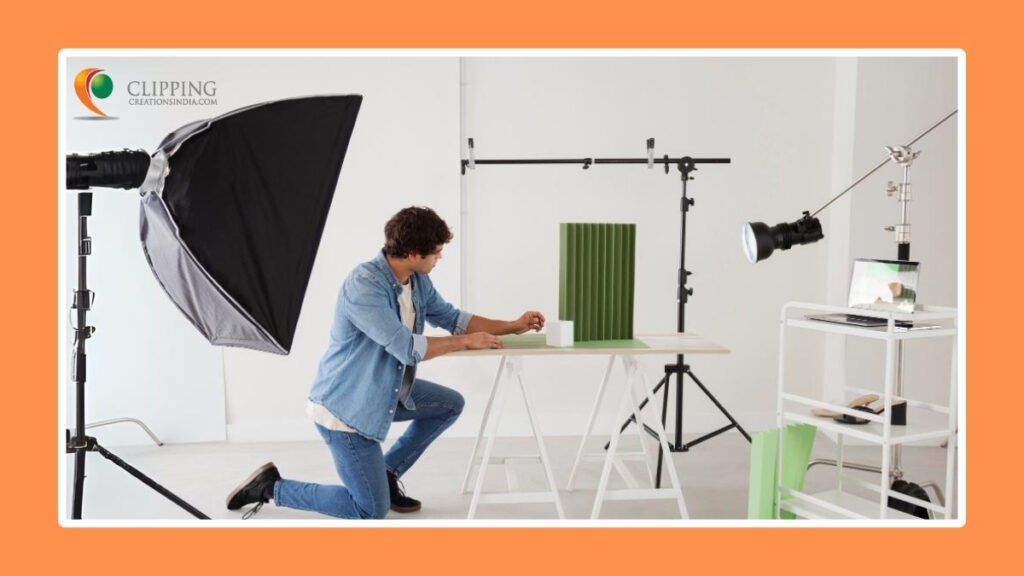
01. Backgrounds Equipment:
As a background white is widely accepted and utilized. There are different types of white background components you can use for different product photography purposes. They are
- White background or backdrop paper roll.
- White bed sheet.
- White foam board or cardboard.
- Light-colored walls.
Tripod is essential in order to keep your iPhone or camera steady and fixed during photography. It helps eliminate any handshakes that could result in blurry images.
Remember to use a tripod which is heavy and able to stand erect on a smooth surface. It will ensure better control over framing and composition making it easier to capture professional-looking shots with consistent quality.
02. Softbox or Lightbox:
A lightbox or shadow cutter is an excellent tool especially important for eliminating harsh shadows. It is also called softbox as it softens the hard light by diffusing it and provides a clean, uniform background for your product photography.
Additionally, it helps ensure even illumination, allowing your products to be showcased clearly and professionally.
The controlled environment of a lightbox also reduces distractions, making it easier to focus on the product’s details and features.
03. Reflector:
A reflector usually reflects the source light at the targeted spot. It helps to regulate the main light in any direction. Using reflectors is a great way to fill in shadows, bounce light and create even shade of soft light to balance in your photography. By redirecting light onto your subject, reflectors help soften harsh shadows and illuminate dark areas too.
A reflector is not so expensive; in fact, you can easily make one at home. By simply gluing foil paper onto a piece of cardboard, you can create an effective reflector.
Reflectors are especially useful when shooting with natural light or when additional lighting is limited. Alongside a softbox, a reflector is quintessentially useful in product photography.
When a lightbox or softbox cannot fully eliminate hard shadows from the background, as a supplementary, the reflector ensures smoother lighting, providing a refined, polished result.
04.Shooting Surfaces:
You can create unique effects manually shooting your product on different kinds of surfaces. Plexiglass is preferred for its ability to create subtle reflections, adding a professional and polished look to product images. Foam core is commonly used as a table surface due to its clean, matte finish, which provides a distraction-free background. For a more dramatic effect, a mirror can be used to create a reflective surface, giving your product photography an elegant and artistic touch. Different surfaces offer different advantages depending on the style and effect you want to achieve.
Never try to take a photo, Make it
In photography, composition is all in all for a compelling image. Especially when you are going to work with just an iPhone, or low configured equipment or device, image composition must be taken into serious consideration. Though the sense of composition does not grow in a fortnight. It refers to how elements within the frame are arranged thoughtfully, conveying the visual appeal and the message through the photo. I am giving you a nice examples of Geometric Composition sense applied in a photography from https://capturetheatlas.com/

Source: https://capturetheatlas.com/photography-composition/
This image highlights essential photography composition techniques, guiding you on how to balance elements for a visually appealing shot. A well-composed shot directs the viewer’s attention where it matters most, creates balance, and can evoke a strong emotional response.
On the other hand, poor composition can lead to confusion, or boring images, regardless of how technically perfect the shot might be.
In essence, it’s not just about what you capture, but how you arrange it that determines the impact of the photograph.
Follow these basic tips for better composition with your iPhone:
Grid Lines:
Activating grid lines in your camera settings provides a visual aid that divides the frame into sections, typically using the Rule of Thirds. This helps you align key elements more effectively, increasing measurement, balance and symmetry.
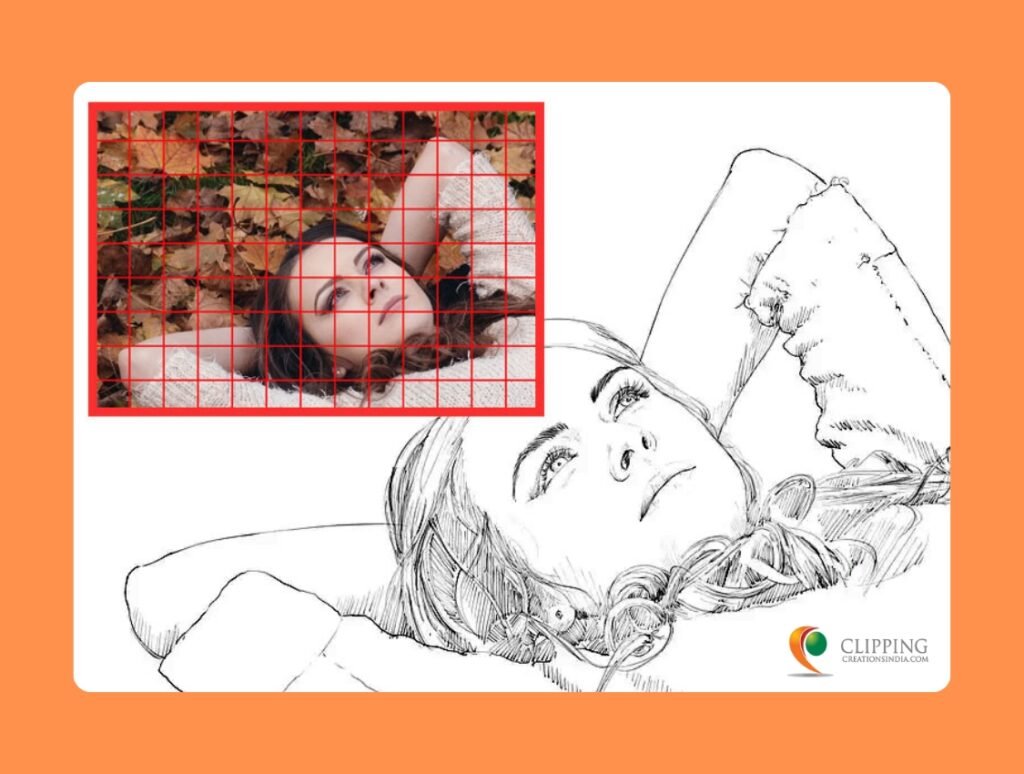
The image is overlaid with red grid lines to demonstrate the rule of thirds, a key photography composition technique used to create balance and visual interest.
Whether shooting portraits, landscapes, or products, grid lines improve your ability to position objects precisely, making sure that verticals and horizontals are straight, which is especially important for maintaining a professional and polished appearance in product photography.
Rule of Thirds:
The Rule of Thirds is a fundamental compositional guideline in photography. Two horizontal and two vertical lines divide an image into nine equal parts. Placing the subject or focal point at their intersections, draws the viewer’s eye more naturally and creates a more engaging and dynamic image.

Composition in Landscape Photography
For product photography, positioning your product off-center using this rule can add depth and lead to a more visually interesting shot that emphasizes the product’s features.
Camera Angles:
For eye-catching photography, you have to understand the language of Camera Angles. Suppose, A low-angle shot is applied in shot to denote something appearing larger and more dominant, while a high-angle shot could give your product a delicate or refined look.

Shooting from eye level, on the other hand, often presents the product in a way that is natural and relatable for the viewer. Thus, distance between product and lenses can vary the result of image output.
By experimenting with various perspectives—such as flat lays, side angles, or close-up macro shots—you can highlight different aspects of the product’s texture, color, and form, providing a comprehensive visual story.
Focus Lock:
Using focus lock is essential when photographing products to ensure that the detailed features of the item remain in sharp focus. This is particularly useful when dealing with products that have fine details or textures you want to showcase.
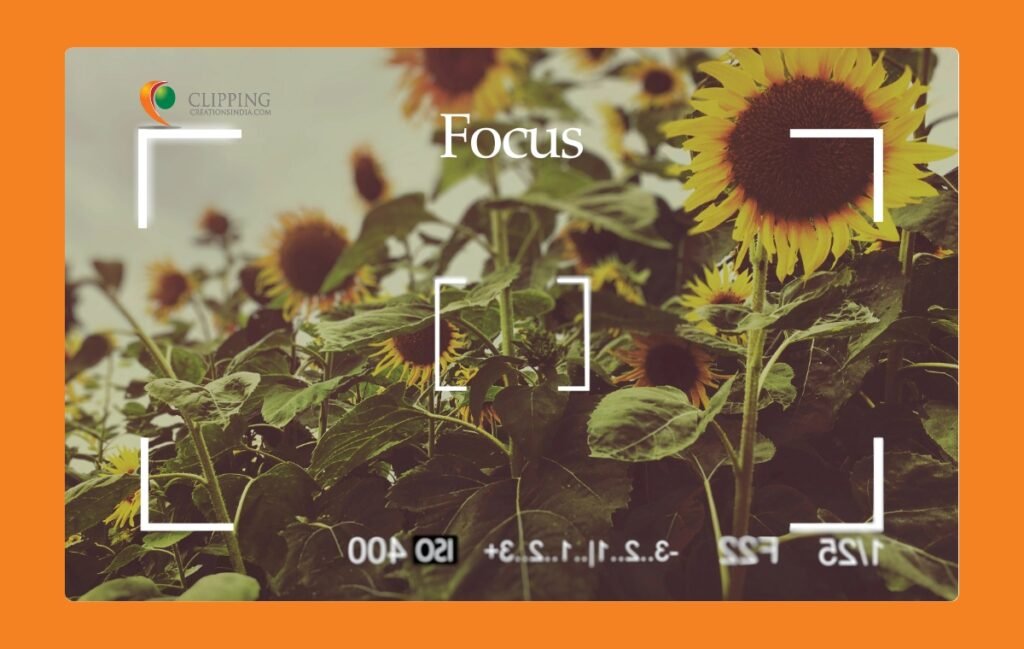
Focus Lock technique on photography.
Source: https://iphonephotographyschool.com/ae-af-lock/
Golden Ratio:
The Golden Ratio is another compositional tool that offers a more mathematically organic approach to framing. The universal ratio, approximately 1.618:1, creates a spiral pattern in the frame that can guide the viewer’s eye naturally towards the most important elements of the photograph.

Leonardo da Vinci used to follow natural law and composition in his Master Work of Art.
While the Rule of Thirds is more commonly used, the Golden Ratio is an advanced technique, which can provide a subtler yet aesthetically pleasing balance, especially for products with intricate designs or complex patterns.
Types of Product Photography in iPhone
Now it’s time to take your photos. There are many types and modes of captivating photography. Which technique and type you will use normally depends on your product category and where you are going to post or publish.
Portrait mode can help create depth effect, close-up for specifications and detailing with macro shots; a flat lay shot is great for social media post for product promotion. with lifestyle photography technique especially in e-commerce products can give customers a look of real life. Likeably, some important types of product photography are mentioned below:
- White background product photography
- Flat Lay
- Scale shots
- Pack-shot or packaging shot photography
- Group Shots
- Detailed shot
- Lifestyle photography
- Contextual
We are going to discuss some popular Photography techniques.
White background product photography
White background is a very common style of ecommerce product photography. It presents the simplicity and elegance of your product that has a lasting impression on potential buyers.
You can see this approach used on ecommerce websites, social media, brochures, flyers, and magazines due to its consistency and effectiveness.
It looks simple in style but needs some technical intricacy.

Here, we’ll walk you through the steps involved in achieving that clean, professional look using various backgrounds, surfaces, and lighting setups.
What is White for?
Shooting on white offers a clean and clear display of the product, ensuring that there are no distractions from the background. This approach highlights the product effectively and allows it to stand out, making it the focal point of the image.
Backgrounds:
In white background photography, various types of backgrounds serve different purposes to achieve the desired effect. A white backdrop paper roll provides a smooth, even surface that ensures a clean look. A white bed sheet can be a cost-effective alternative, offering a simple way to create a seamless background. White foam board or cardboard offers rigidity and a smooth surface for better control over the backdrop. Light-colored walls can also work if they are well-lit and free of shadows or imperfections. Additionally,
Shooting Surfaces:
For shooting surfaces, smooth surfaces of white paper or clothes, boards are often preferable. Foam core serves as a versatile and lightweight table surface, offering a clean, neutral background for various types of photography. Additionally, a mirror can be used for its reflective properties, creating interesting visual effects and enhancing the depth of shots. But it’s a risky method and shouldn’t be used by beginners.
Distance Considerations:
When considering distance, it’s important to maintain enough space between the product and the background to prevent light spill. Experiment with different setups in your studio to find the best arrangement for your lighting and product.
Lighting Setup:
To achieve optimal lighting for your product photography, start by using natural sunlight whenever possible. If natural light is unavailable, use one or two artificial lights like LED or Standing Lamp that can be shifted in different angles and positions.
Using softbox material as a diffuser or shadow cutter to cut out the hard shadows panel helps evenly distribute light, ensuring a clean background.
Flat Lay Photography with iPhone
Flat lay photography technique is very well suited for phone photography. It is not just a technique rather a means of telling a conceptual story. Flat lay photography is a fun and creative way to showcase products, food, or even your everyday life.
This still life photo-technique involves arranging objects on a flat surface and capturing them with a top shot or a bird’s eye view, creating a clean and organized composition. You can apply it to take photos of any kind of product because of the 2-dimensional nature of these photos.
It has been immensely popular because of its quick, simple and super versatility, particularly, for food bloggers, fashion influencers, and marketers, or just showcasing cool everyday items on Instagram, this technique is everywhere.
It lets you show-off your creativity with intuitive fun as you have to arrange the items with much thought on creating a balanced composition with a mix of shapes, colors, and textures.
Tips for Creating a Perfect Flat Lay
Want to create a flat lay that really pops? Here are a few tips to get started:
- Focus on Lighting:
- Make sure your scene is well-lit to minimize shadows. Natural light is your best friend here—try shooting near a window or bright light source. Bad lighting can ruin your shot.
- Avoid harsh lighting or direct sunlight, as it can create unflattering shadows or overexposure.
- Balance Your Composition:
- Mix different shapes, sizes, and colors to create a visually pleasing layout.
- Arrange items following ‘less is more’ rules, leaving some empty space to keep it from feeling cluttered.
- Play around with heights! Adding a little depth to your objects with small risers or placing items at angles can add interest.
- Fine-tune contrast can help your objects stand out, and increasing saturation brings out the colors.
- Align your photo so that it’s straight and evenly cropped for a cleaner, more professional look.
- Use Props That Tell a Story:
- Every item in your flat lay should contribute to the overall theme or message you want to convey. For example, if you’re doing a flat lay for a morning routine, include things like a coffee mug, a book, and a cozy blanket.
- Don’t be afraid to add personal touches like handwritten notes, greenery, or even everyday items like sunglasses or a watch.
Common Mistakes to avoid
While flat lay is fun, there are a few pitfalls you’ll want to steer clear of:
- Don’t overload your image with too many items. Less is often more effective when it comes to flat lay.
- If natural light isn’t an option, use softbox lights or ring lights to get an even, well-lit scene.
- Every object in your photo should have a purpose. Avoid random items that don’t add value to the overall theme.
Scale shots in Product Photography technique
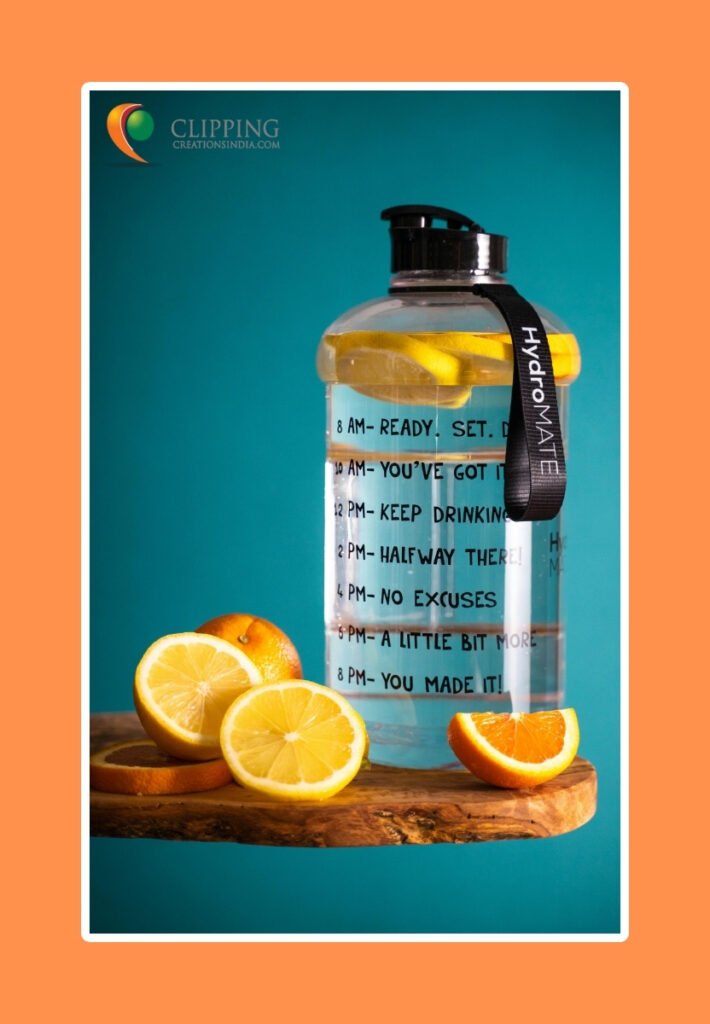
The scale shot plays a crucial role in product photography, particularly for online shopping. It serves to illustrate the size of an item in relation to other known objects. However, by incorporating everyday objects into scale shots, you can give customers a clearer sense of the product’s true dimensions.
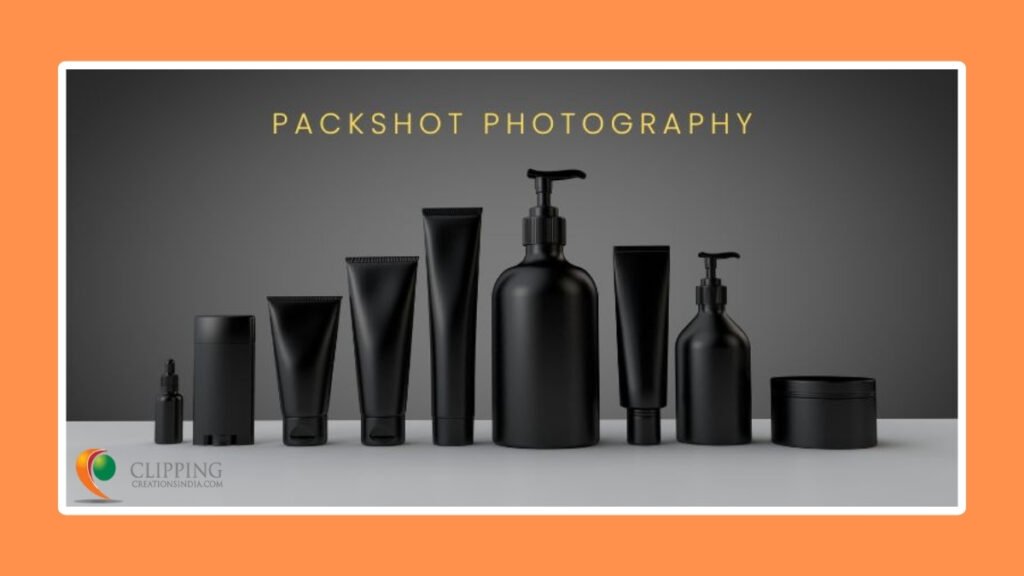
Pack Shot photography
The primary objective of Pack-shot photography is to present the product exactly as customers will see it in its packaging, or as it might appear on a store shelf. The intention is not to exaggerate or enhance the product beyond reality.
Close-up shots that zoom in on specific features, such as logos, fabric types, or materials, are often used to give customers a more intimate look. Ultimately, A good Pack-shot directs all attention to the product itself, emphasizing intricate details and design elements. This is why a clean, distraction-free background is as essential as showcasing the unique aspects of the item.

Source: Freepik.com
Using full-frame cameras from front angle can be beneficial and a common practice in this regard, as they offer higher resolution, enabling photographers to capture even the finest details that consumers often scrutinize in product photos.
But close up shots from 45-degree angle is another effective angle used in Pack-shot photography that capture the front part and profile view together.
Group shots
You guess right—group shots capture multiple products of a brand in one frame, providing a more comprehensive visual of your offerings.
It is often utilized for showcasing product kits or sets of entire collections. These images help emphasize the variety and scope of your product range. to get a fuller sense of what your brand has to offer your customers, rather than focusing on just one item.
Group photography is particularly effective for social media campaigns and advertisements. The goal is to capture the essence of your brand in a single glance, enticing shoppers with a more holistic view of your products.
Detailed shot in Jewelry Product Photography
Detailed shot is necessary for products with complex designs, such as jewelry and other small items. Such detailed shots photography allows viewers to fully apprehend the specific product features that a traditional photo might not catch.

Image Source: https://www.squareshot.com/post/how-to-make-stunning-jewelry-product-photos-that-evoke-the-desite-to-buy
Capturing these intricate features often demands specialized lighting and Professional Camera. The more lighting you initiate, the finer elements will stand out.
Another important factor is, resolution or the number of pixels also determine the fine specification of an image. The higher the resolution, and the richer the pixel count, the more detail and definition you will see.
Close-up shots with scaling from perfect angle or position photography can help to achieve sharp, well-defined images; it’s important to illuminate the subject thoroughly.
Camera Settings in iPhone
iPhones 14, 15, and 16 are all great choices for capturing detailed product photos. They come equipped with high-quality cameras and a second-generation optical image stabilizer, making images sharper and more refined. To get the best results from the new Photonic Engine, head over to Settings, >Camera > Formats, turn on Apple ProRes along with the 48-megapixel option. This will maximize the quality of your shots.

Image Source: https://nektony.com/tips/iphone-camera-settings
ISO Controls: ISO controls how much light your camera lets in, which affects how bright or dark your photos look. Here are some handy tips to get the right exposure:
- For bright, sunny days, keep your ISO low, like 100.
- When you’re taking pictures at night or in places with low light, crank your ISO up to 1600 or higher.
Apple ProRAW: Apple ProRaw is like camera Raw footage or images captured from lenses. It is the best format for creating photos like a professional camera with your iPhone. When you turn on this option, you have to free up storage space for it.
ProRAW preserves the unprocessed data like a raw image of the camera directly from the camera sensor. It gives more advantages during photo editing to tune color and brightness in a much more flexible way.
On the other hand, if you prefer to begin with standard JPEG images, it’s important to remember that a higher frame rate (fps) will result in smoother-looking images.
Use Macro Mode
One of the best iPhone photography tips for beginners is to shoot in Macro mode for small subjects, such as up-close nature shots or jewelry details.
Macro Control in iPhone automatically turns a small icon on the camera app screen when you are super close to a subject. Macro mode is engaged. This will give you impressive closeups and sharp focus for still/live photos and videos.
Image Edit
The iPhone 16, 15, and 14 models offer robust photo editing capabilities, allowing for both automatic and custom edit options adjustments to color, contrast, and exposure with a single tap.
In iOS 17, you can easily toggle Auto Enhance on or off in the settings. For most users, Auto Enhance and filters provide sufficient tools for editing Detailed Shots across all these models. However, if you prefer more precision, the settings can be manually adjusted for finer control over your edits.
Custom edit options include:
- Exposure – lighten or darken the entire photo
- Highlights – lighten bright areas like clouds
- Shadows – enhance dark shadows on faces and buildings
- Brightness – adjust lightness and darkness with more saturation and contrast
- Vibrance – brighten colors realistically or mute colors for an aged look
Lifestyle Photography:
Lifestyle photography is great and commonly applied in e-commerce websites as it can really connect with the customers. For instance, if you’re selling baby products, featuring a baby or a mother with the product helps create that connection.

This style of photography showcases products in real-life settings, surrounded by related items that reflect a specific lifestyle. By including props or models, it places the product in context and makes it more relatable.
Unlike Pack-shot photography, which focuses solely on the product, lifestyle photography tells a story using creativity, imagination and perspective. You don’t need much fancy equipment; you can even use your iPhone to capture beautiful lifestyle shots without any hassle.
Best Composition and Framing for Lifestyle Shot
To capture vibrant and engaging lifestyle photos, experiment with different angles and perspectives. Instead of just shooting straight on, try taking shots from above, below, or the other side. Good image composition must include some negative or empty space around the subject to keep the image clear and make the main focus stand out.
Setting up Props and Directing Models
Using props can make your photos tell a better story. Pick items that complement and fulfill the thematic story you are going for.
If you are working with models, give them clear instructions. Focus on getting natural expressions and movements. Make sure they are comfortable and guide them to interact with the product in a genuine way.
Contextual Product photography
Contextual and lifestyle photography share similarities to some extent. Both types of photographic technique decorate valuable context or environment with other real-life elements about the products you’re showcasing.

Human perception of a product is developed not just by the image itself but by what we already know about it. When customers shop online, they usually can’t touch, feel, or try out products. That’s why it is helpful to create contextual product photos that offer enough information to instigate confidence in their purchase decisions.
For instance, if you’re selling office furniture, photograph it in a real office setting. If it’s a kitchen gadget, include it with other kitchen items to enhance its appeal and promote your brand effectively.
Flat lay photography also conveys context. Here, the subject, its surroundings, and the background all contribute to the visual story. Remember, the background is just as important as the main subject.
Lighting plays a key role too. Make sure the light enhances rather than distracts from the focal point of your photo. Thoughtful lighting can highlight your product and add depth to the image.
Using these techniques not only adds a human touch to your visuals but also gives customers a better sense of your product’s scale and context.
Editing Your Photos
Editing your photos is the last stage of creating a professional and stunning product image for your business. There are some great apps you can use, like Snapseed, Canva Pro, Adobe, and Photoshop Mix to transform your captured images into a professional look.
Maybe you just increase the brightness of your photo, a simple trick but boost your pictures really pop. Likewise, adjusting the contrast can help add clarity and depth, making everything look sharper. You can also enhance the colors with saturation to make your products stand out more.
Don’t forget to balance the shadows and highlights for a natural look, and increasing sharpness can bring out the finer details. These simple steps can really make your photos shine!
The steps to edit a photo are given below
1. Crop
2. Straighten
3. Brightness
4. Contrast
5. Saturation
6. Clarity
7. Shadows
8. Highlights
9. White Balance
The Best Photo Editors for photo editing on iPhone?
- Hipstama tic
- Dazz Cam – Vintage Camera
- Afterlight: Photo Editor
- FIMO – Analog Camera
- NOMO CAM – Point and Shoot
- Polarr
- Darkroom
- A Color Story
Final Tips and Best Practices
Here are some additional tips to keep in mind:
Avoid Zoom: When capturing images, it’s beneficial to get closer to your subject rather than relying on digital zoom, which can degrade the quality of your pictures.
Consistent Style: Strive for a uniform appearance in your photography to create a signature style that is recognizably yours.
Review and Refine: It’s also important to regularly evaluate your work and look for ways to enhance your photography skills.
ClippingcreationsIndia Image Editing Services
There are several types of Product Photo services available clippingcreationsindia.com,
clipping Path Services
- 360 product photography
- Makeup products photography
- Ghost-mannequin product-photography
- Jewelry product photo editing
- Professional car photo editing
- Furniture photo editing
- Car photography tips-and-tricks
An iPhone is quite enough.
In this article, we’ve taken a deep dive into product photography with your iPhone. You’d be surprised how easy it is to snap professional-looking photos if you use the right techniques and tools! Having a good grasp of photography basics can really make a difference in a product photography journey. By prepping your gear, getting the lighting just right, composing your shots thoughtfully, and doing some editing, you can capture stunning images that showcase your products beautifully. Don’t forget, practice and a little experimentation go a long way—so feel free to try out different styles and improve your skills along the way. And if you ever need extra help to make your images shine, our team at ‘clippingcreationsindia’ provides image editing services worldwide and is here to assist you in getting that perfect look!
