How to Make a Star in Photoshop: 2-Min Guide
- September 20, 2025
Don’t you want to know how to make a star in Photoshop? Stars are often used to add a touch of magic, elegance, or whimsy to various design projects.
Whether you’re working on digital art, graphic design, or photo manipulation, learning how to create a star in Photoshop can open up a world of creative possibilities. In our guide today, we’ll guide you through the step-by-step process of making a star using Photoshop’s tools and features.
How to Make a Star in Photoshop
It only involves a few steps to learn how to make a star in Photoshop. Fortunately! We are here to guide and describe the steps.
Step 1: Create a New Document
Open Adobe Photoshop first. Go to “File” > “New” to create a new document. Set the dimensions and resolution according to your preference.
Step 2: Draw a Basic Shape
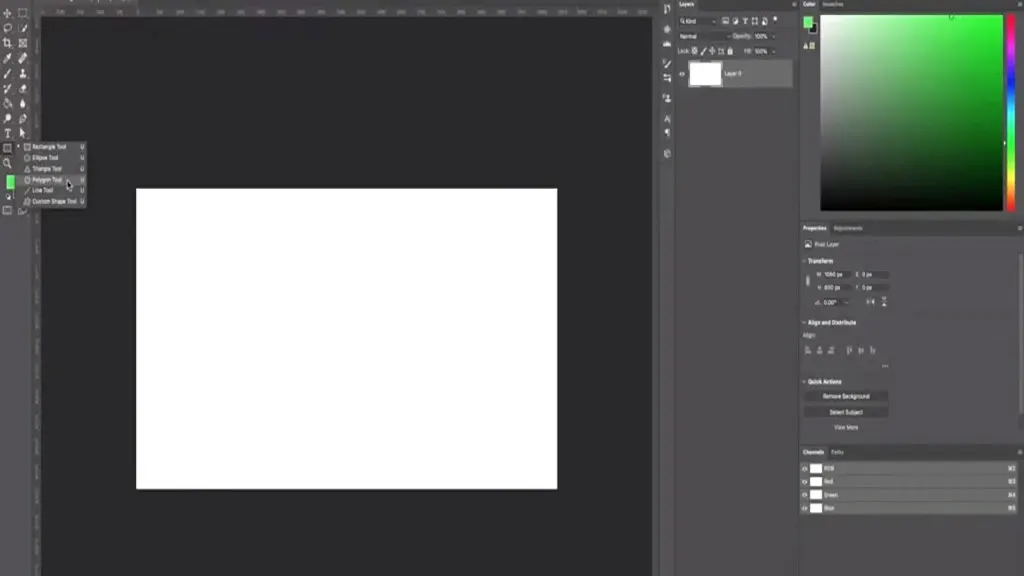
Select the “Shape” tool from the toolbar. It’s the icon that looks like a rectangle; you can right-click it to access different shape options.
From the dropdown menu in the “Options” bar at the top, choose the “Polygon” shape. In the “Options” bar, set the number of sides to 5. This will create a basic star shape.
Step 3: Customize Your Star
Click and drag on the canvas to draw the star shape. Hold down the “Shift” key while dragging to maintain proportions.
To change the star’s size or shape, you can use the “Free Transform” command by pressing “Ctrl + T” (Windows) or “Command + T” (Mac). Drag the corner handles while holding the “Shift” key to resize proportionally.
Adjust the star’s color by selecting the “Fill” color in the “Options” bar. You can also change the stroke color or remove the stroke entirely.
Step 4: Duplicate and Transform
Right-click on the star layer in the Layers panel and choose “Duplicate Layer.” With the duplicated layer selected, go to “Edit” > “Free Transform” or press “Ctrl + T” (Windows) or “Command + T” (Mac) to resize and rotate the duplicated star. Experiment with resizing and rotating to create a multi-pointed star effect.
Step 5: Add Glowing Effects
Click on the top star layer to select it. Go to “Layer” > “Layer Style” > “Outer Glow.” In the Layer Style dialogue box, adjust the glow settings to your liking. You can change the color, size, spread, and opacity to achieve the desired effect. Click “OK” to apply the outer glow to the star.
Step 6: Arrange and Duplicate
Move the stars around the canvas to create a visually appealing composition. Click and drag the layers in the Layers panel to rearrange them. To duplicate a star layer, either right-click and choose “Duplicate Layer” or drag the layer onto the “New Layer” icon at the bottom of the Layers panel.
Step 7: Apply Blending Modes
Experiment with blending modes in the Layers panel to create interesting effects. Some blending modes that work well for stars include “Screen” and “Add.”
Step 8: Add Sparkles (Optional)
Create a new layer above the star layers. Set the blending mode of the new layer to “Screen.” This blending mode allows lighter areas of the layer to appear while dark areas become transparent.
Use a small, soft brush with white color to add tiny dots or sparkles around the stars. This will give the stars a sparkling appearance. It is not as easy as it seems to learn how to make a star in Photoshop. But we are here for you!
Step 9: Final Touches & Saving
Review your composition and make any necessary adjustments to colors, positions, or effects. Once you’re satisfied, go to “File” > “Save As” to save your artwork. Choose your preferred file format (such as JPEG or PNG) and location. After saving the file, you are all done! Now, keep reading to enhance and add more versatility to the star.
Blending Modes and How to Use Them with Stars in Photoshop?
Blending modes in Photoshop are a set of options that determine how two layers interact with each other visually. When you apply a blending mode to a layer, it determines how its pixels blend with those of the underlying layers. Blending modes can produce a variety of effects, from changing the brightness and contrast to creating complex visual combinations. When working with stars or other elements, blending modes can help you achieve unique, creative results.
How can I Personalize the size and color of the star?
You can easily customize the size and color of the star. After drawing the star shape, use the “Free Transform” command (Ctrl + T or Command + T) to adjust the size. You can also change the star’s color by selecting the “Fill” color in the “Options” bar.
Can I Add a Glowing Effect To My Star?
To add a glowing effect to the star, select the star layer and go to “Layer” > “Layer Style” > “Outer Glow.” Adjust the settings in the Layer Style dialogue box to control the color, size, spread, and opacity of the glow.
Is It Okay to duplicate and transform the star to create different sizes?
Of course, you can duplicate and transform the star to create different sizes and angles. Right-click on the star layer in the Layers panel and choose “Duplicate Layer.” Then, use the “Free Transform” command to resize and rotate the duplicated star.
Can I use the stars I create in Photoshop for commercial projects?
Yes, the stars you create in Photoshop can be used for commercial projects. However, ensure that you’re not using any copyrighted material as a base and that you have the right to use any resources you incorporate into your design.
Are there any Photoshop plugins or tools specifically for creating stars? While Photoshop doesn’t have a specific tool solely for creating stars, there are plugins and brushes available that can help you create more intricate star effects. You can explore these resources to further enhance your starry designs.
Final Words
Congratulations! You’ve learned how to make a star in Photoshop from scratch. This basic technique can be customized and expanded upon to create a variety of starry effects.
Remember that experimentation and creativity are key to producing unique and captivating designs. With these skills, you can add a touch of celestial beauty to your digital artwork, designs, or photo manipulations.