How to Do Masking in Photoshop? − Learn Layer Masks and Clipping Masks
- February 8, 2023
If you would like to merge pictures or highlight or hide parts, including the background of an image, then you must learn how to do masking in Photoshop.
You can arbitrarily select the portions you want to hide, and the tool will do its magic. Moreover, if you don’t like the end result, you can revert the process and recover the original picture.
If you’re new to photo masking and stuff, the following information, along with the how-to guide, will surely be beneficial to enhance your skill and knowledge regarding this matter.
Why Use Masking?
A question arises when removing a specific part or highlighting, and that is: why not use the opacity and eraser tools? You could use the Eraser Tool to remove the parts you don’t want. However, that way, you lose those parts forever. Professional editors consider it a destructive workflow.
Similarly, you could use the opacity tool to make the image transparent or highlight it by tweaking it. If you decrease the opacity, the image becomes more transparent, and vice versa.
But with the opacity tool, you can’t choose specific parts while editing. Rather it impacts the whole picture.
That’s where mask layers come in. Masking is a non-destructive method that lets you edit the specific parts you want to alter, and you don’t lose any data.
You can recover the original images at any time.
The Use of Black and White in Layer-Masking
Masking in Photoshop means hiding or highlighting a specific portion of an image.
You create an adjustment masking layer of that image and work on the mask. The mask works in 3 colors: black, white, and all shades of gray.
So, what do the colors mean?
Black represents the hidden parts of the image. You set the color black, paint on the portion you want to hide, and the software hides that area by making it completely transparent.
Mind that the opacity is at 0 percent at black.
The color white represents the visible parts. You select white and brush the areas you want to make visible, and the software does it for you.
The opacity is at 100 percent with white.
Tweaking the shades of gray gives the masked layer a different level of transparency.
The opacity ranges around 50 percent, and selected portions of the image get less transparent as the shade of gray gets lighter.
Similarly, the layer’s mask achieves more transparency as the gray gets closer to black.
Types of Masking
We have 2 primary methods of masking – layer masking and clipping masking. I will explain each technique. Keep on reading.
Layer Mask
This method of masking controls the transparency of an image by creating a single mask. You can make a portion of the layer invisible while highlighting other parts by tweaking the opacity setting.
How to Do a Layer Mask in Photoshop?
Let’s say you want to remove the background of an image and then add a new background.
You would need 2 photos to achieve that – the primary picture and a secondary one for the background. Now, follow the 5 steps below.
Step 1: Create a Document
Open your adobe photoshop software and create a document by clicking on the Create New button. You will see a prompt showing the different document sizes you can work with.
Select your preferred document size and click on Create. The software should take you to a new window.
Step 2: Load the Images
Click on the File button in the top left corner, then click on Open. A dialog box containing the file manager will appear.
Next, browse to the folder where you saved both images and select them. Now click Open, and the software will load the pictures.
You can drag and drop the images on the software.
Remember to put the primary image on top of the secondary one.
Step 3: Remove the Background
You need to choose a Selection Tool first. There are many tools to choose from – Marquee Tools, Lasso, Object Selection, Quick Selection, Magic Wand, etc.

My go-to is the Quick Selection and the Magic Wand tool.
So, select the tool you feel comfortable with and outline the subjects, excluding the background.
Step 4: Create an Adjustment Layer
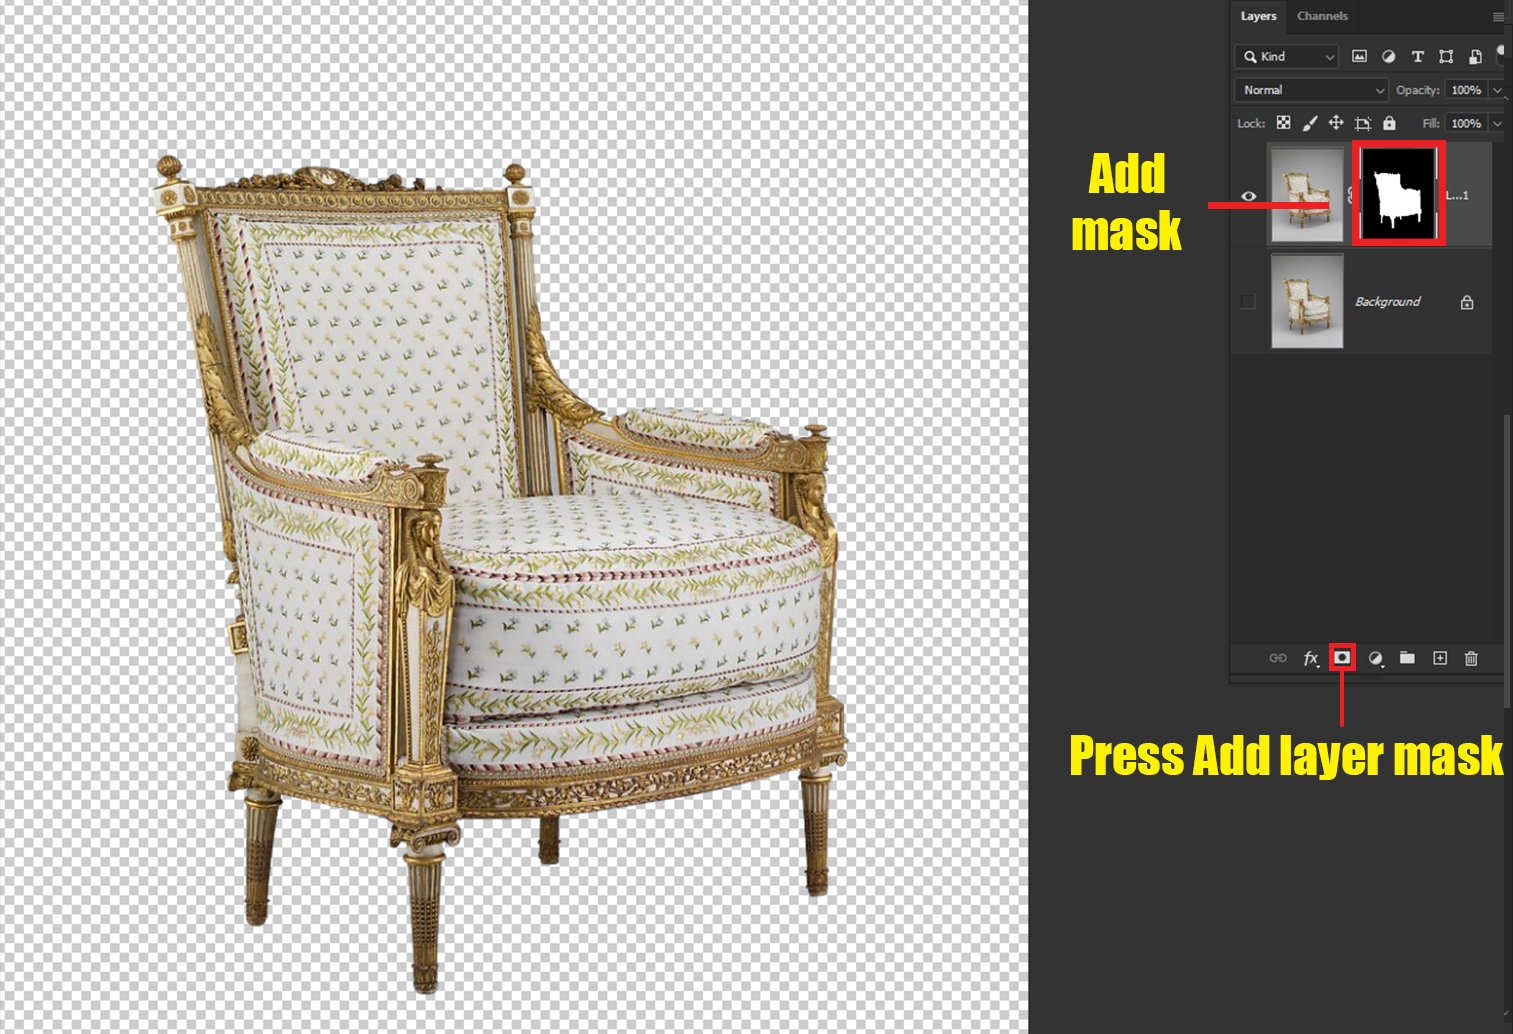
After outlining the area, click on the Add Layer Mask button at the bottom of the pictures.

A white and black-colored adjustment layer should appear beside the primary image. And you will see that the background of the image has disappeared.
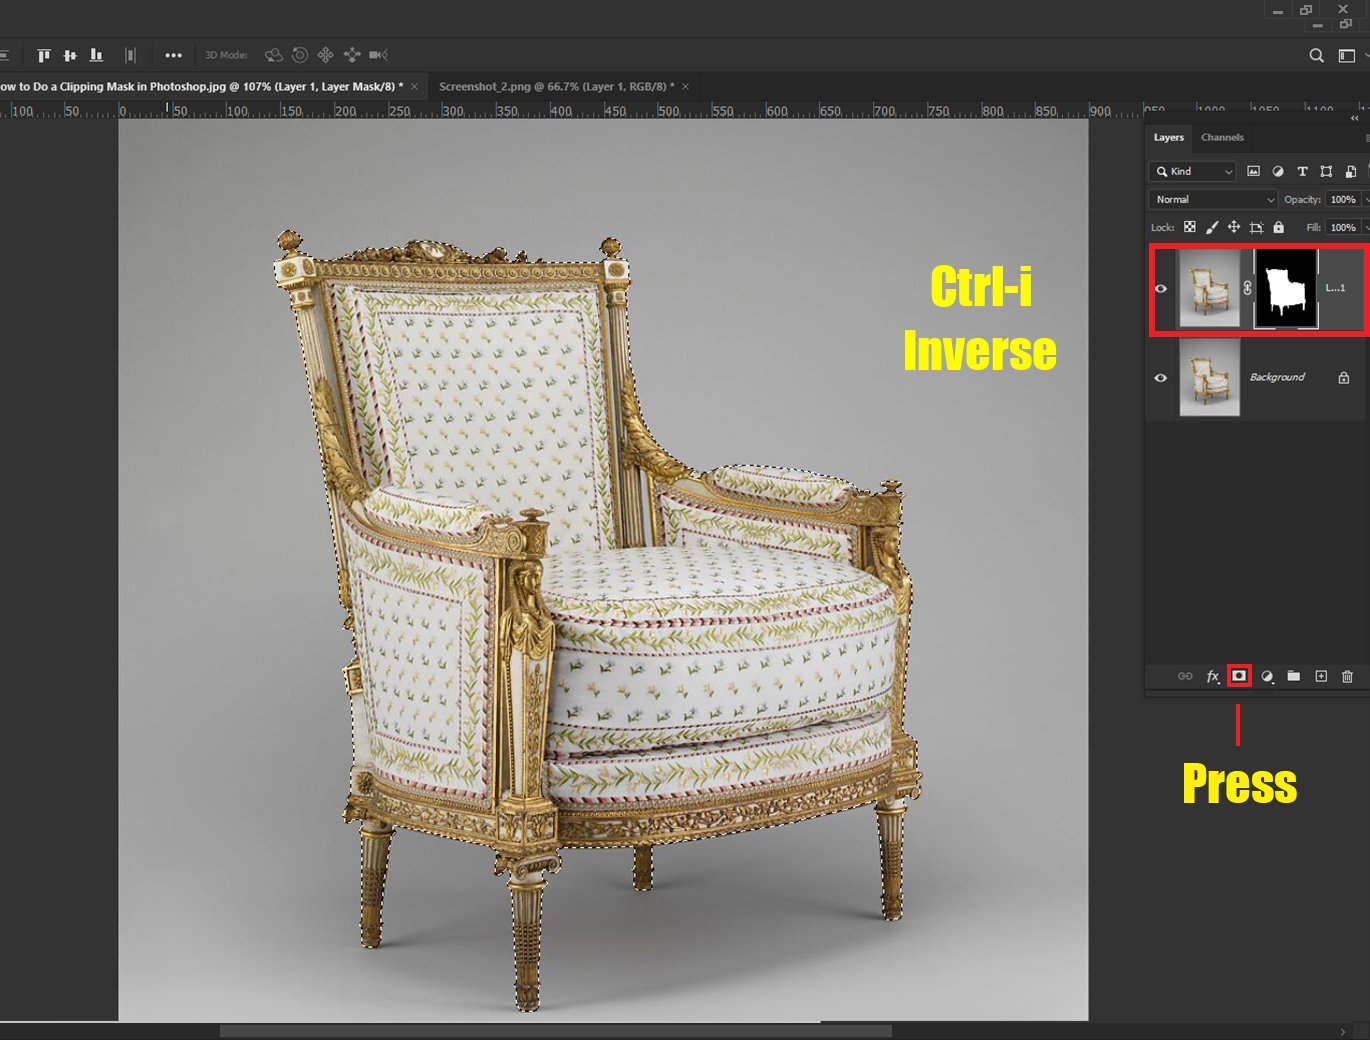
If the software blunders and hides the part you want to highlight, simply pressing CTRL+I will fix the issue. This will inverse the colors – black will turn to white, and the white will change to black, highlighting your desired mask.

Step 5: The Background Has Appeared
Now that the background of the primary image has disappeared, you will notice that the secondary picture has taken the hidden background’s place. You can adjust it to your liking using the cursor.
Clipping Masks
You can use clipping masks to put a background image in any shape. Using this method, you can hide a portion of a picture and highlight the parts in the shape or text.
The difference between layer masks and clipping masks is that clipping masks create multiple layers of an image, and layer masks create a single layer.
How to Do a Clipping Mask in Photoshop?
Let’s say you want to put a picture of your friend in a circle. You can choose any image, shape, or text you want.
To find out how to clip masks, follow the steps below.
Step 1: Create a Document
After opening the photoshop software, click Create New and choose your desired document size. A window will appear, thus creating a new document.

Step 2: Draw a Shape or a Text
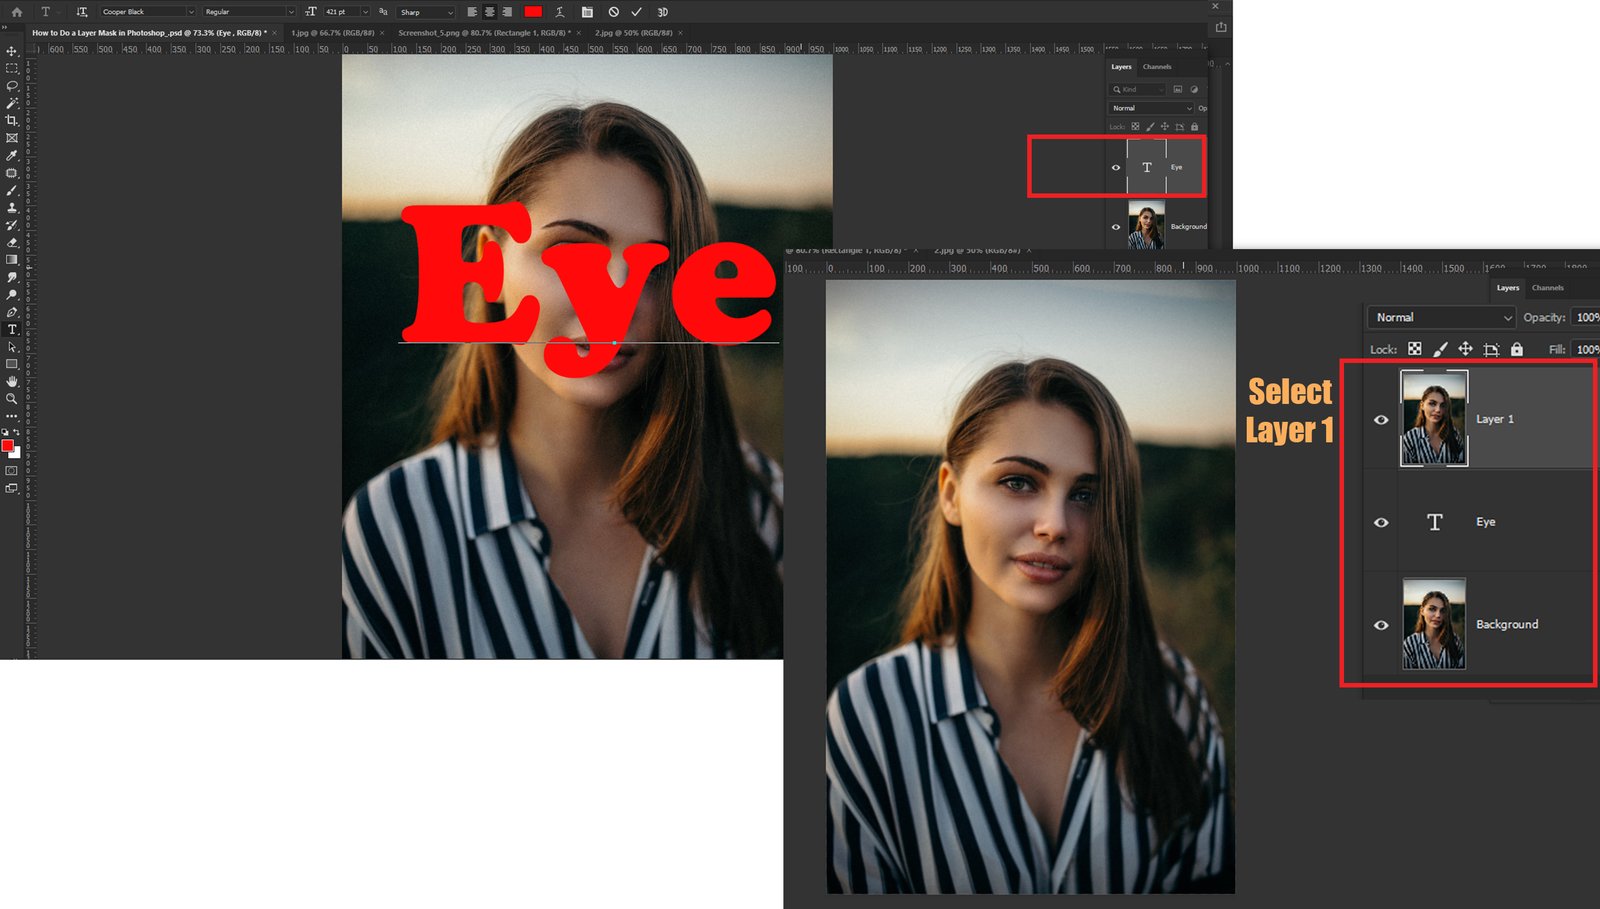
In Photoshop, the shape could be anything. Moreover, you can work with text too. We have created a text “Eye” here.

Step 3: Import the Image
Find the File menu on the top left corner and select Open. Now go to the picture’s location, select the image, and click Open.
Or, you can drag the image and drop it on the software. Either way, the layer of the picture should appear above the text/shape’s layer.
Step 4: Create a Clipping Mask
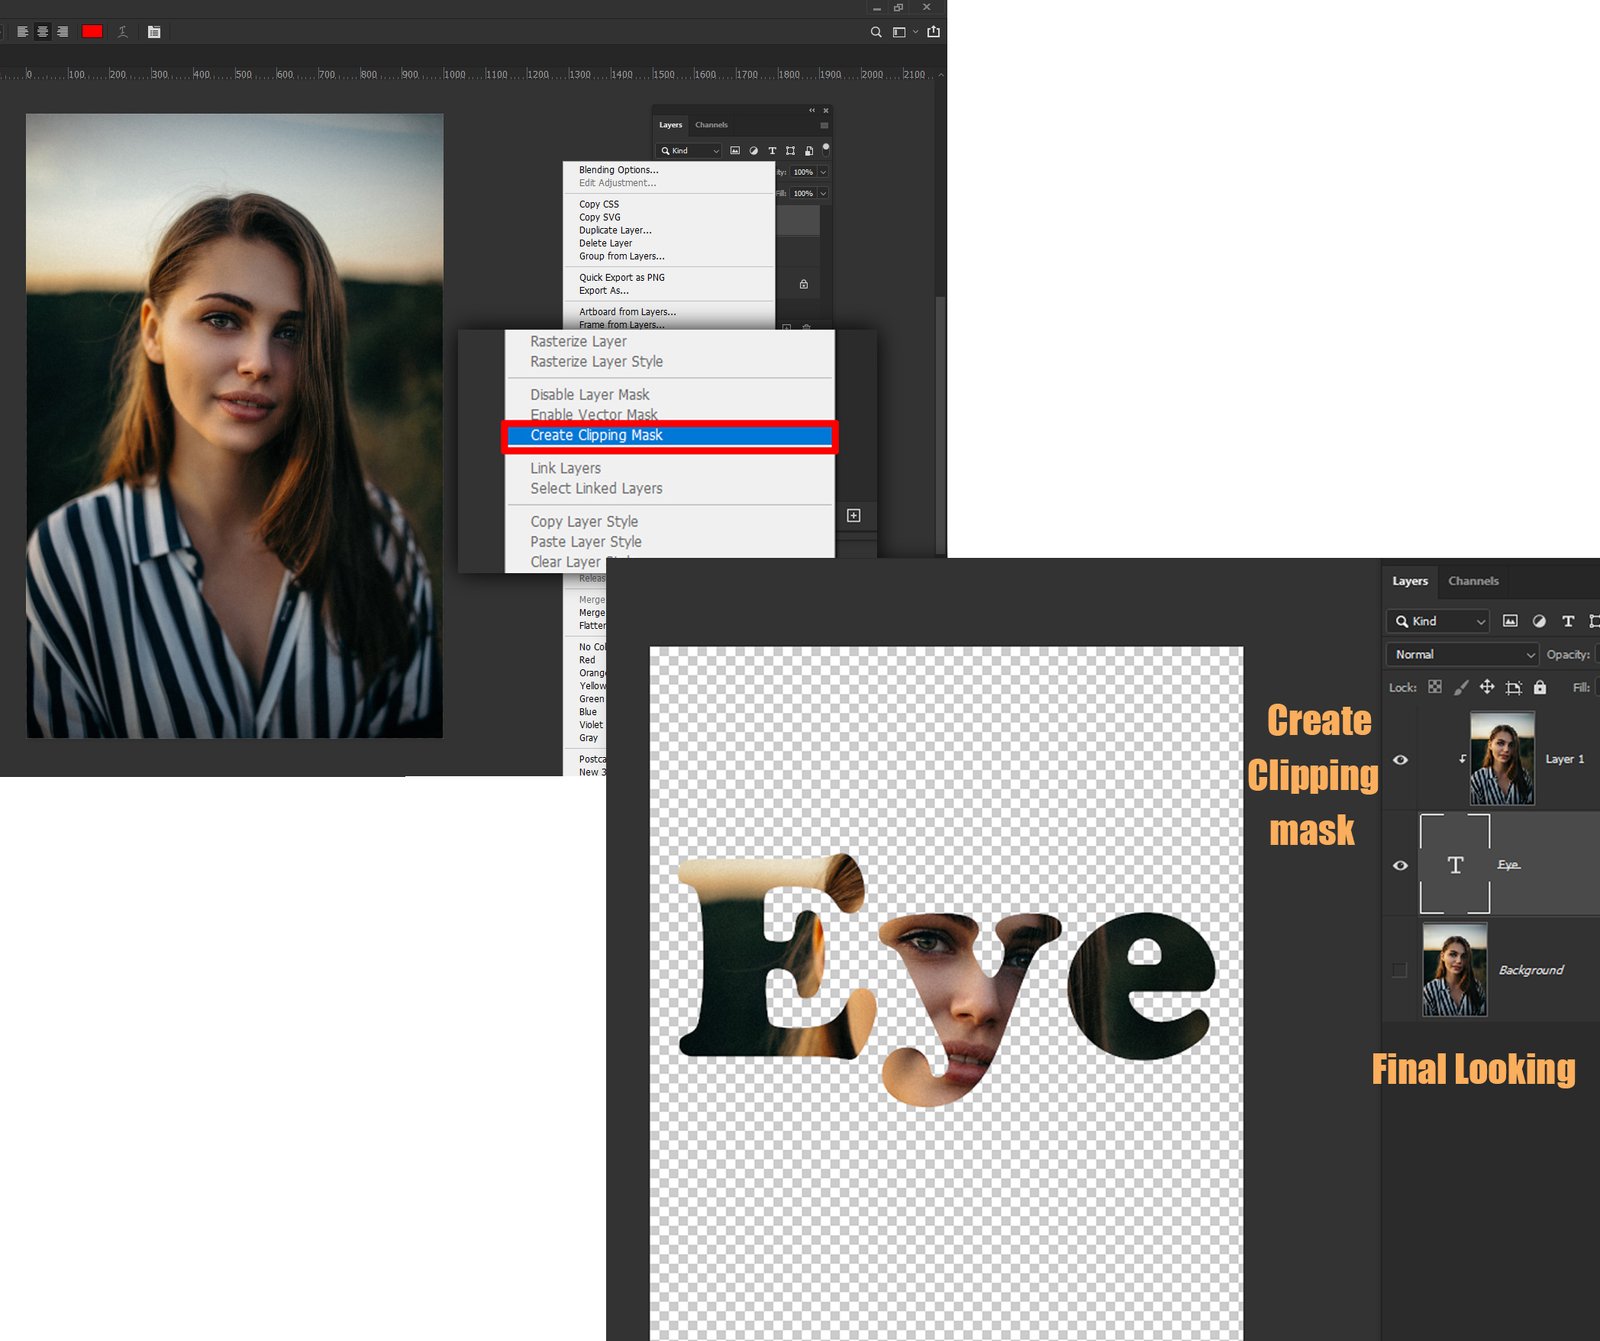
Right-click on the picture and select Create Clipping Mask, and voila! The image should appear in the circle.

Or, you could just press and hold the ALT button, move the cursor between both layers, and then click. This works too.
Practice the processes several times to master how to do masking in photoshop like a pro.
Learn more: What Are The Benefits Of Hair Masks
FAQs about How to do Masking in Photoshop
Many common questions arise while masking on Photoshop, below are one of the most frequently asked ones.
Do I have to convert my layer to a smart object?
It’s not necessary. We check the convert to smart object toggle to enlarge the mask/object without losing any pixels and change the values later.
Is it necessary to duplicate the background layer?
Yes, it’s convenient to duplicate the layer before creating a mask, so you can use the source image later if you have to make another mask from this. You can create multiple mask layers and work on them independently, just duplicate the background before making a selection.
How can I perfectly make the Selection of a roundball?
You have the Elliptical Marquee Tool, but it can only create an ellipsis. So, while creating a circle, press and hold the Shift key, hold down the left mouse button, and drag. Press and hold space and move around to align the circle with the object.
The exact process goes for any 1:1 object, such as a circle, square, etc. In case of a square, select the Rectangular Marquee Tool and repeat the process.
How can I make the edges of the image more adaptive to the background?
Use any blurring tool to blur the edges. Click on the mask and choose a tool, preferably The Gaussian Blur, and apply it on the edges. You can tweak the settings of the tool to change the strength and exposure.
How to do Masking in Photoshop: Conclusion
I have explained how to do masking in photoshop. There are two primary ways of doing it, and I have explained them both. You follow the one that suits your task.
Remember to put the primary image on top of the second one while layer masking. Additionally, set the background image above the shape’s layer.
