What Is Shadow Clipping and How to Fix It?
- January 11, 2025
Even the basic shades of black and white can dramatically impact the quality of your photography. And this all comes down to adjusting the shadows and highlights in Photoshop. But if you’re a newbie to editing, how do you figure out what shadow clipping and highlight clipping are? The short answer is that shadow and highlight clipping are basically warnings given in blue and red, respectively, to indicate blown-out black-and-white areas in photos. These areas are then adjusted through editing to bring about cohesion to the photos. In this short guide, we’ll take you through all that you need to know about shadow clipping, its importance, and how to fix it.
What Does Shadow Clipping Mean?
In photography, specifically Photoshop, ‘Clipping’ occurs when there are areas on a photo that have little to no image information. These areas are usually blown out and have almost no visible details that match the rest of the image.
For example, completely white parts of a sky in a picture of a landscape and pitch-black parts in a picture of a forest are clipped parts or blown-out areas.
Pure white areas of a photograph are called clipped highlights, whereas pure black parts of a photo are called clipped shadows or shadow clippings.

What Is the Difference Between Shadow Clipping and Highlight Clipping?
There are two types of ‘clippings’ in Photoshop, which are shadow clipping and highlight clipping.
Both of these clippings are the result of the same effect — blown-out areas during capture. However, they have some differences−
Color
The differences in color for highlight clipping and shadow clipping can be easily deciphered by their names. Highlight clipping is all the blown-out parts that are part of the highlighted areas of the photograph. This includes skies, clouds, any bright light source, white clothing, flashy objects, etc. Shadow clipping, on the other hand, is the complete opposite. It refers to all the dark, blown-out areas of a photo, which include shadows, crevices, black objects, black clothing, low-light areas, etc.
Clipping Warnings
In software such as Photoshop and Lightroom, colored warnings are shown on photos to help users identify the blown-out areas. These are called clipping warnings, which further help users fix and edit the highlight clippings and shadow clippings. Highlight clippings are usually indicated in the color red, while the shadow clippings are shown in the color blue. Both these colors are fluorescent and cover only the problematic eras for users to edit them as precisely as possible.
Editing
While clipped shadows and clipped highlights are both formed in a similar way, they are edited and fixed differently.
Typically, with clipped highlights, the 3 most common go-tos are using whites and highlights sliders, adjusting the tone curve, and using the adjustment brush.
As for shadow clippings, the process is simple and only requires a slight adjustment of the highlights and shadow sliders.
Some users even opt for the ‘mattifying’ effect to make the black areas a lighter shade
How to Fix Shadow Clipping
Unlike highlight clippings, clipped shadows are much easier to fix, and there are plenty of different ways you can edit them.
Here are some easy ways to fix shadow clipping –
Histogram
In ‘Lightroom,’ there’s a histogram located at the right-hand side of the window, which controls the clipping warnings. To turn these off, you can do two things.
Either you can use the ‘J’ keyboard shortcut to turn the shadow clipping warnings on or off. Or, you can do this using your cursor by clicking the left arrow at the top left of the histogram.
This will only remove the blue shadow clipping warnings without making any changes to the original picture.
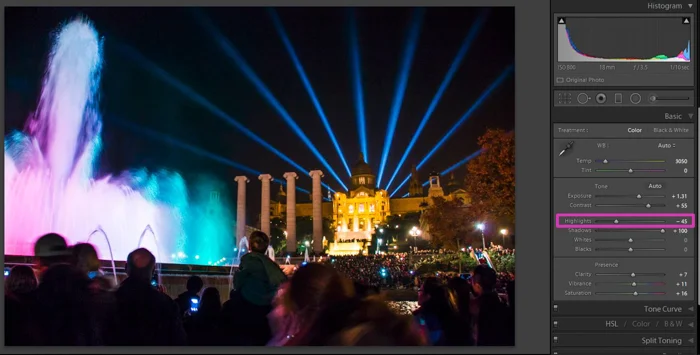
Adjusting Highlights and Shadows Sliders
In the ‘Basic Panel,’ you’ll see a section for the highlights and shadows sliders. These are very easy to toggle. All you have to do is move the sliders left or right according to your preference to adjust the shadows and lighting of your picture.
To fix the blown-out shadows, you should move the shadows slider to the right. You can also adjust the highlights to make the photo look more cohesive.
Also, you can go even further with adjusting the shadows by toggling the curve of the ‘Tone Curve Panel’ in case the ‘Basic Panel’ doesn’t provide the results you want.
Using Masking Tools
Masking tools in Photoshop, such as the Select Sky, Brush, and Linear Gradient tools, allow users to precisely select the problematic areas and edit them only.
Simply open the basic panel and select the masking tool. Then you will be given a few options for masking.
Most users prefer the brush tool because it gives them more control over where the mask is applied.
Once you’ve selected the tool, you can load it by adjusting the highlights, exposure, shadows, and B&W sliders.
Using Presets and Filters
By far, the easiest way to curb clipping problems is to use presets or filters. Every version of Photoshop comes with a set of preset filters for users to choose from. These filters essentially handle all the toggling and adjustments for you, eliminating blown-out areas. For instance, Lightroom comes with many presets, and new presets and brushes can be installed from their newest collections.
Why Are Clipped Shadows Important in Photoshop?
Shadow clippings are arguably more important to adjust in comparison to highlight clippings. This is because shadows in a photo can darken the rest of the photo and throw off its aesthetic balance. Especially in photos taken during the night or in low light conditions, shadows have to be adjusted as the majority of the photo is drowned in blown-out dark areas. If you leave these areas untouched, the picture will be very unclear. Moreover, there are more ways to edit shadows than there are to edit blown-out highlights. This again goes back to how shadows can affect a photo’s cohesiveness.
Do Clipped Shadows Need to Be Removed?
Blown-out areas in photos generally never look appealing, but does this mean they have to be removed?
Usually, most photographers like to adjust the shadows and highlights of their photos to make them more cohesive. Areas with too much white or black exposure will throw off the general aesthetic of the photo. Regardless, this all depends on how you view your work and prefer it to be.
Most of the time, little bits of blue warnings don’t mean anything and are not visible in photos. So, you can leave these out if you want.
Conclusion
To sum up our answer for ‘what is shadow clipping,’ it’s basically the blue warning that is displayed on the blown-out black areas of your photos. If these are minor, you don’t need to worry about them. However, we recommend touching up the shadows and highlights if you see a lot of blown-out dark spots. To learn more about exciting topics like this, follow our regular articles.