Photoshop Spot Healing Brush Tool: Best Spot Removal Solution 2025
- September 3, 2022
You went on a Hawaiian trip and took a beautiful photo of yourself. But Alas! There is a trash can behind you, ruining your stunning self-portrait. Don’t worry. With the help of a photoshop spot healing brush tool, you can quickly eliminate that unexpected spot from your photo.
Yes! Photoshop gives you this remarkable opportunity to remove/ fix any unwanted spot from your photo. Whether it is a self-portrait or a breathtaking landscape, you can always find a solution for such scenarios with photoshop if you know how to use it.
Luckily, this article covers everything about the spot healing brush tool and how you can use it effectively to remove dirt or unwanted objects from your photo to have a beautifully clean, neat image.
N.B: As a former photographer, I suggest that using the spot healing brush tool to remove anything you don’t want will spoil the photo’s origin. Unless something ruins your image, you shouldn’t bother the natural atmosphere of your photo.
Spot Healing Brush
This photoshop brush tool helps remove any unwanted object from your photo. Also, suppose your print is damaged or has lost information in some parts. The spot healing brush tool can also fix it. It is one of the smarties spot removal tools used by almost anyone.
Developers built this tool based on a technology called content-aware fill. It can detect the nearby environment around the damaged part and predict how it should be. That’s how the spot healing brush tool inserts new pixels and blends the new features with its surrounding.
Spot healing brush tool saves your time and protects photographers from constantly retouching every photo by hand. You can use it easily from the toolbar of Adobe Photoshop. But to show you a tutorial on how to use it, there is an additional section in this article. Keep up with us.
Read more: How To Use Deep Etching In Adobe Photoshop?
Benefits of Using Spot Healing Brush Tool:
Benefits of Using Spot Healing Brush Tool: This photoshop brush tool saves you from trouble. All you have to do is learn how to use it to retouch an image.
This part will discuss the possibilities this fantastic tool holds for you.
- Portraiture with lots of dark spots due to the variance of light is not always welcome in the fashion industry. Photographers who continuously shoot commercial photos can hardly have any time to process each of these photos separately. Here comes a spot healing brush tool to deal with such problems.
- Even if you are not a professional, you can quickly eliminate minor blemishes or flaws from any image. Not every time can you use the clone stamp tool to have a neat solution. Spot healing brush tool ensures such issues can be quickly dealt with and blends in fine.
- Landscapes often face the most disturbing facts of nature. For example, you can take a beautiful landscape, and a bird stool can ruin the entire charm of your photo as a gift of nature. But the spot healing brush tool can always take care of such awkward situations for you.
- Another impressive fact about this tool is that it’s very forgiving. Even if you make a mistake, paint over it again, and Photoshop will take care of it just fine.
- Spot healing brush tool is more accessible than most other tools in photoshop. Even a beginner can start with it nicely by following some tutorials online or by reading this guide.
- All you need is a desktop with configurations good enough to support photoshop. Of course, you can also use a laptop with powerful features to help with photoshop. But to carry out these kinds of tasks seamlessly, you will need a mouse.
Not always laptop keyboard will help you to have an intelligent solution. Hence, purchasing an additional USB mouse is wise if you intend to use photoshop from the laptop or any ThinkPad.
How Should You Use Spot Healing Brush Tool:
Using the spot healing brush tool is simply effortless. Photoshop delivers a user-friendly interface that helps get things done efficiently with little practice.
Here’s how you can practice your way out with the spot healing brush tool:
1) Start by opening Photoshop on your device first. However, if not, you will need to download it from the official website of Adobe by opening a creative cloud account.

2) Select the image that you want to process. Open it in Photoshop and make an empty layer. Go to Layer> New> Layer. Creating a new layer will ensure the original Layer remains unharmed if any problem occurs. You can also do it by pressing (Shift+Ctrl+N) for windows. Name the new Layer to a reference name.

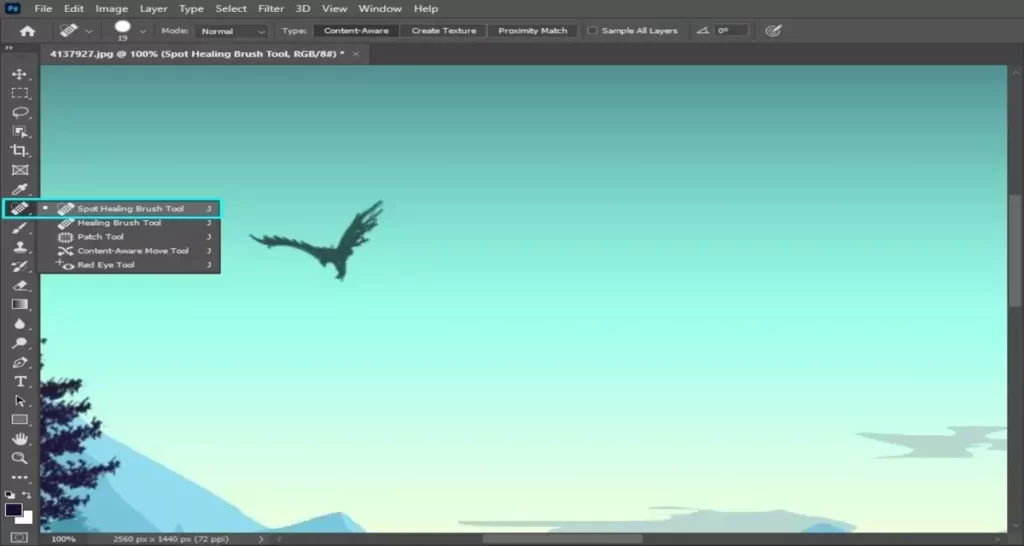
3) I have selected a landscape with a bird in the sky. Practically there is no problem with this image. But for this tutorial, I will remove the bird from the sky since my object is quite large. So I don’t need to “zoom in” on my image.
However, you will have to zoom in on the area for blemishes like smoke or specks of dirt. You can do it by selecting this icon from the toolbar.

4. Now go to the toolbar and press right-click on this icon. You will see five options: A Spot healing brush, a Healing brush, a Patch tool, a Content-aware move tool, and a Red-eye tool. You have to select the Spot healing brush tool from this box.
FYI: Our blog section will add complete guides on other types of brushes. So keep in touch with us.
5. Now, you have to work with the brush size. Since the object you are about to remove can be either a large or a small dot. Depending on the size of this article, you have to modify the spot healing brush size and its hardness.
On the top menu bar of Photoshop, you will find an icon like the image below. It indicates the brush size with a drop-down sign. Click on it, and a box will appear with multiple options for modifying the brush.
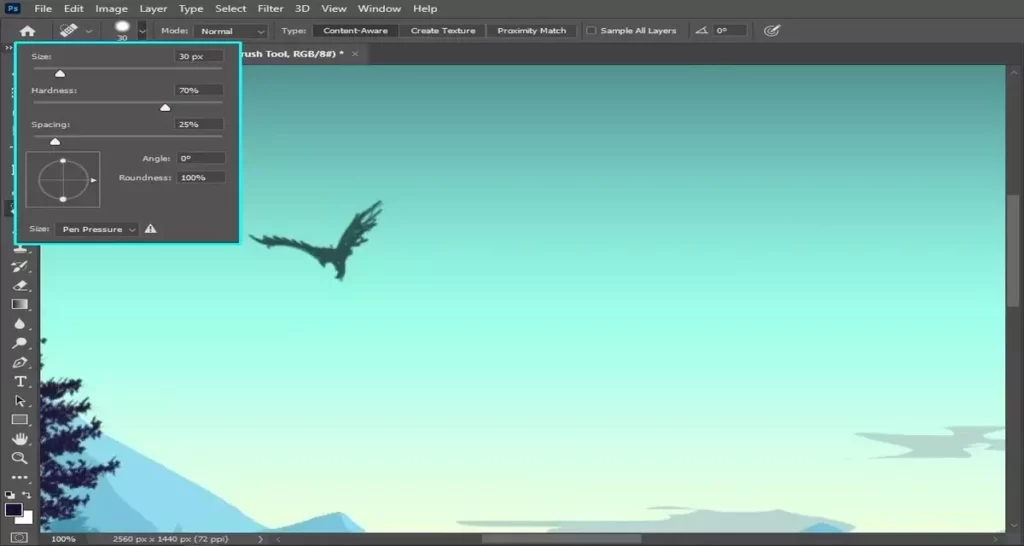
In my case, I will need a brush size of 30px with a hardness of 70%. Since my background texture shows some sign of gradient color, it is wise to reduce the hardness slightly. Stiff brushes often make the edge acute and noticeable.
There are several options for Angle, Pen Pressure, and Spacing. Pen pressure suits you well when you are working in a Wacom. Several strokes come from a brush.
Spacing decides how far two stroke points are. You can keep it around 20-25% based on the nature of the image. But in my case, I kept it untouched. The same goes for adding angles to the brush. The rise of angle refers to which angle your brush strokes will fall on the spot.
You will see three other options:
- Content Aware,
- Create texture,
- Proximity awareness.
Since we need a content-aware solution for our image, we will work with that. But FYI: Create texture is an option that allows you to add an intelligent pattern by using the pixels near that damaged part. Contrarily, in Proximity Match, the brush tool will use the area just outside the brush itself.
6. Now, it’s time to move on to the final part. But before we get to that part, you need to do a simple trick. Put a tick to the box “Sample All Layer.” It will bring information from the Background layer. Otherwise, you will only end up working with the selected Layer only.
Now, you have to use the brush tool to remove the spot. First, select the new Layer you created a few times ago. Next, press down the left mouse button and hover over the area you want to remove. Repeating this step a few times can remove the spot successfully.

Now check on the area and see if any object parts have remained. If yes, repeat the previous step and roll it over the leftover points. When you are complete, zoom out the image and give it an overall view. Next, choose the zoom-out icon from the top toolbar and click on the image.
In my case, I have successfully removed the bird from the sky! Oops! I am sorry for that 😀 And my final result is as follows:

Finally, to save the image, select both layers and click on “Merge Layer.” Then, go to Layer> Merge Layers or press Ctrl+E to merge both layers and export the image to your preferred format.

Spot Healing Brush Tool vs. History Brush Tool
In Photoshop, you might confuse yourself between the spot healing brush and the history brush tool. Since both names are similar, a clear-cut definition of both these tools will help you eliminate the confusion.
Spot Healing Brush Tool: This tool is best for removing minor blemishes or spots from an image. It samples pixels around the mark and blends them into the surrounding area, making the scar disappear.
History Brush Tool: The History Brush Tool is used to restore part of an image that has been deleted or altered. It paints over the area you want to convert with information from the history panel. This tool can help restore old photos or fix mistakes.
Both of them have different applications for different situations. In other cases, you can always go with the one most suitable for you. Once you have used both brushes under two different circumstances, you will get a knack for it.
Troubleshooting:
To use photoshop on your device, you need to ensure your device is of a specific configuration. Follow this thread and get to know more about the ideal design.
For better performance, you also need to ensure certain things, set your image in RGB mode instead of CMYK mode. CMYK is more suitable for prints.
Also, it is wise to have your healing brush set in Content-Aware mode other than proximity match or texture mode. You can also set an angle for the meeting based on the elevation of your image.
These tips will improve the Photoshop spot healing brush for you. But, if not, you can always reach us at CCI, where we are always willing to help you.
Final Words:
Now you have it. The spot healing brush tool is a magic wand for fixing up your photos. It’s simple to use and can do an excellent job of fixing minor problems.
However, as mentioned earlier, do not try to overuse this tool, and don’t make a habit of it. Always try to maintain the actual originality of the photos you take.
Also, follow the few tricks above to ensure you get the best result from this tool. If this article is useful to you, do let us know.
Also, please let your friends and families dealing with noisy photos know about this article.