The Beginners Guide to Using Scatter Brushes in Photoshop 2025
- August 2, 2023
What’s popular in the market now? Design with some randomness is a trend believed to be creative—and scatter brush results in randomness and more natural results. There are so many brush options available in Photoshop that can convert into a scatter brush. If you know its efficient use, then you can get better results. But do you know how to use scatter brushes in Photoshop?
As a beginner, don’t get distracted by a short tutorial! Here, I will discuss every section with an overview and suitable parameters to learn the basics of using a scatter brush.
Keep reading this entire article and learn like a pro!
Try Our: Clipping Path Service
The Beginners Guide to Using Scatter Brushes in Photoshop: Step-by-Step Guideline
You can easily learn to use scatter brush in Photoshop by following these five easy steps. Each section has a short overview with important tricks, which are discussed below-
Step 1: Select the brush
First, you must select the brush that will become a scatter brush! The good news is that Photoshop can convert every brush into a scatter brush. So, you can select a round or star brush tool or create a custom brush tool as you want.

- Open the Photoshop brush panel and go to the brush preset. Here, you can select or load any brush or custom brush.
- If you want to load any custom scatter brush tool, go to the top of the screen. You’ll see an “Edit” option. Click on it and then select “Define Brush Preset.”
- Now, set a name and click “Ok.” Here, you can also see it tells about the pixel you want. Set the pixel also.
Pro tip: You need to select accurate pixel density. Otherwise, it’ll error out for other devices where you export it.
- For Adobe CS5 or below – the maximum pixel density should be 2500×2500
- For CS6 or Creative Cloud- the maximum pixel should be 5000×5000
Step 2: Setting the brush preset
Close the recent layer and select a new layer. Now, click on the “Brush icon” on the top of the left side. Then select Brush tip shape.
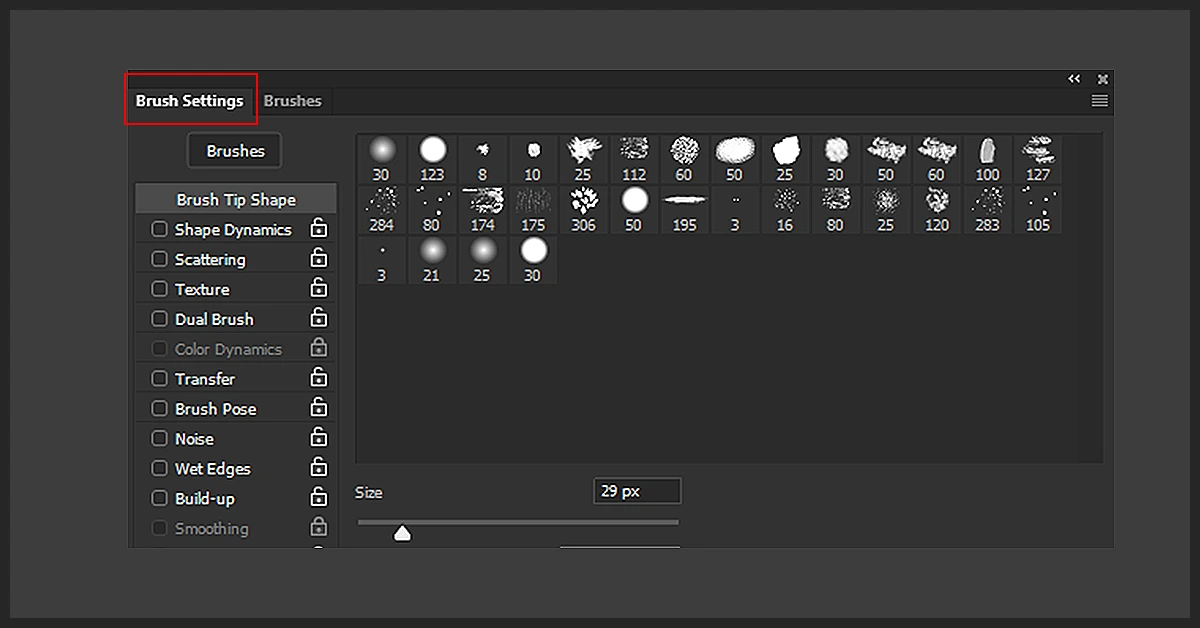
You’ll see the New brush has already loaded, which you must save above. Select this one.
Or, you can select any of the brushes that are available in Photoshop. Now set the spacing to 200%.
Step 3: Select shape dynamic
One thing to note is that you can see more options in the preset brush section. But, we are just using two options- “Shape dynamic” and “Scattering. “Well, let’s move on to the main point.
So, what is “Shape dynamic”? Shape dynamic is an option that allows you to add variation whenever you drag the brush. It gives a more natural look and randomizes things for a scatter brush.
Select “Shape dynamic. ”
Here you’ll see more options – “Size Jitter,” “Angle Jitter,” And “Roundness Jitter.” Before setting this option, let’s see a short overview.

Size jitter: Size jitter adjust how the brush looks in scale at its biggest and smallest. It makes the scatter much more organic. You can set it 100%—just experiment, which looks more natural.
There’s also a “Control option if you have a pen tablet. “You can emphasize it more with “Pen pressure.” But it’s optional. Just turn off this “Control option.”
Next, If you want to avoid making the tiny brush set this 100%. But it’s better to set the minimum diameter at 0. Otherwise, the scale will look more unrealistic. So, leave it with a zero diameter!
Angle jitter: Angle jitter around the brushes and make them more natural. The more it naturally looks, it doesn’t seem like the computer made it!
You can set the angle jitter at 25%. Or, you experiment more with your pen tablet if you need more natural. Or, you can set this at 0% also.
Roundness jitter: Roundness jitter is for Over emphasizes the brush, and it creates a more 3D space look. You can set this at a desired 10-25% percentage if you want a more layered look. Otherwise, set this at 0%.
Step 4: Select Scattering
You have to select scattering to give your brush a more scattering look. It determines how the brush looks when scattering, and you can see the example below the page.
So, here you need to select the desired percentage of scatter level. Experiment with percentages ungotten you’ve got the desired result.
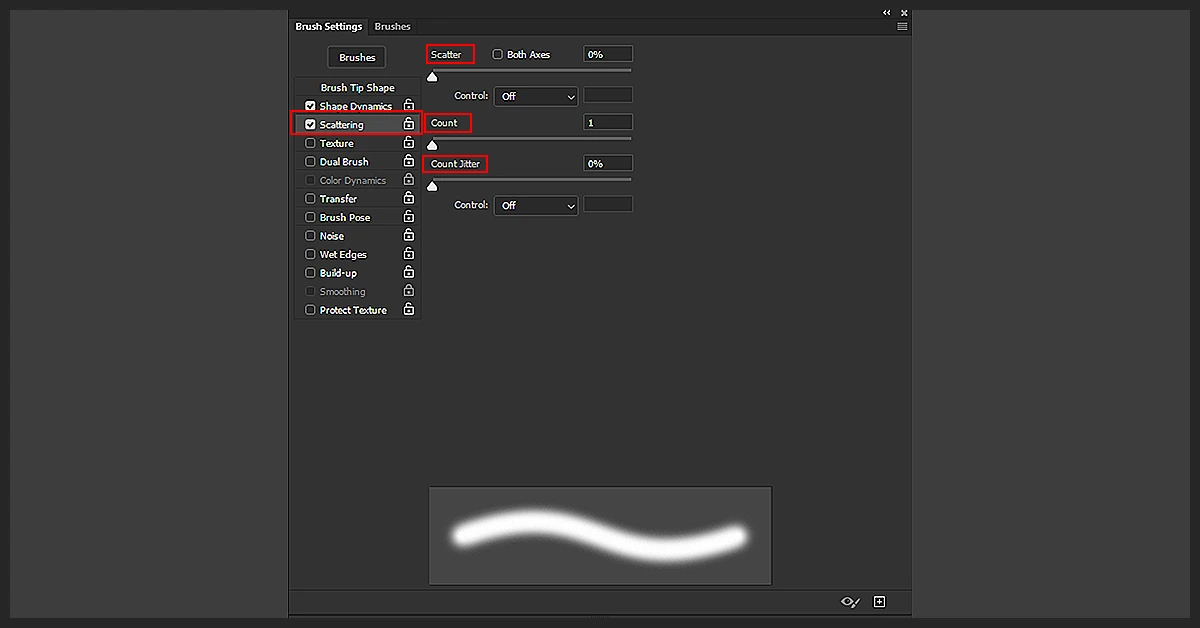
If you need a more natural look, set it between 10-25%. Or, you can set it up between 100-300%. The maximum level is 1000%.
Control: You can see the “Fade” option, which reduces the amount of scattering. Set this at 25%. Or, you can select an experiment.
If you don’t want to reduce the scattering, leave it with 0%.
Count: Next, the count option allows you to change the density of the brush. You can set it to 1%. If you need a dense brush, set it above 1%.
Count jitter: It allows randomly changing the count value with the jitter option. Set this at 0%.
Step 5: Save the brush
Finally, you’ve done all the necessary steps to create a scatter brush. You can share or export this by clicking Edit>Preset>Preset Manager>Select brushes.
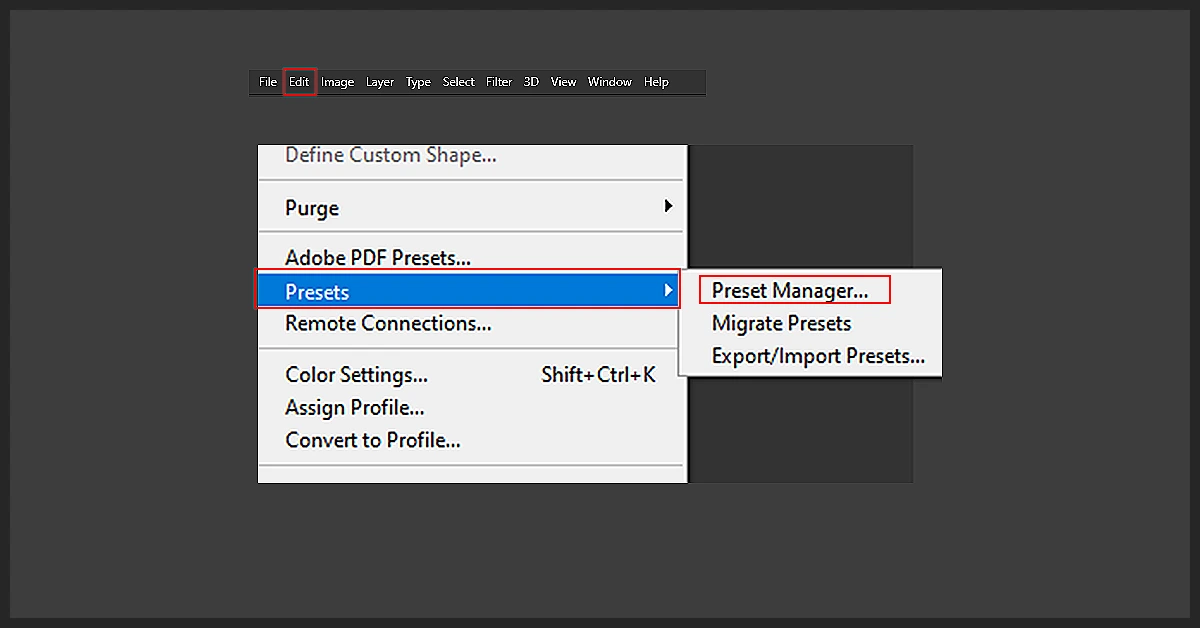
Next, click “Save set,” go to the desktop, set the filename, and save this.
Now, you can load this one on Photoshop or where you want. Use this brush to create any design or pictures you want to scatter features.
Read more: How To Copy A Layer Mask In Photoshop: Best Guide 2025.
FAQs on The Beginners Guide to Using Scatter Brushes in Photoshop
Here are some commonly asked questions in the beginner’s guide to using scatter brushes in Photoshop:
You can make a scatter effect in photoshop brush by following these steps –
1. Select the subject in which you want to create an effect. Select a low-contrast background to look more natural. Duplicate the layers.
2. Select a new image to give a brush effect on another layer in Photoshop.
3. Adjust the first image and duplicate the layers. Now, create a layer mask for both duplicates.
4. Now, it’s time to set up your brush as you want. You’ve already known how to use the parameter to adjust parameters.
5. Next, filing the layer with the brush effect on the subject. Click on more where you need more density and detailed results.
Count jitter in Photoshop is usually random with changing count values. Whenever you set a count jitter, Photoshop changes the count value and shows randomness each time you use the brush.
Yes, a scatter brush can be used as a drawing tool. Like, you can create bitmap images with the scatter brush. An excellent result will show a different pattern of the same object you use.
It is very simple to use a brush tool in Photoshop. Open Photoshop, and go to the brush tool panel. Select the brush tool. Then, click and drag the brush to paint the document. You can also change brush color, size, density, and many other options from the control panel.
The brush types available in Photoshop are acrylic brushes, colored pencil brushes, charcoal brushes, splatter watercolor brushes, spray paint brushes, and many more.
Final words
Though, it seems tough to use a scatter brush in Photoshop. But, after following the steps I discussed above, you can use a scatter brush like a pro designer in every type of design! It’s my words!
I hope you are enjoying learning from this effective guide. Please give me feedback on whether the article was helpful or not!