Photoshop Hair Retouch Tool : Get Over Frizzy Hair
- December 20, 2022
Whether you have natural curls or straight hair is blown out, dealing with frizz is always a pain. It can be so frustrating when a few rogue frizzies ruin your style. However, the Photoshop hair retouch tool takes care of it just fine.
You can retouch hairstyles with this clever effect we are now going to discuss. Photoshop has made sure our photos look more beautiful and spot-free than ever. The hair retouch tool is one of the many intelligent moves they had on their sleeves.
This post will show you how to edit frizzy hair in Photoshop for a sleek finish. With just a few simple steps, you can tame those unruly strands and have your hair looking like you just stepped out of a salon. Let’s get started!
Hair Retouch Tool: What Is Hair Retouching?
Do you have a commercial shoot tomorrow, and your hair isn’t cooperating? It’s frizzy, dry, and unmanageable. What do you do? You retouch it, of course!
But how far do we know about it, yes? Hair retouching is editing your hair in Photoshop to give it a sleek and polished finish. You can do this trick on photos of real people or models in stock images.
It’s a simple process, but it takes a little time and patience. In this guide today, you will know how to get the best results with just a few easy steps. Are you ready? Let’s get started!
Common Techniques of Hair Retouch Tool
There are a few standard hair retouching techniques that you can use to get a sleek finish.
The first is to select the clone stamp photoshop tool . This tool allows you to copy part of an image and then paste it over another part of the Image. So if you have any flyaways or curly hair, you can use this tool to copy part of a neighboring strand of hair and paste it over the curly hair.
The second technique of using the hair retouch tool is to use the liquified Filter. This Filter allows you to distort the shape of an image, which can help smooth out any flyaways or kinks in the hair.
Lastly, you can use the blur tool to soften any harsh lines or edges in the hair. This photoshop can help to make the hair appear more sleek and polished.
How to Retouch Hair in Photoshop
So, you’ve got a picture of someone with curly hair and want to give them a sleek, finished look. Follow these smart tips for retouching hair in Photoshop:
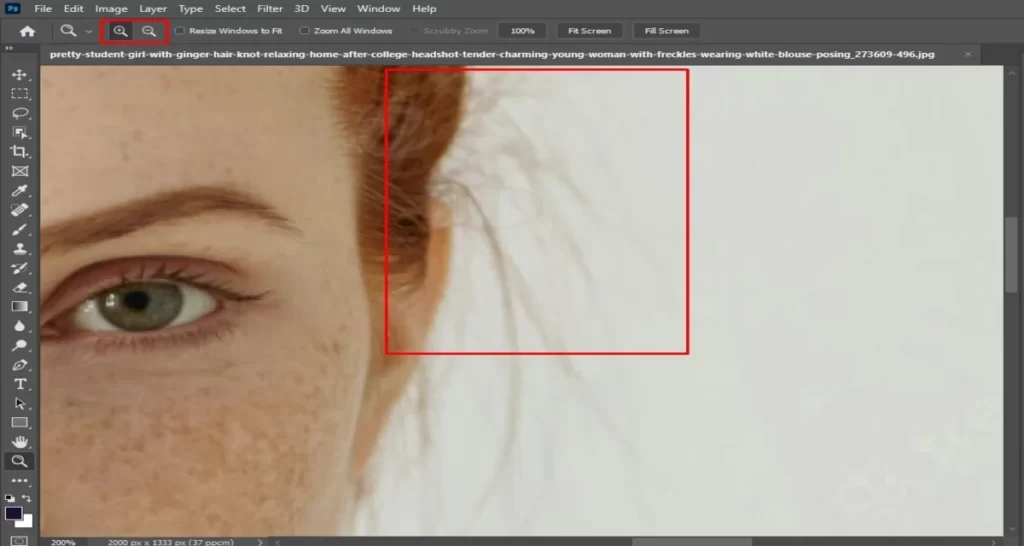
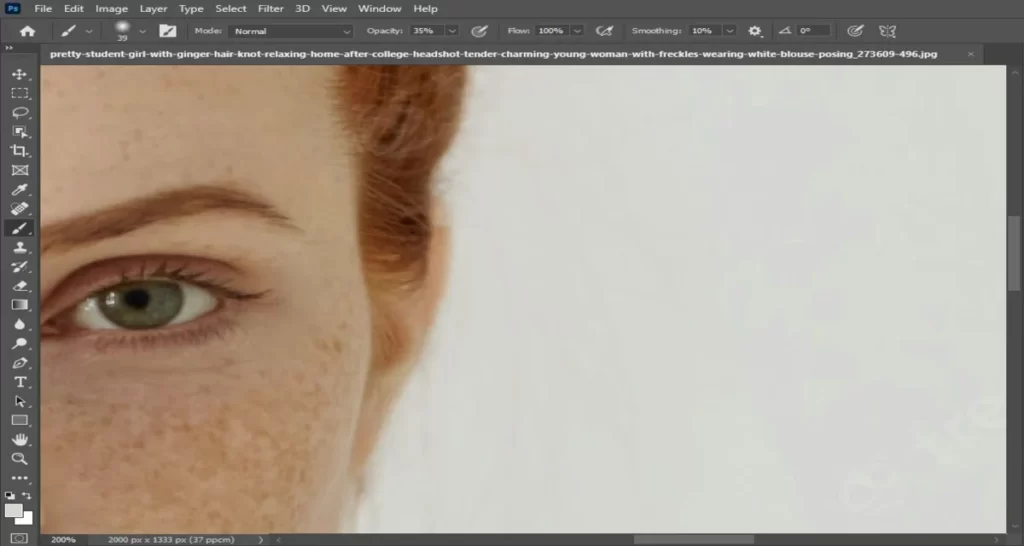
1. Open your photo in Photoshop and zoom in on the section of hair that you want to apply this effect.
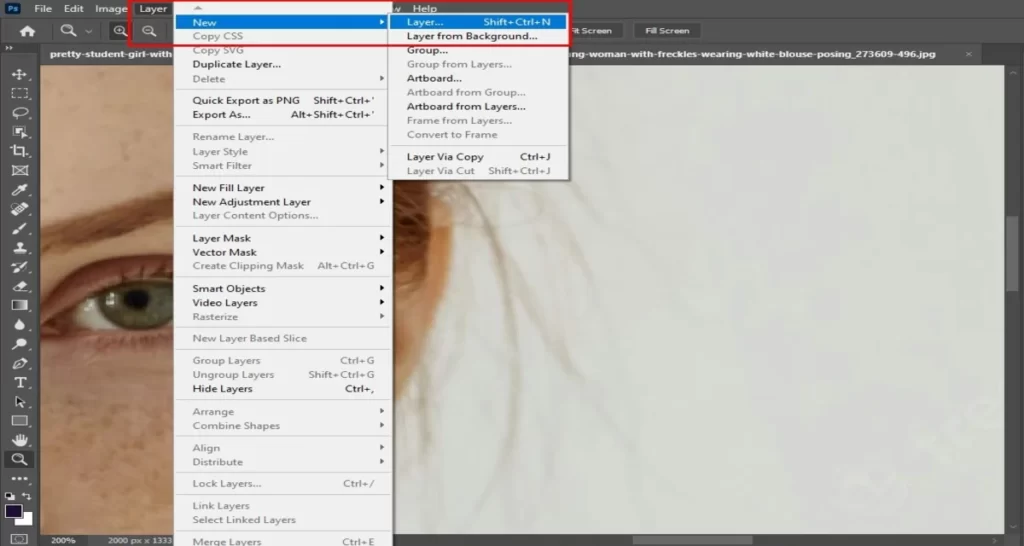
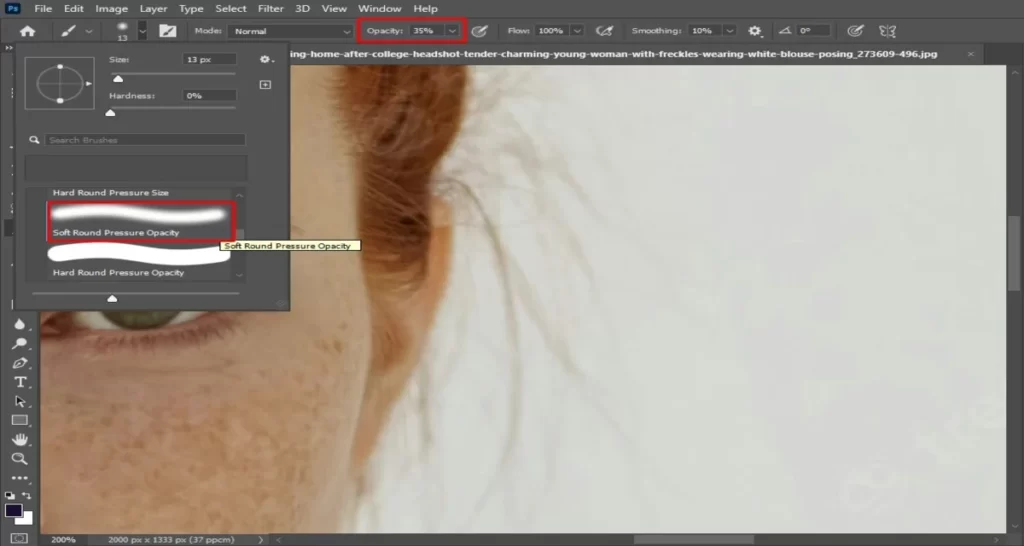
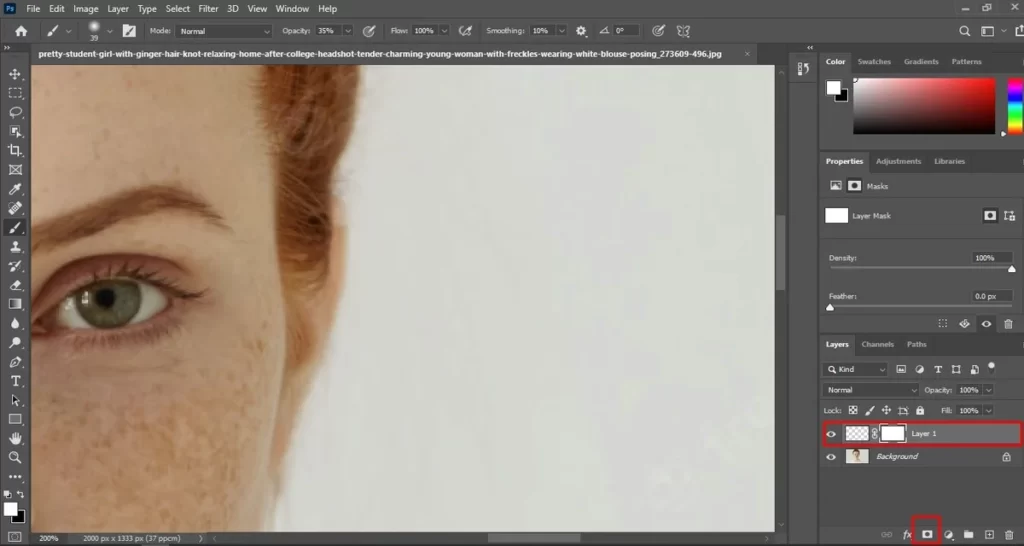
2. You have to make a new layer and select the photoshop brush tool to paint over the frizzy areas.
3. Choose a brush with a soft edge and set the opacity to around 30-40%.
4. Keep brushing until the frizzy areas are covered up.
5. If you need to, add a layer mask to hide any parts of the hair that you don’t want to retouch.
6. When clear, save your photo and admire your handiwork!
How to Edit Frizzy Hair in Photoshop
So, your hair is curly, and you want to sleek it out for your next photo shoot. Luckily, we can do that in the Photoshop hair retouch tool. Here are the steps:
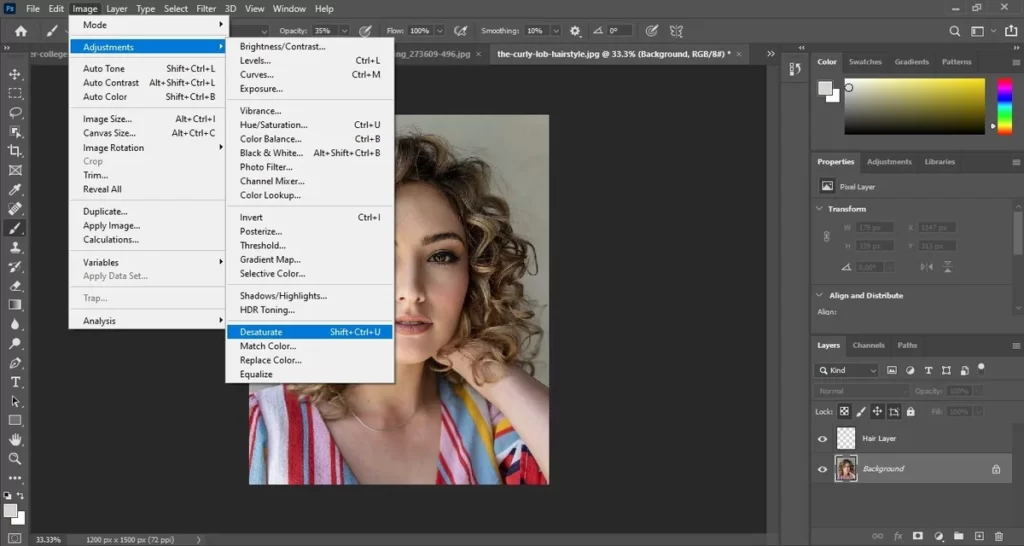
1. Select the photo and open it in Photoshop and select the hair layer.
2. Go to Image > Adjustments > Desaturate. Desaturating will get rid of any color in the hair and make it smoother for seamless hair treatment.
3. Next, go to Filter> Blur > Gaussian Blur and choose a radius of about 2 pixels. This step will help smooth out the hair.
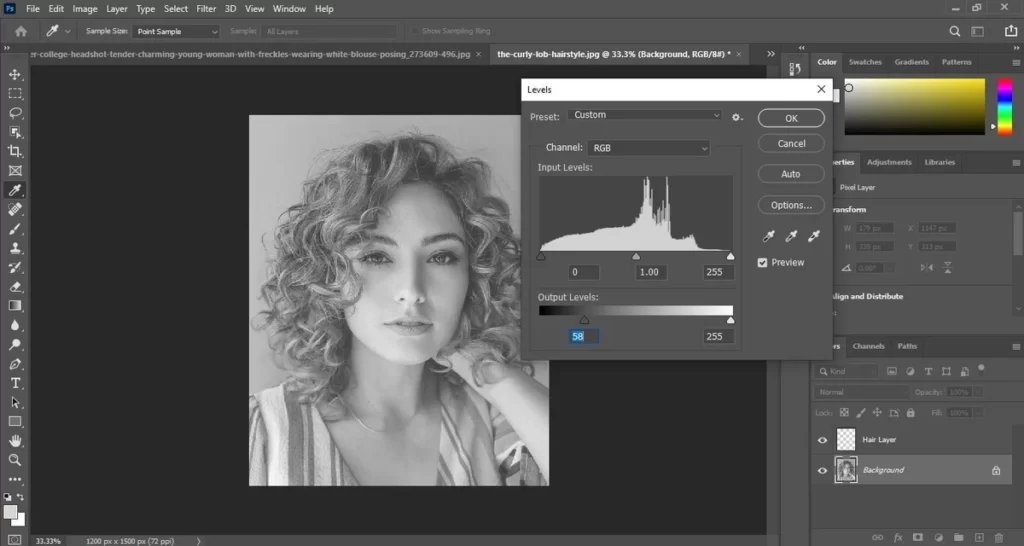
4. Now, we’ll add some definitions to the hair. Go to Image> Adjustments > Levels.
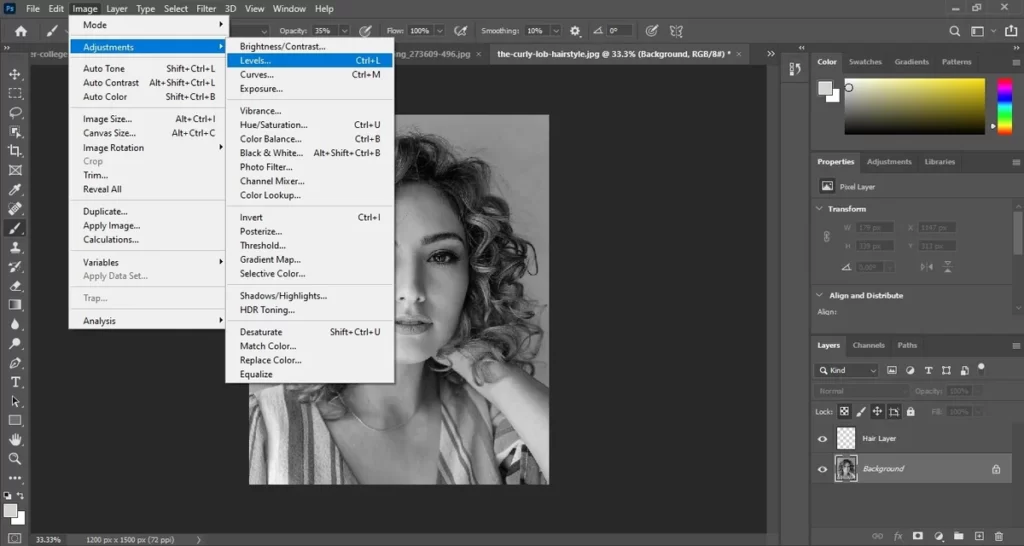
Now you have to higher up the contrast level by shifting the black slider to the right.
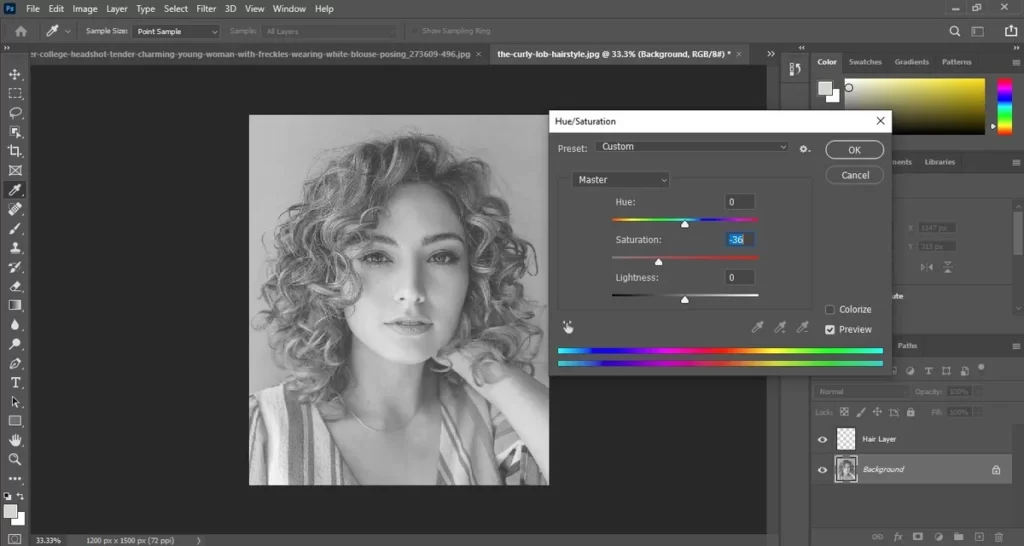
5. Finally, go to Image> Adjustments > Hue/Saturation .

and decrease the saturation by moving the slider to the left. Reducing it will help get rid of any unexpected dots from the hair
And that’s it! You’ve now edited your curly hair into a sleek masterpiece.
Read more: Photoshop Spot Healing Brush Tool .
How to Retouch Hair Color in Photoshop
Now that we’ve covered how to get rid of frizzy hair let’s talk about changing your hair color in Photoshop. The process is pretty simple:
1. Select the photo and open it in Photoshop you want to retouch it in Photoshop.
2. Select the Toolbar at the top of the screen, and then select the “Hue/Saturation” button.

3. An empty window will show up with three color sliders. Slide the RGB (red-green-blue) sliders to the opposite of the right to remove all color from your Image.

4. Next, use the “Select” tool to select all the hair in your photo.

5. Go back to the “Hue/Saturation” window, and move the red, green, and blue sliders until you’ve reached your desired hair color (you can also use the eye dropper tool to select a specific color).
6. Click “OK” and save your photo!
Tips for Retouching Hair in Photoshop
When editing frizzy hair in Photoshop, the key is to eliminate frizz while preserving the natural movement and texture of the hair. Follow these few tips for achieving a sleek and polished finish:
1. Always set your photo in RGB mode before you get into retouching.
2. Use the Forward Warp tool to push the hair strands in the right direction.
3. Be careful not to over-edit your photos; take a little step for a long way.
4. If you need to, add a layer mask to hide certain areas of your retouching work.
5. Save your work as a .psd file so you can get back anytime and tweak it if needed.
6. Use the Healing Brush to eliminate frizz and smooth the hair’s texture.
7. Go to the Dodge and Burn tools and select it to subtly adjust the highlights and shadows in the hair to give it more depth and dimension.
8. Use a layer mask to adjust the color and brightness of different hair parts selectively.
Final Words
When it comes to the Photoshop Hair Retouch Tool, it’s time to get over it. This tool is not perfect, and it never will be. There will always be some flyaway hairs or frizz that it can’t fix.
But that’s okay! They are just tools, and we need not expect them from them either. This tool is still a great way to improve the look of your hair in photos. It can help eliminate unwanted blemishes and add shine and volume to your hair.
So don’t be too hard on it; give it a try the next time you edit a photo.
if you need professional support with photoshop, you can always count on experts like Clipping Creation India.