How to Edit Real Estate Photos in Lightroom in 6 Easy Steps
- April 16, 2025
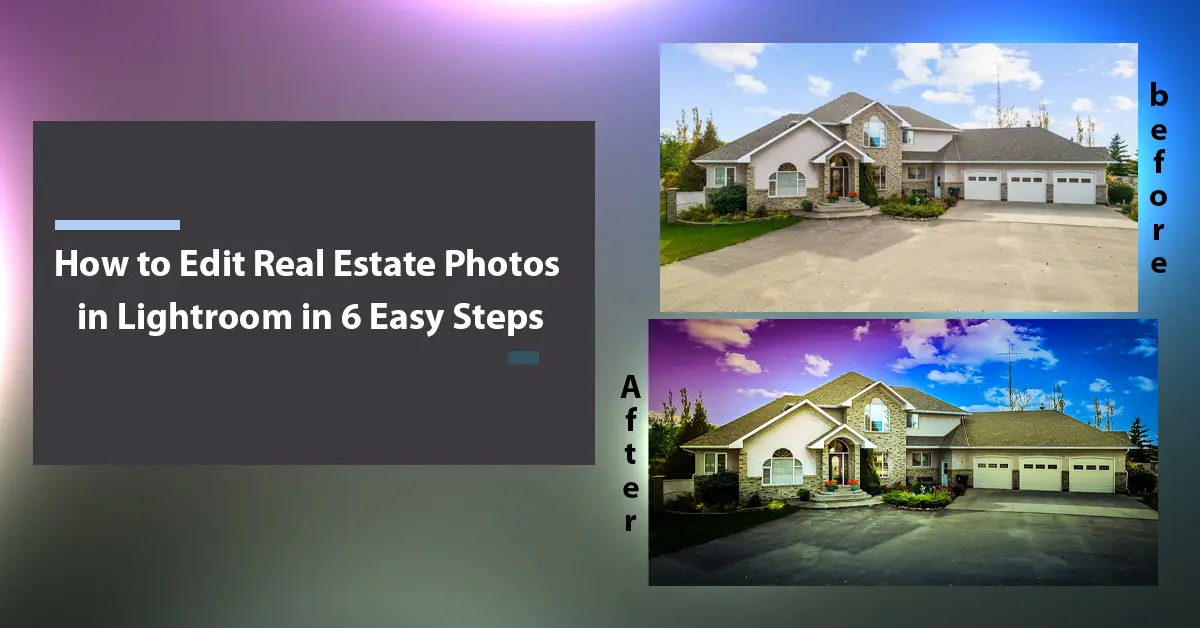
Real estate photo editing can be a tiring, time-consuming job without the right tools and proper knowledge of them. If you want to learn about how to edit real estate photos in Lightroom, you can learn in just 6 steps.
Over the years, Lightroom has been very popular as an editing tool for real estate images. With some simple tips and techniques, not only can you speed up your post-processing work, but you can also produce high-quality images that capture the client’s attention at a glance. So, without waiting any further, let’s dive in.

6 Simple Steps to Edit Real Estate Photos in Lightroom
There is no specific way to edit real estate photos in Lightroom. With the number of variations and variables there, we can probably come up with hundreds of workflows and settings. But it’s not possible to get into all of them for obvious reasons.
However, we have come up with some efficient settings you can use as a foundation for editing real estate photos in Lightroom. And in the meantime, you can still play around with them to figure out what works best for you.

Step 1: Import Photo into Lightroom
The first step is to import the photos you want to edit into Lightroom. You can transfer them from either a drive or a memory card. Make sure to copy the new photos. In the worst-case scenario, even if the imported photo is wrong, you’ll still have the originals in the main source.
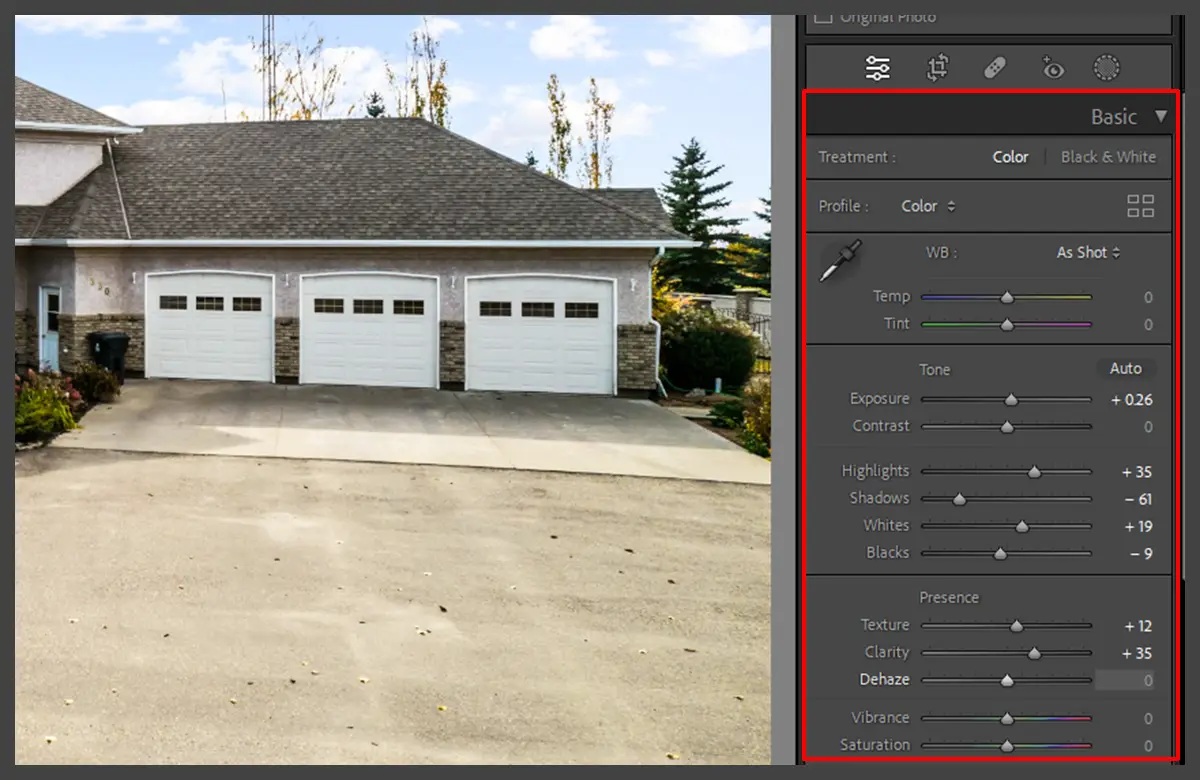
Step 2: Set Up Basic Panel
The Basic Panel offers many options, such as texture, brightness, composure, highlights, shadows, whites, and blacks. You can adjust these options so they apply to all the photos you import into Lightroom.

Step 3: Set Up the Detail Panel
The next step is the Detail Panel. And the options here are smoothness, luminescence, noise reduction, sharpening, etc. You can also set these up to apply to all imported photos.
Step 4: Effects
There is also a panel for Effects. This is not always a compulsory step since most clients prefer natural-looking real estate photos. But they can come in handy for special cases, such as if you want something to stand out.
Step 5: Post Processing
Now that the photos are processed at a primary level, you can go into more detail with the editing. This step is usually considered post-processing. You can compile them into stacks to edit HDR photos or manually correct and adjust to create the perfect real estate photos.
Step 6: Copy Adjustments
A quick little trick to save time on editing when you have tons to do is to copy the adjustment and apply it to the rest of the photos. This way, you can save a huge amount of time without having to go through the images individually and make the same adjustments.
HDR Photo Editing Technique in Lightroom: 8 Simple Steps
One of the most common and effective approaches to editing real estate photos is HDR editing. Especially if your goal is to properly balance the light spectrum, then this is a must-try method. So, what exactly is an HDR photo?
HDR stands for High Dynamic Range, which is basically the range of light and dark tones in your photos. Most of the time when we take photographs, we fail to capture the high and low contrast of the light, and as a result, the picture always looks different from how the scene appears to the human eye.
The HDR technique eliminates these irregularities between the dark and light tones by blending a series of captures at different exposures. Therefore, we get a very well-balanced image that is fresh, natural, and pleasing to the eye.
The reason the HDR technique is so popular in real estate photography is that it can work well with the building’s bright and dark tones, as well as its interior, exterior, and surroundings.
Also, if you are taking pictures inside any buildings, there are often different lighting conditions that can ruin image quality during further editing. Consequently, you can prevent these scenarios by using HDR editing in Lightroom. Now, let’s see step-by-step instructions on how to make your photos HDR in Lightroom.
Step 1: Bracketing
The very first step of HDR editing is called Bracketing, which means taking multiple shots of the same scene with different F-stops. F-stop refers to the aperture setting on your camera, and it controls the amount of light that enters your lens.
You can select them manually on your device. Make sure the device is steady and take pictures of the scene from the same angle for maximum effect.
Step 2: Importing and Sorting
After the pictures are taken, transfer them to Lightroom and sort them accordingly. A single HDR photo requires at least 3 images. But you can choose more for a better effect. Remember, the more images there are, the more detailed your final result will be.
Step 3: Infusing the Pictures
The next step is infusing the pictures. There are two different ways you can go through the infusion process. For manual stacking, right-click on the images to select them. It will show Stacking options, and from there, select Group into Stack.
The 2nd way is to stack them using Auto Stack by Capture Time. You just need to select the images you want, and Lightroom will automatically stack them for you.
Step 4: Multiple Stacking
You can also combine multiple stacks of photos by using the Plug-in Extra feature and blending them.
Step 5: Auto Aligning
It’s important to ensure the Automatic Align option is checked. It ensures that all images are in accordance with each other to create the most accurate output.
Step 6: Adjustments
There’s also an option labelled Auto Settings that makes some minor adjustments.
Step 7: Blending
The images are now ready to blend. Click the Blend option to input the command. Here, you will also need to select the folder you want to save the HDR photos.
Step 8: Saving Infused File
This is an additional step that lets you save your infused files for further editing. Usually, there is a Re-import image into Lightroom option for this purpose. Finally, tap on the Infuse Images option, and it’s done!
Some Tips on How to Edit High-Quality Real Estate Photos
It’s always wise to be on the safe side! Here are a few tips on editing high-quality real estate photos. Follow these tricks to master the skill.
Cropping
Cropping can do wonders to enhance your real estate photos without doing any additional editing. It draws your attention to the scene and removes distractions in the surrounding area. This is considered one of the first steps of editing real estate photos.
Noise Reduction
Noise is another function that goes unnoticed most of the time but is one of the many reasons a photo looks dull and gloomy. No buyer wants to look at a real estate picture with millions of tiny hazy dots and think, “Yes, I want to buy this; it looks amazing.”
There are multiple reasons, from incorrect sensor size to incorrect light settings, why a photo may have these unwanted grains. For that, Lightroom has a feature called Reduce Noise, which you can find in the Filter Menu. Click on that, and you’ll notice the change right away.
Use Sliders
Using sliders, you can balance the dark and light areas of the image. We use white sliders to balance the bright areas and black sliders to make the black areas more visible.
For both cases, press down the Alt key on Windows or the Option key on Mac while moving the slider panel. Keep adjusting around until you are satisfied.
Sky Backdrop
We don’t have to tell you the difference between an image taken on a sunny, bright day and one taken on a cloudy, gloomy day. The colors just seem to come to life with the sunlight. But what if the weather didn’t cooperate when the picture was taken?
We can’t possibly control the weather, but what we can do is a sky replacement to make it seem like a nice, bright day. With a few editing tricks in Photoshop, you can instantly change the whole aesthetic of the picture. Make a few color adjustments in the other areas as well. This is a nice little trick to produce an appealing real estate photo that attracts buyers.
Always Color Correct
Color correction is the main pillar of any photo editing. Even more, in real estate photos, it’s extremely important to make small but detailed color corrections to make them more appealing to buyers.
In Lightroom, there are usually different curves and levels for adjusting colors and tones, contrast, saturation, etc. You can drag these curves up and down, left and right, to see what works.
The great thing about using Lightroom for this option is that the functions are so easy to use. Even without any previous experience, you can play around and just see what looks good to you. Changing a simple, boring picture into a lively and bright picture, there are no other alternatives for color correction.
Lens Correction
The lens comes into play when editing real estate photos. The technique eliminates the issues that come with most lenses. However, Lightroom has an easy solution for this problem as well.
You can find this feature in Lightroom under the name Lens Correction. After clicking on that, check the option Enable Profile Corrections. Lastly, click on the Remove Color Aberration option to complete.
Remove Unwanted Objects
It’s not always possible to take everything into consideration while clicking real estate photos. There’s always something in the surroundings that goes overlooked and only gets noticed during editing.
Tangled-up cables, that one single bowl on the countertop, a random neighbor at the side of the garden, or even a car in the driveway can ruin an otherwise good picture. The good thing is that Lightroom has just the right feature to remove these inconveniences.
For instance, you can use the Healing Brush Tool for any small objects at a random place. These tools take the pixels from a matching area and blend them with the original pixels to hide the undesired object.
Then there’s also the Clone Stamp Tool. The tool picks up the pixels from the source area and clones them over the object or disturbance to be removed. This one provides a better result than the healing tool.
Don’t Go Overboard
When editing real estate photos, we need to remind ourselves of the goal or what we are doing the editing for. And that is to present the property to potential buyers in an appealing way. While it is important to portray the attractive sides of the property through the photos, it’s also crucial to keep them natural-looking.
Since we are selling a product, the potential customers should not feel like they are being deceived by overly edited and false pictures. Especially if the image already has good exposure and color coordination, just make some adjustments to the highlights and shadows, and they should be done.
Conclusion
The key to editing real estate images is to keep them minimal yet efficient. And Lightroom has all the potential to be a great editing tool. Personally, I like using Lightroom a lot for photo editing because of its simple techniques and easy-to-use features.
Plus, the options are wide, with many possibilities to go whichever way you want. Because of all these reasons, Lightroom has recently become very popular for real estate photo editing. And if you are still not on board with that, I hope this information and these simple steps are enough to get you started. Happy editing!
FAQ’s
How can I remove reflections on the mirror in Lightroom?When taking interior photos, it’s common to catch reflections in mirrors, which can degrade photo quality. You can use the cloning tool in Lightroom to remove these unwanted reflections.
What does the Auto Sync tool in Lightroom do?Autosync is sort of an alternative to presetting the photos. It lets you edit a bunch of photos with the same adjustment, angle, light, exposure, etc., so you don’t need to edit them one by one.