10 Exceptional Photo Retouching Tips To 100% Satisfy Your Customers
- November 23, 2023
Photo retouching is a powerful tool that allows you to enhance and perfect your images, giving them a professional and polished look. Whether you’re a photography enthusiast or someone looking to improve the visuals for office purposes, with our photo retouching tips, you can master the art of photo retouching can make a significant difference.
On the other hand, for those seeking solutions for office purposes, photo retouching can be a valuable skill. It may help you deliver professionalism and attention to detail in presentations, marketing materials, or any visual content.
In our guide, we will explore essential photo retouching tips for beginners, using simple language to ensure accessibility for everyone.
10 Photo Retouching Tips: You Haven’t Heard Of
Take a look at our 10 Photo Retouching Tips. We doubt that you will find the solutions anywhere else in the way we have presented here.
1) Start with the Basics:

Before diving into advanced techniques, it’s crucial to understand the basic tools available in your photo editing software. Familiarize yourself with tools like the crop, rotate, and resize options. These fundamental tools set the foundation for more intricate retouching processes.
Crop:
Picture this as your own personal magic scissors. With the crop tool, you can trim the edges of your photo, getting rid of stuff you don’t want. It’s like giving your photo a stylish haircut, making it look just right.
Rotate:
The rotate tool is like turning the steering wheel of your photo. You can spin it around until it faces the right direction. Maybe your photo looks better sideways or upside-down – the rotate tool lets you play with different angles.
Resize:
Now, resizing is like stretching or squishing your photo. You can make it bigger to focus on details or smaller to fit into a frame. It’s like giving your photo a makeover, adjusting its size to suit your vision.
The simple tools are the foundation, the starting point for all the cool tricks you’ll learn next. So, grab your toolbox, play around with these tools, and get ready to take your photos to the next level!
2) Lighting and Color Balance:

When you’re working with your photos, take a good look at how the light plays in them. It’s like making sure the sunshine or the indoor lights are playing well with your pictures. Now, to make everything look just right, we’ll tweak a few things.
- First off, let’s talk about brightness. This is like turning a dimmer switch up or down. If your photo feels a bit too dark, you can brighten it up to see everything more clearly. On the flip side, if it’s too bright and glaring, you can dial it down a bit.
- Next, there’s contrast. This is about making things pop. It’s like boosting the difference between the light and dark areas. It helps details stand out, giving your photo a bit more oomph. You want to avoid a flat, dull look, and contrast is the secret sauce.
- Exposure is another friend in this trio. It’s like adjusting the overall lightness or darkness of your entire photo. If things seem a bit too washed out, you can dial down the exposure. If it’s feeling a bit too shadowy, you can turn it up a notch.
- Now, let’s chat about color. Making sure your colors look true to life is key. Imagine you took a picture of a juicy red apple. You’d want that red to look as scrumptious in the photo as it did in real life, right? That’s where color balance comes in. It’s like tuning the colors so they match what you remember.
Check that the whites look white and the colors don’t seem too crazy. If something looks off, like the grass appearing too blue or the sky too yellow, it’s time for a color adjustment. The goal is to keep things looking natural and real, just like how you remember them when you pressed the shutter button.
So, in a nutshell, when you’re tweaking your photos, play around with brightness, contrast, exposure, and color balance. It’s like fine-tuning your radio to get the best reception. With a little adjustment here and there, your photos will shine with a balanced and true-to-life charm.
3) Smooth Skin Imperfections:
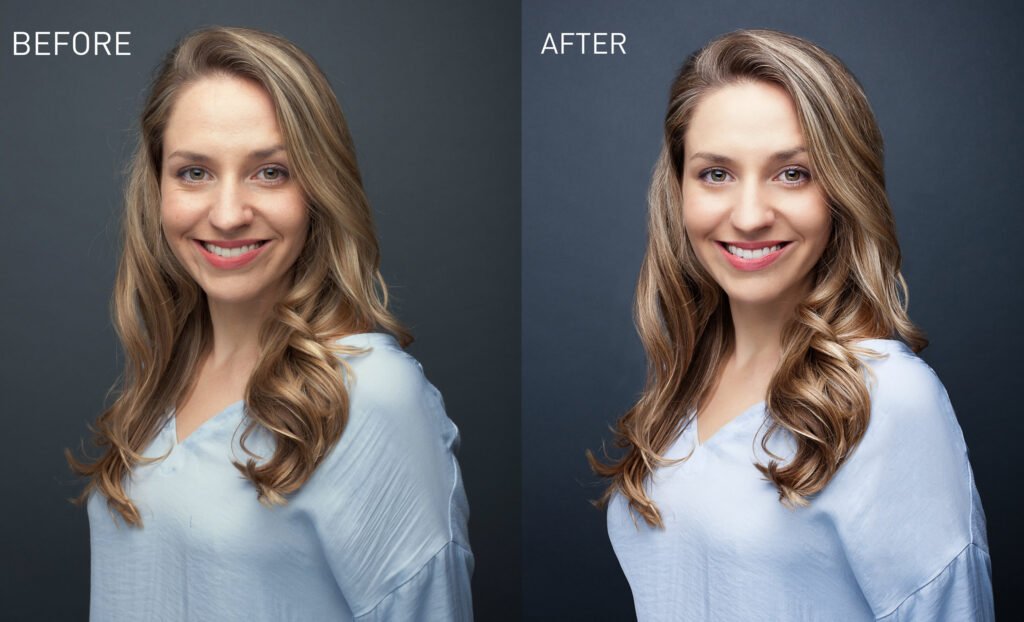
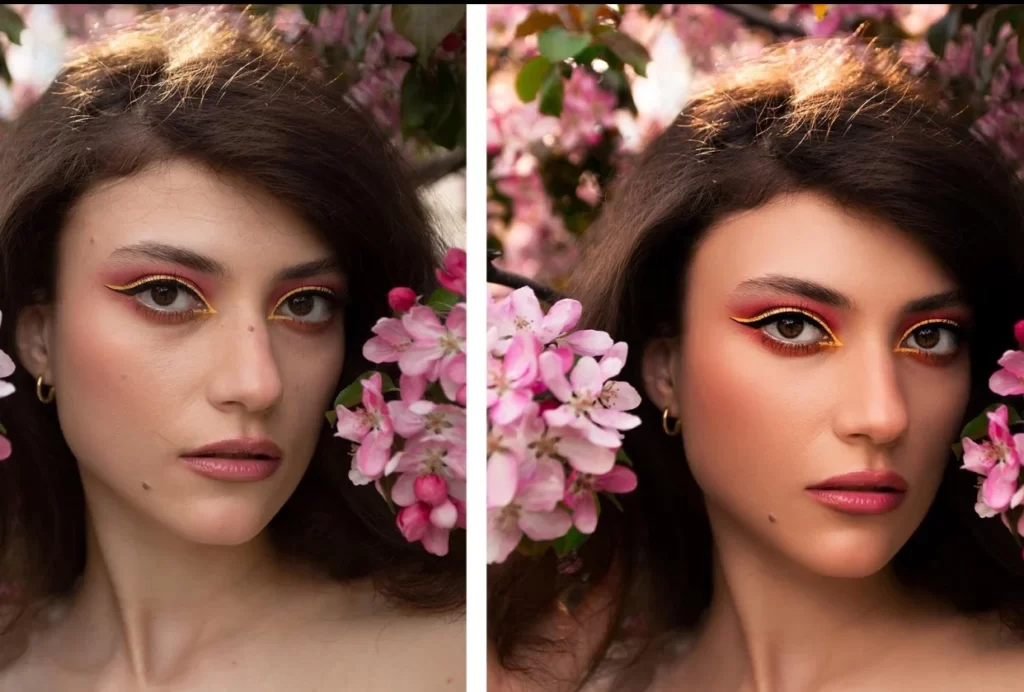
Photo retouching Toften comes in handy when you want to make the skin in your pictures look really smooth and flawless. It’s like a digital eraser that helps you get rid of things like blemishes, acne, or any imperfections on the skin. Two handy tools for this job are the healing brush and the clone stamp tool.
Now, let’s talk about the clone stamp tool. This tool is a bit like a copy-and-paste for your photos. You can pick a clean and clear part of the skin, and then use the clone stamp to cover up any spots or blemishes by copying that good skin to the problem areas. It’s like giving your photo a makeover, making the skin look more even and nice.

But here’s the important part: don’t go overboard! It’s easy to get carried away and erase too much. The key is to keep things natural. You have to wear the right amount of makeup – enough to enhance, but not so much that it looks like a completely different face.
So, when you’re using these tools, be cautious not to do too much. You want your photos to look improved but still real and true to life. It’s all about finding that sweet spot where your skin looks smooth and flawless, but not so perfect that it seems unreal. Remember, less is often more when it comes to photo retouching!
4) Enhance Eyes and Teeth:
The eyes are like the stars of a portrait—they grab attention. So, one of our next photo retouching tips is going to be on eyes and teeth. To make them pop, you can brighten them up. It’s like turning up the lights on a stage. In your photo editor, find the exposure tool. It’s like adjusting the brightness, so the eyes stand out.
Be gentle, like adding a bit of sunlight. Also, there’s this cool thing called a catchlight. It’s like a tiny reflection in the eyes that adds sparkle. Just a subtle touch of catchlight can make the eyes look lively and full of energy.
Now, let’s talk about the teeth. We all want our smiles to shine, right? There’s a tool for that, specifically for teeth whitening. It’s like a magic wand but for smiles. Use it to make the teeth a bit brighter. But, and here’s the important part, don’t go overboard.
Too much whitening can make the teeth look fake, like cartoon teeth. Moderation is the key here. Just a gentle touch to enhance the natural brightness of the teeth.
5) Fine-Tune Facial Features:
When it comes to making faces look even better in your photos, you can do some gentle tweaking to enhance the overall appearance. It’s like giving your photos a little touch-up, just like you might do with a painting.
There’s a handy tool called the liquify tool that works a bit like digital modeling clay. It lets you make tiny adjustments to the shapes of things on the face, such as the nose, jawline, or cheekbones. It’s like a mini makeover for your pictures!
6) Remove Unwanted Objects:

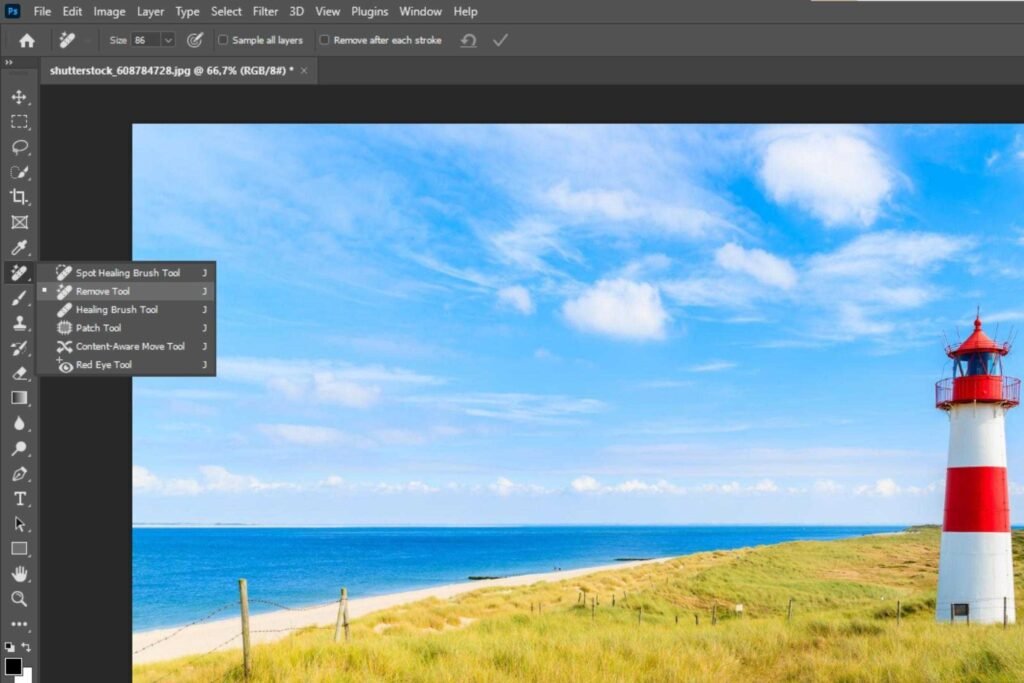
In many pictures, there might be things that grab attention away from the main part you want everyone to notice. Imagine you have a great photo, but there’s something in the background that’s not supposed to be there. No worries! Some tools act like magic erasers to make these distractions disappear smoothly.
These tools have cool names like the “clone stamp” and “content-aware fill.” They work like this: if there’s something in your photo that’s bothering you, you can use the clone stamp to copy a good part of the picture and cover up the distracting thing. It’s like copying and pasting a good piece over the not-so-good one.
The content-aware fill is a bit like having a smart assistant. When you point out something you don’t like, it cleverly figures out what should be there instead and fills in the space. It’s almost like telling your photo, “Hey, this doesn’t belong here,” and it fixes itself!
So, if you have a photo with, let’s say, a random person in the background or a stray object that’s stealing the spotlight from your main subject, grab your clone stamp or content-aware fill tool.
With a few clicks, watch those distractions vanish, leaving your photo looking clean and focused on what matters most. It’s like having your photo superhero to keep things looking just right!
7) Focus on Detailing:
Take a closer look at your photos, and you’ll find tiny details like strands of hair, the texture of clothing, or delicate patterns. These small things might not catch your eye at first, but enhancing them can make a big difference. Imagine it like adding a sprinkle of magic dust to your pictures!
To do this, there’s a handy tool called the “sharpening tool” – A superhero gadget for making things clearer and crisper. When you use this tool on your photos, it’s like giving a gentle boost to those tiny details, making them stand out more.
Let’s talk about hair, for example. Sometimes, in pictures, hair might look a bit fuzzy or not as sharp as you’d like. The sharpening tool can fix that. It works like a little magnifying glass for your photo, making each strand of hair clearer and more defined. Suddenly, your subject’s hairstyle goes from okay to amazing!

The same goes for clothing. If there’s a cool pattern on a shirt or a lovely texture on a dress, the sharpening tool can highlight these details. It’s like bringing out the hidden beauty of what your subjects are wearing. Your photos go from good to “Wow, look at those details!”
And don’t forget about intricate patterns! Maybe you captured a photo of a beautiful carpet, or there’s a mesmerizing design on a piece of furniture. The sharpening tool is like a spotlight, making sure every little detail in those patterns shines through. It’s like showing off the artistry that might have gone unnoticed.
By using the sharpening tool to enhance these finer details, your images take on a more refined and professional appearance. It’s like giving your photos a polished finish, making them look like they belong in a magazine or a fancy art gallery.
So, when you’re editing your pictures, don’t forget to let the sharpening tool work its magic on the little things—it’s the secret ingredient for that extra touch of excellence!
8) Experiment with Filters and Presets:
Numerous photo editing programs come with cool features called filters and presets. These things act like magic buttons that can swiftly change how your pictures feel and look. It’s like trying on different outfits for your photos – each filter or preset gives your image a special vibe.
Now, here’s where the fun begins! You can play around with these filters and presets to find a style that matches how your office wants to present itself visually. It’s like picking the right dress or suit for a special occasion but for your pictures. Just like your office has its unique personality, these filters and presets help your photos showcase that personality too.
So, go ahead and click around, and try different filters and presets. It’s like a digital dress-up game for your photos. Have fun experimenting until you discover the perfect look that fits your office’s visual style. It’s an easy way to add a dash of flair to your images and make them uniquely yours.
9) Maintain Realism:
Our next photo retouching tips is about – reality check. When you’re jazzing up your pictures, it might be tempting to go all out and get super creative. But here’s the deal: it’s important to keep it real. Going overboard with edits can make your photos look a bit weird like they don’t belong in the real world. We want your visuals to be genuine and authentic, not like they’ve taken a detour into Fantasyland.
Think of it like hanging out with friends. You want to be yourself, right? Well, your photos should be themselves too. Overly edited pictures might make people wonder if they’re looking at the real deal or some kind of digital masterpiece.

So, the key is finding that sweet spot between creativity and reality. You want your photos to shine and catch your eyes, but not by turning into something totally different. Keep it real, keep it genuine, and your visuals will have the authentic charm that everyone loves.
It’s like giving your photos a stylish makeover without losing their true personality. And who doesn’t love a makeover that stays true to who you really are?
10) Practice and Learn from Others:
Mastering photo retouching is like learning to ride a bike – it gets better with practice! Imagine it as a journey where the more you travel, the more you discover. Here’s a simple roadmap to help you cruise along and enhance your photo retouching skills.
Firstly, don’t hesitate to check out online tutorials. Think of them as friendly guides showing you step-by-step how to use different tools and tricks. These tutorials are like treasure maps, leading you to the hidden gems of photo retouching wisdom. You’ll be surprised how much you can learn from these virtual teachers.
Next, consider joining photography communities. Think of them as big, friendly gatherings where people share their experiences and insights. It’s like joining a club of photo enthusiasts who are ready to help and inspire you. You can ask questions, share your own experiences, and be part of a community that cheers for your progress.
Now, picture this: learning from the experiences of others is like having a bunch of friends who already know the ropes. They’ve been there, tried different things, and can guide you on what works best. It’s like having a mentor without even asking for one! So, listen to their stories, ask for advice, and soak in the collective wisdom of those who’ve walked the path before you.
Remember, just like a garden needs the care to bloom, your photo retouching tips skills need nurturing. Continuously refine your skills by practicing regularly. It’s like watering your skills every day – the more you do it, the more they grow. With time, you’ll start noticing your results becoming more impressive and engaging, like a plant blossoming into a beautiful flower.
Photo Retouching Tips Conclusion:
Photo retouching can be a real struggle if you can’t find your way out. It combines technical skills with a creative eye. By understanding and implementing these fundamental photo retouching tips, you’ll be well on your way to creating captivating and polished images for your office purposes. Remember, practice makes perfect, so don’t hesitate to experiment and refine your techniques over time. You can also check out the top-notch Photo Retouching service we offer.
So, hop on this journey of improvement! Practice, explore, and learn from others. Before you know it, you’ll be the one sharing your experiences, helping others, and creating stunningly retouched photos. Happy practicing!
