How to Remove a White Background in Simple Steps?
- February 23, 2025

I’m sure almost all of us have tried to remove an annoying white background from an image at least once in our lives. An image with a transparent background is like heaven to work with.
They are easy to manipulate, edit, and fit almost anywhere seamlessly. But our question is how to remove a white background in simple steps. There are a bunch of very efficient and easy tools that can help remove a white or any background in just a few simple steps. So, without further ado, let’s get right into it.
Removing White Background Using 4 Different Editing Software
Let’s get familiar with some of the most common tools and applications that you can use to remove any white background.
Photoshop
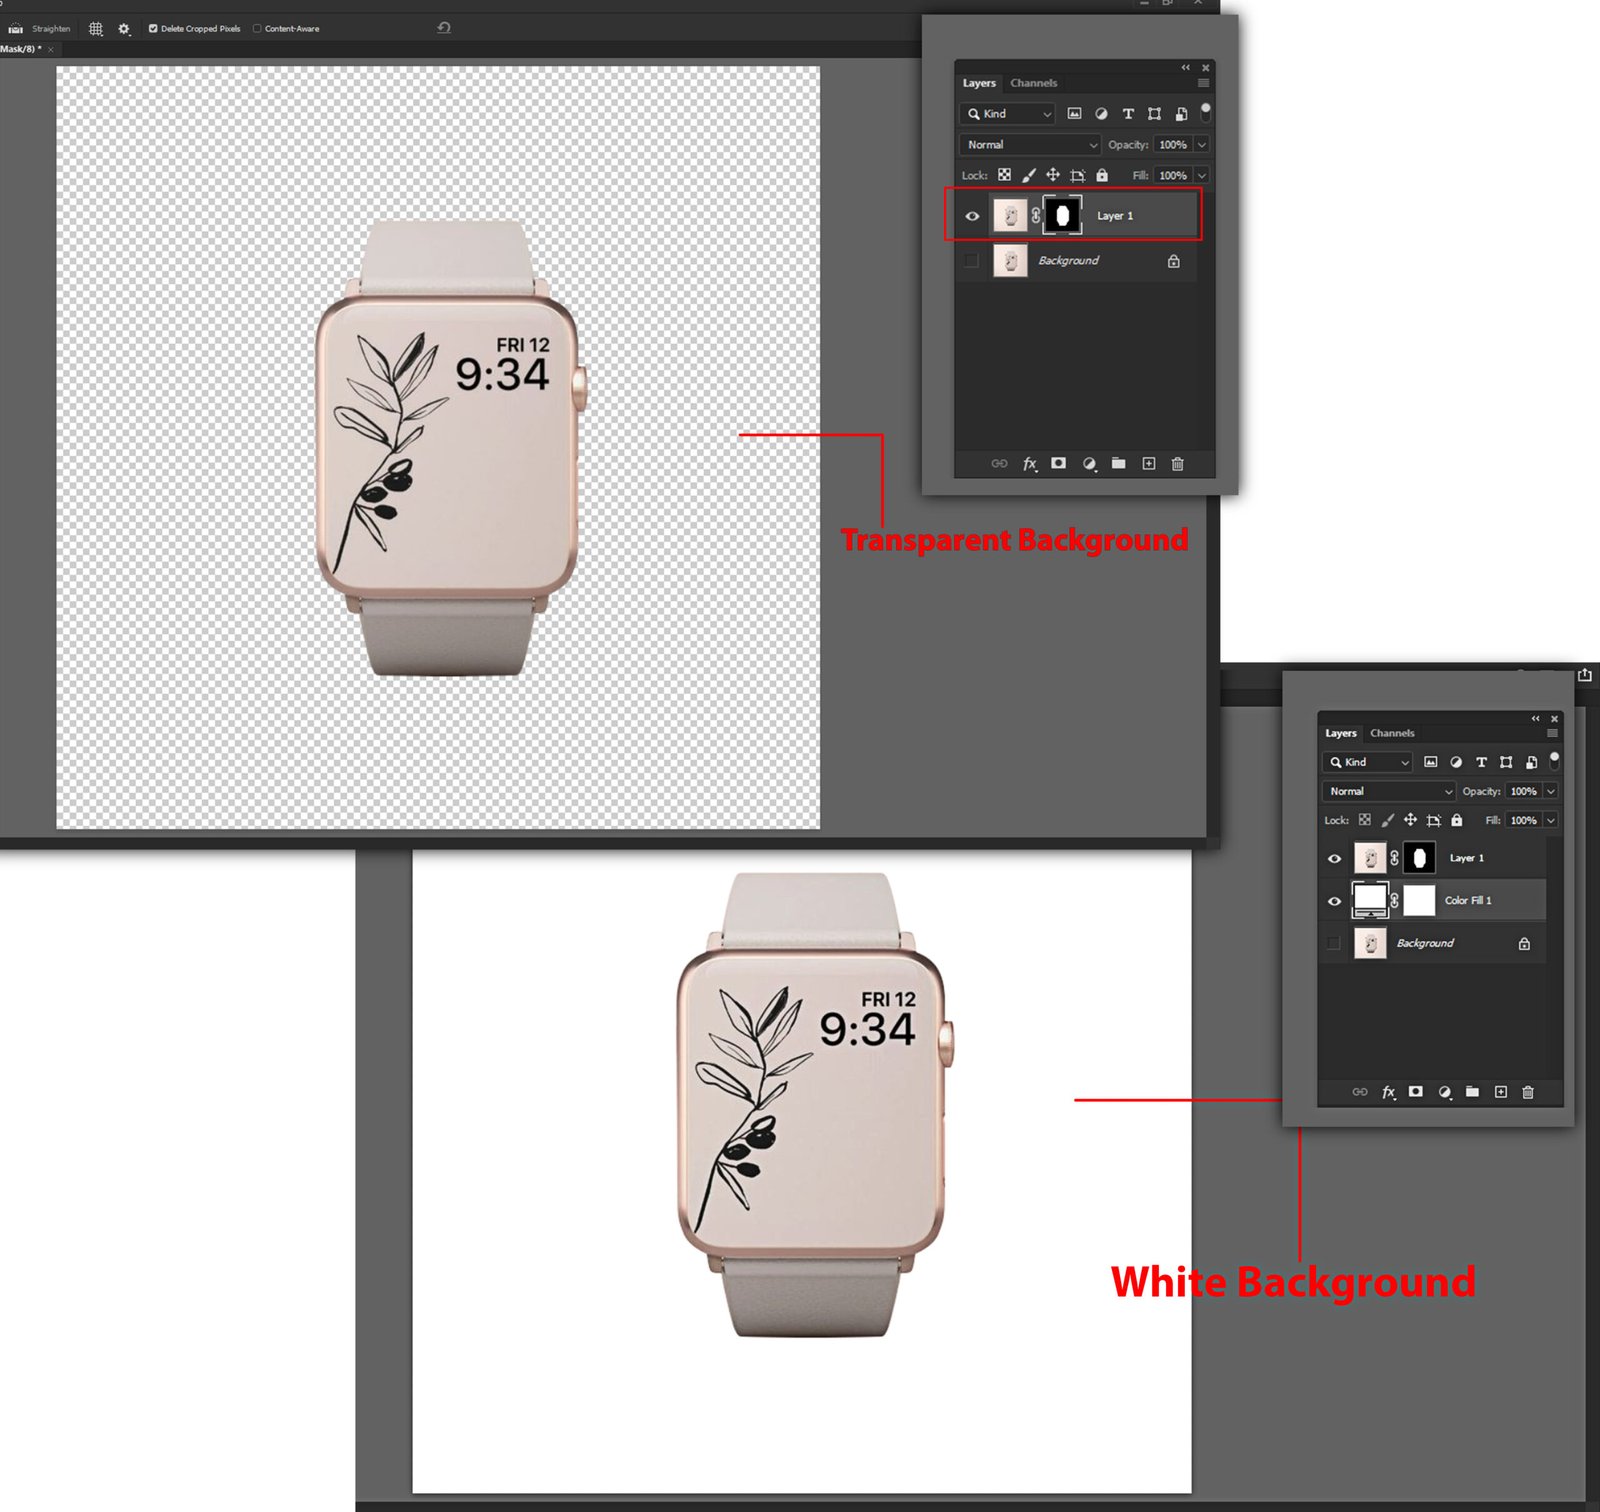
This is one of the easiest methods in this list. Even though the result is not as great and accurate as you’d expect, it is something you can work with when in a hurry. Here’s the procedure you can follow to quickly remove the white background in Photoshop −
Step 1: Open the image you want to work on in Photoshop.
Step 2: Click on the Layer Panel to select a New Layer. Now, copy the original image and paste it on the layer.
Step 3: Hide the background layer with the eye icon on the layer palette.
Step 4: Select the Quick actions menu from the upper right corner. Choose the Remove background tool from there. This feature automatically identifies the white background and converts it to a transparent one.
Step 5: Save the file for further work. Usually, the PNG file retains the transparent background. Being kind of a shortcut, this technique does not give a good result. There might be some rough edges that the tool didn’t pick up and need retouching; regardless, it’s definitely a trick worth trying.
Microsoft Office
Yes, you can actually remove the white background from an image in Microsoft Office. This is a fairly old trick, but it still works great. Here’s how you can do it—
Step 1: Choose the picture you want to work on.
Step 2: From the toolbar, select Picture Format. It should show a Remove Background feature. In case it doesn’t, make sure you select the picture beforehand.
Step 3: The feature should automatically identify the white background area and show it with a magenta-colored mark to specify the area that will be removed. The unmarked area refers to the parts that will be unchanged.
Step 4: Again, the default area that the tool selected might not exactly be correct. In that case, there is an option called Background Removal in the toolbar. If you click on that, you will see two more options: Mark areas to keep and Mark areas to remove. Use the Drawing Pencil to retouch the parts you want to keep or remove for better results.
Step 5: After you are satisfied with the result, click “Keep All Changes” to save the edits. And finally, save it as a separate picture with the Save As picture option. This is a nice little technique that comes in handy when working in the office, and you need to remove backgrounds for any purpose. You can use it in the office or save it as a separate file for further use as well, so it’s definitely a win-win.
Paint 3D
Paint 3D is another old but efficient tool to remove any white background from any image. This technique works great for images with a solid background, like plain white, so you can make them transparent or add a different background.
Step 1: Open Paint 3D and select the file you want to edit. In Windows 10, they updated it to MS Paint 3D.
Step 2: Click the Canvas option from the toolbar at the top of the screen.
Step 3: You’ll see a Transparent Canvas option. Switch it on by sliding to the right. This will switch off any background color.
Step 4: There is an option called Resize Image with canvas down below. If there is a check mark, unselect it.
Step 5: Rearrange the canvas edges closer to the image so it fits inside the canvas. Make sure the part you are planning to keep is inside the canvas.
Step 6: Again, from the toolbar, select the Magic Panel option. You can find this at the far right of the toolbar. It will open the option on the right side of the screen. Choose Next from there.
Step 7: From the next panel, unselect the Autofill Background option.
Step 8: There are also two more icons on the same panel; the pencil is for when you want to add or keep something from the selected part. And the Eraser is when you want to remove something. This keeps the edges more refined and fresher.
Step 9: Now, click on the Canvas option again and turn the Show Canvas option off by sliding it to the left. Step 10: To save your edits, click on the Menu button at the top left corner of the screen. From there, select ‘Save as Image.’
It will give you a bunch more options, like transparency, aspect ratio, image type, etc. Make sure the transparency option is switched on to save the transparent background. Hit Save, and you are done.

Illustrator
Adobe Illustrator is a great application for working with images. So removing a white background or, in fact, any background from an image in Illustrator is extremely convenient and efficient.
Most people like to use illustrators for this purpose, mostly because they can identify the subject from the background with great efficiency. Plus, the finishing result is good enough to be impressive.
Step 1: Open the Illustrator application on your computer and open the selected image in the workspace.
Step 2: From the menu bar, select Window. It will open a drop-down menu. Tap on the Image Trace option to convert it into a vector image.
Step 3: Now, from the menu bar again, click on the View option and select Transparency grid from the resulting drop-down panel. This will show you the background transparency with a chequered pattern.

Step 4: Again, go back to the menu up top and select Object. The drop-down menu will show an Expand option. Go ahead and click on that. There will be anchor points on your vector image at this point. Drag them around to create a shape.
Step 5: Now tap on the part you want to remove and click Delete. Do this for each area until all the background parts are removed.
Step 6: Finally, save the file as a PNG file to keep the transparency.
Final Words
No more annoying white backgrounds in images; that is just a pain to work with. Hope these tricks and techniques will help you in your inquiry on how to remove the white background from any image. From business product photos to simple personal photos, you can get the job done with these amazing tools.