How to Outline Photo in Photoshop: Simple Photoshop Hacks
- February 1, 2025

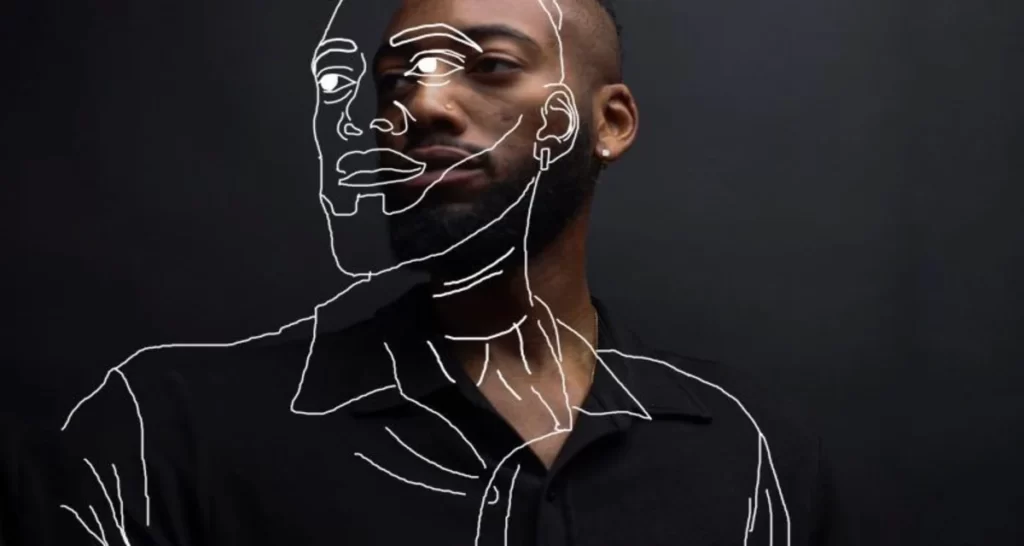
Are you looking to create some simple outlines for your photos in Photoshop? How to outline a photo in Photoshop? This smart trick can be a great way to change the look and feel of your images or make them stand out in a crowded social media feed. Outlining an image can be a smart move to improve your photos’ visibility. You can easily create a picture of a line and let more people know what’s unique about your photo. From agencies to bloggers, many set up their cover photos with outlines, which is an interesting fact, to begin with. While it’s not a complex process, getting the results you’re looking for can be tricky if you’re not sure what you’re doing. This is the reason we have made this Photoshop guide on how to outline a photo in Photoshop.
What You’ll Need
Before you finally begin, you will need a few objects besides Photoshop to perform the trick. To outline a photo in Photoshop, you’ll need:
- The photo you want to outline
- The Photoshop software
- A pen or pencil
- Paper
- A ruler or a measuring tape
- A scanner (optional)
Tracing Your Image
Would you like to learn how to create an outline of an image in Photoshop? It’s not that tough once you’ve figured out what you’re doing.
This Photoshop lesson will show you how to outline a photo in Photoshop. To begin, you must first open the image. Next, from the toolbar, pick the “Pencil” tool.
Now, start tracing around the edges of your image. Again, make sure you’re tracing carefully and accurately so that your outline is as precise as possible.
Once you’re finished tracing the outline of your image, select the “Inverse” option from the toolbar. This step will create a selection around the inside of your outline.
Select the “Feather” option from the toolbar and set it to about 50 pixels. This step will help soften the edges of your outline.
Finally, hit “Ctrl+C” to copy your selection and “Ctrl+V” to paste it into a new document. Save this document as a .jpg or .png file and you’re done!
How to Outline Photo in Photoshop:
Now that you have your original image open in Photoshop, you’ll need to duplicate the background layer first. To accomplish this, navigate to Layer> Duplicate Layer.
Once you’ve duplicated the background layer, you’ll need to add a threshold adjustment layer. Navigate to Layer> New Adjustment Layer> Threshold to accomplish this.
After that, you must invert your image. To do so, navigate to picture> Adjustments> Invert.
Once you’ve inverted your image, you’ll see that your photo is now black and white. You will calibrate the threshold next so that only the outline of your image is visible.
To do this, drag the slider until you see just the outline of your image. Then, when you’re happy with the results, click OK.
Adding a Stroke
When it comes to outlining your photos, you have a few different options. The first is to add a stroke. “Stroke” is the easiest way to get an excellent, clean outline around your photo.
Select the photo and then go to Edit > Stroke. This step will open up the Stroke dialog box. Here, you can choose your stroke’s color, width, and location.
If you are not content with the end results, you may always undo it and start over..
How to Outline Photo in Photoshop: Fill the Object
The following step is to complete the object with your chosen color. Then finally, ensure that you select the Layer that contains your outline (this will be the layer currently highlighted in the Layers panel).
Fill in the object with the Paint Bucket. By selecting a new colour from the Swatches pane, you can modify the colour of the fill. You can also adjust the opacity of the fill by using the slider at the bottom of the panel.
Facts to Keep In Mind While Outlining A Photo:
When it comes to outlining photos in Photoshop, there are a few things you need to know in order to achieve perfect results. Here are a few pointers to get you started:

- Make sure your photo is in RGB mode before starting.
- Select the Pen Tool and set its properties to Paths.
- Choose a colour for your outline that contrasts well with the photo.
- Carefully trace around the edges of the photo using the Pen Tool.
- Select the path by right-clicking it.
- First, copy the selection, then paste it into a new layer.
- Merge the two layers, then save your file as a .jpg or .png.
Conclusion:
When you outline your photos in Photoshop, you do more than add a pretty frame. Instead, you’re creating a visual hierarchy that helps direct the viewer’s eye to the most critical parts of the image. Outlining also gives your photos a clean, polished look that can make them stand out. It’s an excellent method to add flair and individuality to your photographs. So, how to outline a photo in Photoshop? Why not try outlining your photos today? It’s simple to execute, and the results may be breathtaking. So for photographers, the clipping path is a better solution for their images.