How to Save Clipping Path in Photoshop: Protect the Paths
- January 14, 2023
Clipping path in photoshop is one of the best tools for changing backdrop colors, removing objects from their backgrounds, and creating composite product pictures. Once you understand clipping paths, you may rapidly and safely edit your photos.
It’s time to save the clipping path you just produced in Photoshop. Yet how?
Rest assured that we are here to assist you. You can learn how to save your clipping path for later use in this step-by-step guide.
Are you prepared to begin? Move along!
How Does a Clipping Path Work?

An object in a graphic image is selected and isolated using a clipping path, a closed vector path. The clipping path is created by drawing a closed vector around the thing you want to separate.
The clipping path is then used to select the object and delete the background from the image. You can save the Clipping Path as a vector EPS or PDF file when you save the picture.
Making a Clipping Path in Photoshop

You must first open your image in Photoshop to generate a clipping path. When the painting is open, you must select the ‘Paths’ tab at the top of the window.
Once you are in the ‘Paths’ tab, you will need to click on the ‘Create New Path’ button, which is located in the top left-hand corner of the window. Once you have clicked on this button, a new path will be created, and the ‘Pen Tool’ will be automatically selected.
Paths can be made and modified with the Pen Tool. By clicking and dragging on your image, you can utilize it to make any form you like. Once you have completed your desired form, you must right-click on it and select ‘Make Selection.’
You’ll see a dialog box asking you how you want to make your choice. You can choose between ‘Crease Points,’ ‘Anti-Alias,’ and ‘Feather.’ For this tutorial, we will select ‘Feather.’ Once you have chosen it, Photoshop will create a clipping path around the shape you created.
How to Save the Clipping Path
Once you’ve created a clipping path, the next step is to save it so you can use it again. To start:
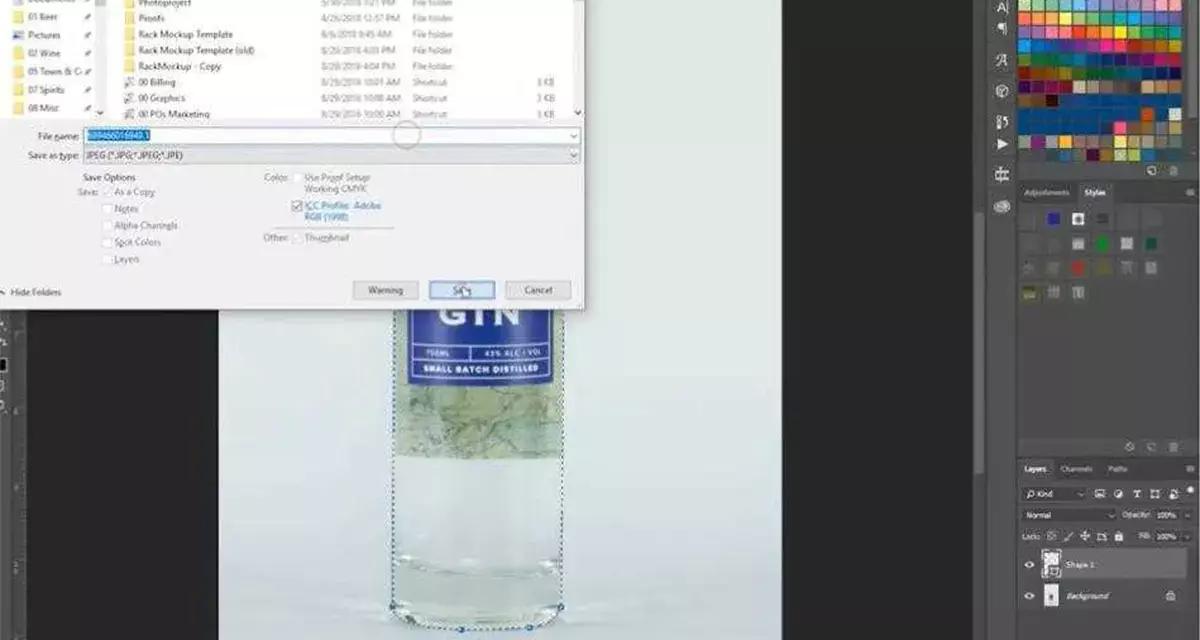
- Select File > Save As
- In the Save As dialog box, select Photoshop from the Format list, and then choose PNG from the compression menu.
- Click Save.
- In the Save PNG dialog box, enter a name for your clipping path and click Save.
Your computer will now save your clipping path as a PNG file.
Calculating the Correct Resolution for Saving the Clipping Path
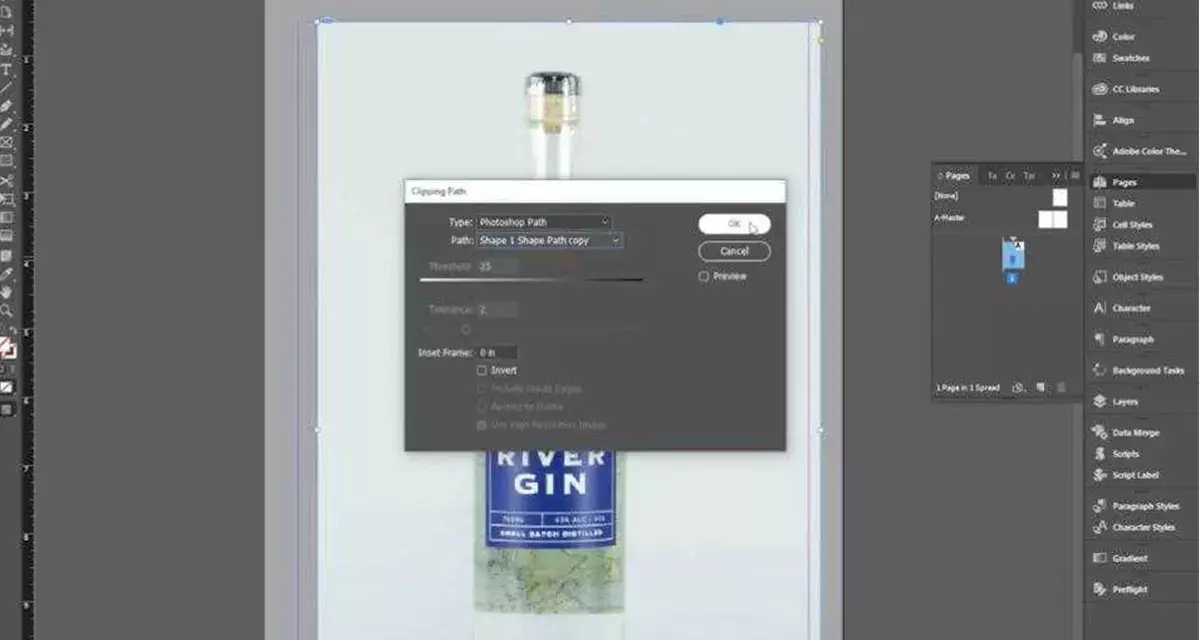
Once you’ve set up your path and made any necessary adjustments, it’s time to save. Generally, you should use an EPS file format with the calculation set to a decent resolution— around 300-600 dpi will do.
But why is resolution important? Well, it all comes down to size. A low resolution will result in an image with lower quality, while a higher resolution means that the image can be scaled up without compromising quality.
So, here’s what you need to do: Select File > Save As and pick your file name and destination. Then, under Format options, select EPS from the drop-down menu. Under the Options section, you can then enter a value for the Target Resolution— usually, anything from 300-600 dpi is fine for web use. And that’s it!
Tips on Saving Complex Paths in Photoshop

Here are a few pointers to assist you because saving intricate paths in Photoshop can be quite challenging. You should always be sure to choose the right path command before saving, first and foremost. This means that if it’s a vector path, use the “Save Path” option. Choose the “Save Selection” order if it’s a pixel selection.
Another piece of advice is to give your path a name that makes sense and is simple to recall. This can help you quickly find and edit your clipping paths in Photoshop. Additionally, note where on your computer you’re saving the ways—you may want to create a folder to keep all of your clipping paths so you can easily access them later.
Finally, if you’re working with many complex paths, consider using Photoshop Actions. Actions allow you to record sequences of steps, so you don’t have to do them manually each time, and they can help save time when it comes to editing your clipping paths in Photoshop.
Export Options for Saving Your Clipping Paths in Photoshop
It’s time to save your clipping path after you’ve finished creating it. You might have a few different export alternatives to think about, depending on the size of your project. Here are a few of the most popular methods for saving Photoshop images: Save as PSD: The clipping path will be stored with the image when you save an image as a Photoshop document (PSD). This is an excellent option for small-medium-sized images or projects that you plan on editing again in the future.
Export As TIFF: Saving as TIFF is another common way to store clipping paths, especially if you plan on sending them off to another designer or company for printing.
EPS: Clipping paths can also be stored as Enhanced PostScript files (EPS). This is ideal if you plan on placing scalable vector graphics (SVGs) like logos into your project and need a high resolution of any size.
Double-check that all your clipping paths are included in the file, no matter which export option you choose, before sending anything off!
FAQ about How to Save Clipping Paths in Photoshop
Here are some free questions added about how to save clipping paths in photoshop:
How can I modify the clipping path?
Release or alter a clipping mask and compound path. You have two options for editing or releasing a clipping mask: Select Object > Clipping Mask > Edit/Release. Alternately, isolate the clipping mask by double-clicking it or by looking for it in the Layers Panel.
How can the clipping route be changed?
A clipping path can be made using an SVG or a variety of simple shapes. Next, remove the portions of an element that you don’t want to display.
- Compatibility with browsers
- Simple forms. round() inset ()
- Box value-based shapes.
- Making use of an SVG element.
- Making the clipped area animated.
How do I combine two images in Photoshop?
- Launch Fotor, then select “Make a Collage.”
- On the dashboard’s left side, click “Stitching.” Select a horizontal or vertical layout.
- Upload the two pictures.
- Drag and drop each image individually into the stitching cell.
- Select “Save.”
Conclusion
When you’re finished creating a clipping path, it’s essential to save it in the correct format so that you can use it again later. Here is a little tutorial showing you step-by-step how to save clipping paths in Photoshop:
Open the file that you want to save the clipping path in Photoshop, Select the clipping path that you want to save, and Go to File > Save As, Select Photoshop Paths from the Format drop-down menu in the Save As dialog box, and Click Save.
It’s just as easy as that. To get more tips like that, be in touch with us.