How to Reduce Photoshop File Size Without Loss of Quality? 2025
- March 21, 2024
Often we face a common mistake in Photoshop i.e. we can’t use the Photoshop file everywhere else. Raw Photoshop files are large files. Sometimes they can exceed up to 22 MB. The large files contain all the information and details often not found in JPEG or other compressed formats. So, how to reduce Photoshop file size without loss of quality?
That is we are to find out! You will find plenty of solutions online. However, many free tools will promise you a safe reduction of file size but that will cost you a significant amount of loss of quality. So, how do you avoid this?
Knock knock! Here we are! Stick to the end of our article and find out how you can reduce Photoshop file size without loss of quality. Let’s find out.
About Photoshop File Size
We must start with Photoshop file size to proceed further in our article. Many people believe that jpeg file sizes are “normal”, yet they are not. Jpeg employs extremely aggressive data compression to shrink files to between 2-10% of their natural size – but at a cost! The compression is damaging, irreversible, and cumulative. If possible, avoid resaved jpegs.
An uncompressed PSD or TIFF is the true, natural file size, measured in bits per color component per pixel.
When you open a jpeg, it gets decompressed back to its original size, which is sometimes much larger than the size on the disc. In reality, an open file lacks a file format. File formats are recipes for packing into a storage container. Jpeg packaging breaks down the file in a way that cannot be entirely recovered.
A full-size preview is still required when working with a linked file. So, in your instance, that’s 20 MB. Additionally, smart objects have a certain overhead.
How To Reduce Photoshop File Size Without Loss Of Quality?
Photoshop’s final PSD file size is frequently rather large when working with graphic assets. In other words, opening, saving, and sharing your file take up unnecessary time. Many designers decrease the resolution of their PSDs to save space on the file. Nevertheless, not only do file sizes decrease while doing this, but quality also does. Here are easy 5 ways to reduce your PSD file size without sacrificing quality.
1) Make A Layer on the Front
The high-definition file previews in Photoshop are heavy. You may avoid loading a large preview and save load time by hiding all of your work beneath a solid white layer on top.
Just adding a solid color layer to the top of your Layers panel is one of the easiest and most efficient ways to reduce the size of huge files. To add another layer on top, use Shift-Control-N. Then, press Shift-F5 to fill it with white. You only need to save your PSD file after that.
2) Adjustment Layers Are the Best
A common step in Photoshop picture editing is to make a copy of the layer for editing purposes. For editing, you can use an adjustment layer instead. It can drop file size significantly. Go to Image > Adjustment to use the adjustment layer.
You can see that by employing this technique, we were able to reduce the file size from 181 MB to 171 MB. A solid color layer may be created very quickly and easily using this approach, which is its major advantage. However, file compression has different outcomes; sometimes it reduces the size of the file by 50%, and other times it just provides a slight compression.
Not all individuals are experienced with Photoshop, therefore it’s crucial to let your clients know about this solid color layer. If they see the document’s white canvas without any design features, they may become puzzled.
3) Remove All the Extras
If you want to know how to reduce file size without losing the ability to alter key layers, consider one more option. My template contains a large number of invisible texture layers that are not used. Now let’s select every layer by holding down Shift and pressing the Delete button.
As you can see, using Photoshop to work with huge files—like painting templates, print templates, and other PSDs with numerous parts—may result in massive file sizes, sometimes lacking features that are necessary for our particular design assignment. You can cut down the file size by 76 MB just by getting rid of the invisible layers that have not been utilized in the final version of the project.
4) Rasterize Smart Object
The smart object layers are rasterized as the next Photoshop file size reduction method. Photoshop filters may be applied non-destructively on a layer called a “smart object” that holds the data of raster or vector pictures. Placeholders in Photoshop templates are also made using smart objects.
We’ll rasterize the smart objects by selecting Right Click > Rasterize Layer. If the placeholder layer is invisible, we may remove it to reduce the file size even further.
We can reduce the file size by 33 MB using this strategy, which is an excellent result. Remember that if you rasterize the smart object, you will be unable to update the filters or change the content of the placeholder. In the same manner, you may apply any layer style to a layer and still utilize the “rasterize layer style” tool on that layer.
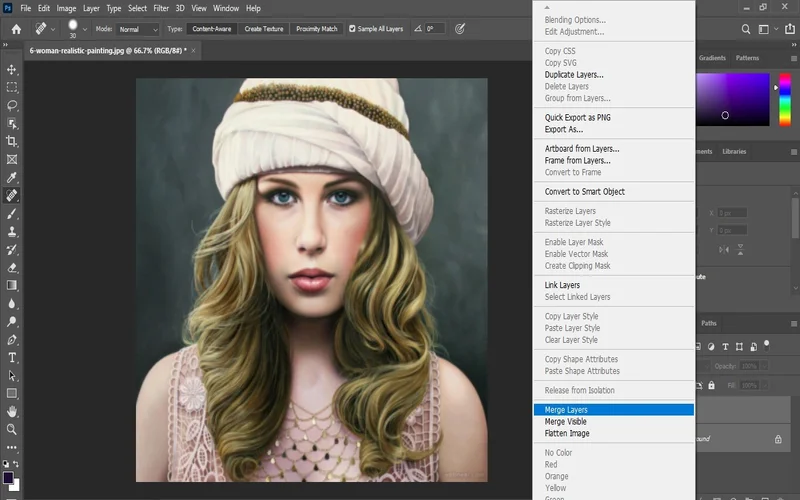
5) Use the Merge Tool
Blending layers together in Photoshop is a fantastic way to reduce file size as well. I have two smart objects in my template that we will combine into one layer using the following method: Hold the Shift key down and select both layers, then Right Click > Merge. We could also simply blend the textures using the same Blending Mode—just remember to adjust the Blending Mode of your merged layer again.
Our goal was to reduce the file size by 35 MB by merging the layers together. Once the layers are fused, the only drawback to this strategy is that you cannot alter the smart object filters or manipulate each texture independently.
Conclusion
Congratulations! Now you know how to reduce Photoshop file size without loss of quality. We have provided 5 useful techniques to help you get down the road. Now you can successfully compress the PS file size without having to worry about the quality.
Your clients are happy, and so are you. Do you need any more help with Photoshop? we offer regular tips and solutions to Photoshop. Follow our daily blogs for more. We are also rich in Photoshop service and always happy to help you if you are in any need. Feel free to reach us for any professional photo editing service.