How to Make 3D Text Effect in Photoshop
- October 8, 2025
In the land of imagery and illustrations, there comes a time when you’ll need to emphasize a particular textbook or point on a website. Emphasis allows you to draw the eye of the anthology and, conceivably, convert a guest into an implicit client. That’s where Photoshop comes in. It has a point that allows you to manipulate the fountain in the textbook and produce three-dimensional objects. Not only does it make textbooks stand out, but it also adds a bit of flair. By learning clever tricks, such as how to create a 3D textbook effect in Photoshop, you can make great advancements in your business. Yes! If you’re looking for a way to add a redundant dimension to your textbook in Photoshop, you must start by creating a 3D textbook effect. With just a few simple ways, you can turn any piece of a textbook into a three- dimensional masterpiece. You’ll discover how to use Photoshop’s 3D tool and other styles to produce a 3D textbook effect in this tutorial.
How to Make 3D Text Effect in Photoshop?
It could feel a little intimidating to utilize the 3D interface, especially if you’re not used to 3D designs. In light of this, this piece has included a technique for making 3D text effects in Photoshop without using the 3D tool.
Method 1: Making 3D Text Effects in Photoshop Without the 3D Tool
Step 1: In order to learn how to make 3D text effects in Photoshop, generate a document in Photoshop. Compose the text on the canvas by first selecting the text tool from the sidebar.
You should pick a bold typeface because it will help display the 3D effect more clearly.

Step 2: Make a clone of the textual layer (3D) and drag it to the left after duplicating the layer.

Step 3: The text on the 3D layer should be changed to a darker shade since it will serve as the “shadow.”
You’ll notice that now the text is beginning to feel three-dimensional by the conclusion of step 3. You’ll also observe that there isn’t much adhesion between the two layers. You suggested rasterizing the text layer first, then using the Lasso tool to fill in the spaces between the two layers of text. Scene geometry is being translated into pixels for projection on a monitor or for printing.
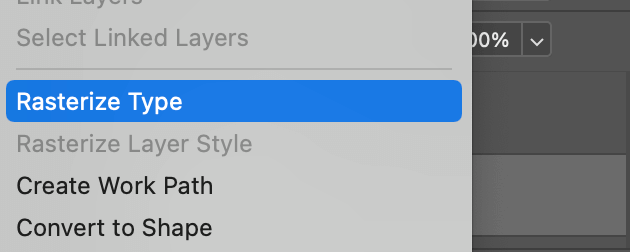
Step 4: From the Layers panel, pick the 3D text layer. Choose the Rasterize Type option.
Step 5: Move ahead on the areas of the text that overlap with the Polygonal Lasso Tool selected.
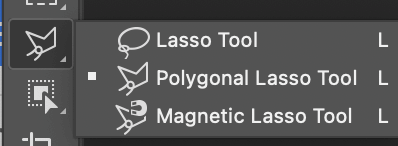
Click to begin the first anchor point, then click again to fill in the desired areas with the darker “shadow” hue.
To refill it with the dominant color, press the keyboard shortcut Option + Delete. The “shadow” color must match your foreground color precisely.
Now that the gaps are not here, press Command + D to deselect. For every gap, repeat the process.
It could be trickier if there are curves. You can make a selection with the pen tool, then pick Make Selection from the context menu by right-clicking.
To fill, press the Option + Delete keys.
You can combine the layers or apply layer styles to give it a special effect.
To give it a little bit of a blended look, you can also add a layer mask.
Method 2: Creating the Effect Using 3D Tool
Step 1: Write on the canvas in a new document. The same with the previous technique, it is advised that you use a bold font and, if you’d like, alter the text color.

Step 2: Select the 3D option and follow up by selecting 3D Extrusion

Step 3: Look out for the properties panel. Coordinates are in the Properties panel. You must also set the X value to a 90-degree angle.

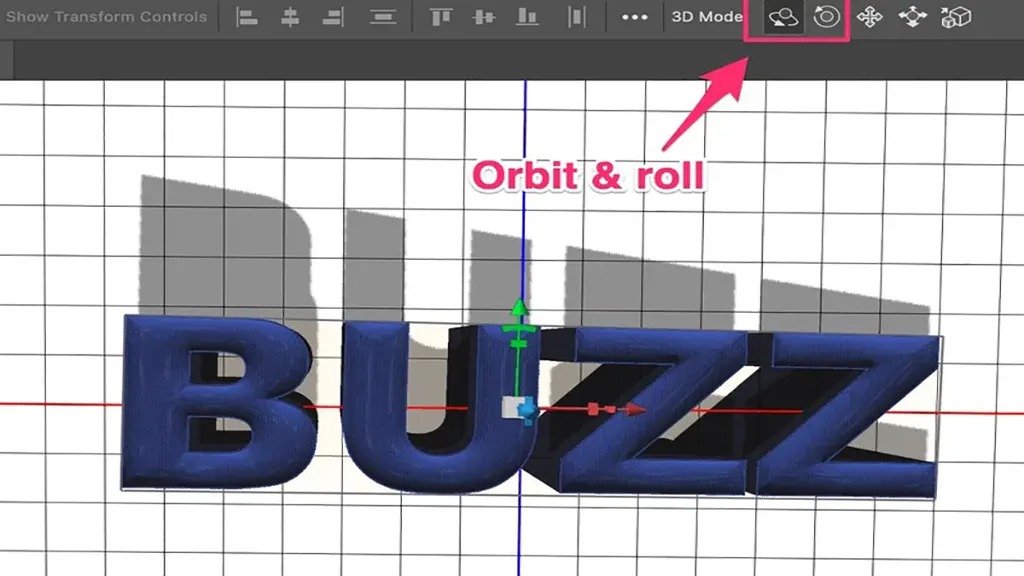
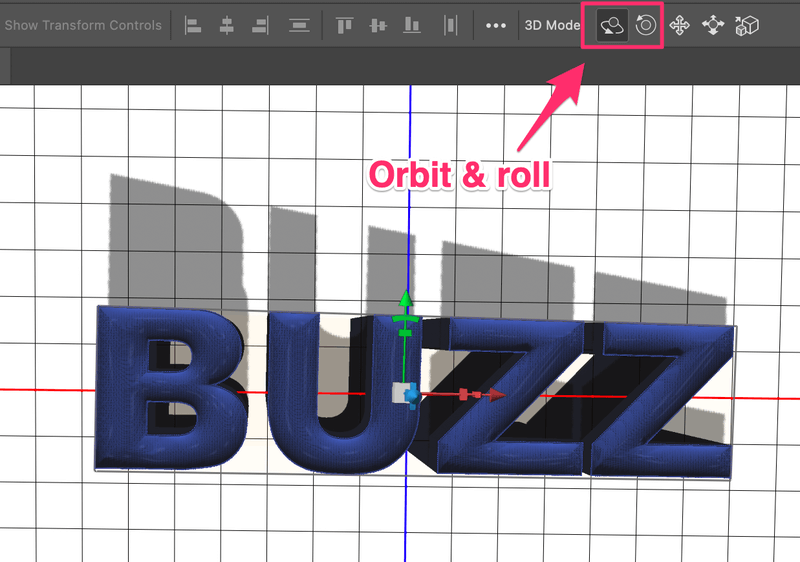
Step 4: From the top toolbar, choose Orbit the 3D Camera.

You’ll see that the shadow is quite a distance away. To change the shadow, simply click and drag the axis in the text’s center. You can notice that the shadow is closer to the text than it was previously.
If you want the darkness gone. Access the Properties panel and unlock the Cast Shadowbox.
In essence, you’ve already constructed the 3D text , but you can still add more effects to it. If, however, you are satisfied with it as is, skip to Step 8 and produce the 3D effect.
You can use your mouse to rotate the camera and move the text to a different part of the canvas.
Step 5 (Optional): From the properties panel, choose the Cap option. The curve and bevel make the shadow appear rather artificial. Additionally, you can enhance the text’s illumination.
Step 6 (Optional): Select the Filter By button. Choose the Lights option from the menu on the 3D panel.
You can set an angle by moving the circle after clicking on the handle to modify the light source by changing the lighting type, color, brightness, and shadow type on the Properties panel.
In case you may want to give your panel a new light source. Go to the 3D panel and choose New Infinite Light. It should be located at the bottom.
Step 7 (Optional): You can alter both the text’s color and composition. Select the Materials icon from the 3D panel. To alter the color or textures, select every option and then navigate to the Properties panel.
Step 8: You may want to render the text effect. You should be able to locate the Render option on the screen. Don’t panic if your Photoshop takes time because rendering may take some time.
You are done now! I am pretty sure that with a little practice, you can also help others learn how to make a 3D text effect in Photoshop.
Conclusion
There you go! An honest approach to learning how to make a 3D text effect in Photoshop. You can use these tricks to create 3D text either for your presentation or for your website. The 3D tool gives you more editing possibilities and a more realistic 3D appearance. The approach would be more than sufficient for a quick graphic 3D text effect. While the method above is clear, we appreciate the fact that there are some who don’t have the time or the technical know-how. Get in touch with us today. Our Photoshop experts are more than happy to help you through the process.