How to Edit Real Estate Photos – Impress Clients to More Sales
- October 6, 2023
When it comes to selling or renting properties, first impressions matter a lot. Hence, you must learn how to edit real estate photos.
In today’s digital age, potential buyers and renters often begin their search online, making it essential for real estate professionals to present stunning photos of properties.
Editing real estate photos can significantly enhance their appeal and help you stand out in a competitive market.
Today, in our guide, we will walk you through the step-by-step process of editing real estate photos to make them more appealing and engaging to potential clients.
Why Edit Real Estate Photos?
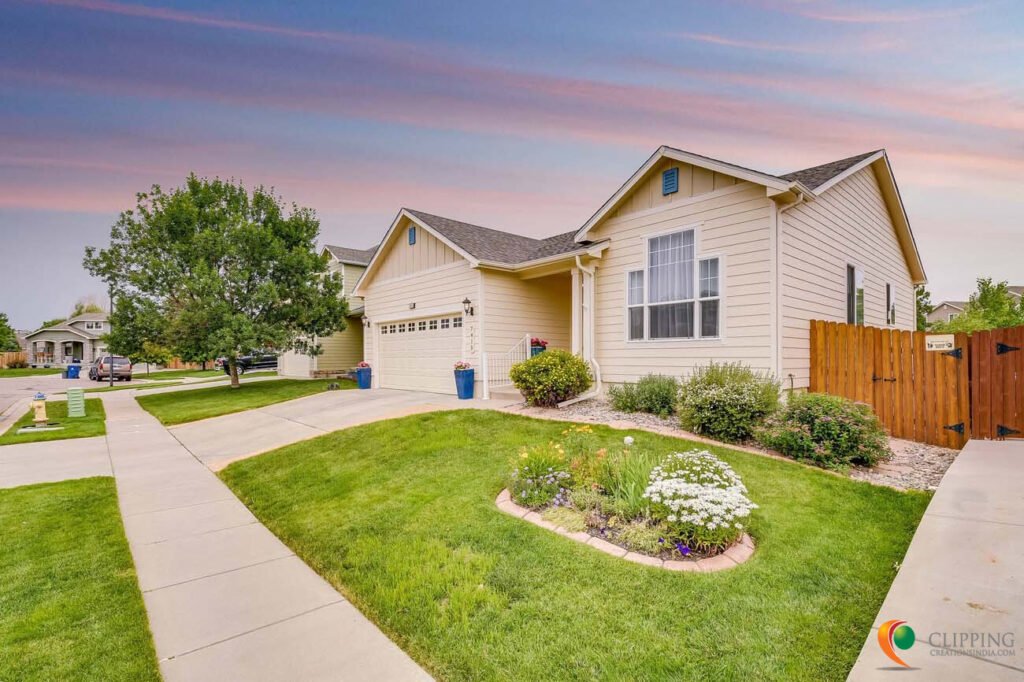
Editing real estate photos is like making a house look its best for a photoshoot. Just like people want to look good in pictures, homes need to look their best to attract buyers or renters. Here’s why editing real estate photos is essential in simple words:
- Better First Impressions: When people look for homes online, they want to see pictures that catch their eye. Edited photos make homes look more attractive and inviting, which can grab their attention.
- Showcasing Features: Editing helps highlight the best parts of a house. It’s like using makeup to enhance your best features. You can make rooms look brighter, cleaner, and more spacious.
- Fixing Mistakes: Sometimes, photos don’t turn out perfect. They might be too dark, too bright, or have unwanted things in them. Editing lets you fix these issues and make the photos look just right.
- Standing Out: In the real estate market, many houses are competing for buyers or renters. Well-edited photos can make your property stand out from the crowd. It’s like wearing a unique outfit in a sea of plain clothes.
- Online Appeal: Most people start their home search on the internet. Edited photos make your property look great online, which can attract more potential buyers or renters.
Keep reading,
- Looking Professional: When you use edited photos, it shows that you care about the property you’re selling or renting. It makes you look professional and trustworthy.
- More Interest: Eye-catching photos get more attention. When people see beautiful pictures, they are more likely to ask about the property or schedule a visit.
- Saves Time and Money: Editing can sometimes replace the need for expensive staging or renovations. For example, you can virtually add furniture to an empty room without buying any.
- Easy Sharing: Well-edited photos are easy to share on social media and property listing websites. This can help more people see your property.
- Building Confidence: Great photos make potential buyers or renters feel confident about the property. They can see it clearly and feel good about considering it for their new home.
In short,
Editing real estate photos is like putting on makeup for a house. It makes the property look its best, attracts more interest, and helps in selling or renting it faster and at a better price.
How To Edit Real Estate Photos?
It involves a set of steps for beginners and professionals. Follow the steps and bring out top-notch real estate photos to impress your clients.
Equipment and Setup
Before you start editing, ensure that you have the right equipment and a well-planned setup for capturing high-quality real estate photos. Use a DSLR camera, a sturdy tripod, and a wide-angle lens to capture more of the room.
Capturing the Right Shots
Taking excellent photos is the first step in creating stunning real estate images. Pay attention to lighting, angles, and composition to showcase the property’s best features.
Organizing and Backing Up Photos
Organize your photos into folders and create a backup system to ensure that your images are safe in case of data loss.
Choosing the Right Editing Software
Select a photo editing software that suits your needs and skills. Adobe Lightroom and Adobe Photoshop are popular choices, but there are many other options available.
Step-by-Step Editing Process
Now that, you have passed the pre-steps to edit real estate photos, the final steps begin here.
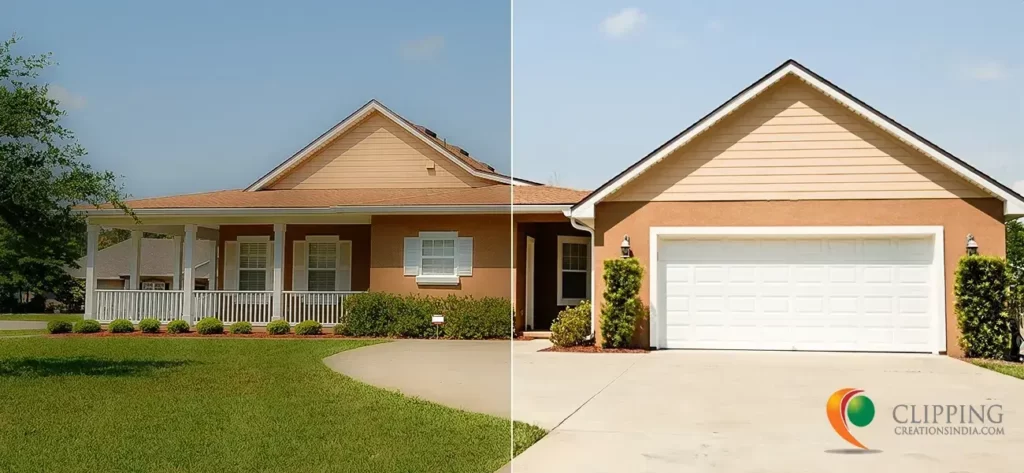
Color Correction:
Start by adjusting the colors in the photo. Make sure whites look truly white, not too yellow or blue. Correct any color imbalances to make the image look more natural.
Exposure Adjustment:
Correct any parts of the photo that are too dark or too bright. You want the whole image to have balanced lighting. This step ensures that details are visible in both well-lit and shadowy areas.
Straightening and Crops:
Straighten the photo if it looks tilted. This can make the property look more professional. Also, consider cropping the image to remove any distracting or unnecessary elements on the edges.
Removing Unwanted Objects:
If there are things in the photo that shouldn’t be there (like a messy room or a parked car), use a tool to remove them. It’s like erasing things you don’t want in the picture.
Enhancing Details:
Sharpen the image to make it look clearer and more detailed. But don’t overdo it; too much sharpening can make the photo look unnatural.
White Balance Adjustment:
Ensure that the colors in the photo look realistic and pleasing. If the lighting was off when you took the picture, this step can fix it.
HDR (High Dynamic Range) Processing:
If the photo has very bright and very dark areas (like a room with a sunny window), you can merge multiple shots to capture all the details. It’s like combining several pictures to get the best of each.
Add Blue Sky (Optional):
If the sky in an outdoor shot looks dull, you can replace it with a nicer, bluer sky to make the photo more inviting.
Virtual Staging:
If a room is empty, you can add virtual furniture or decorations to help potential buyers or renters visualize how the space can be used. It’s like digitally furnishing a room.
Noise Reduction:
If the photo is grainy or noisy, especially in low-light conditions, use noise reduction tools to make it smoother and cleaner.
Final Touches:
Lastly, make any final adjustments like adding a bit of vignette (darkening the edges) or using graduated filters to enhance the photo’s overall look.
Few More Tips!
After you are done, you should never be out of the process! There’s still a lot to do to bring the final output of a real estate photo. They are,
- Maintain a consistent editing style across all your real estate photos to create a cohesive portfolio.
- Export your edited images in a format suitable for online listings and print materials. JPEG is a common choice for online use.
- Be honest in your editing. Do not misrepresent the property by removing structural flaws or altering the appearance of neighboring properties.
Conclusion
Editing real estate photos is a crucial part of showcasing properties effectively. With the right equipment, techniques, and software, you can transform ordinary images into stunning visuals that attract potential buyers and renters.
Plus, detailed knowledge on how to edit real estate photos, will also help you succeed in the competitive real estate market.
Remember to maintain consistency in your editing style and uphold ethical standards to build trust with your clients. Following the steps outlined in this guide, you can master the skill of editing real estate photos and creating a strong online presence for your property listings. Keep an eye on our blog section for more updates like this.