cci logo

Clipping Creations India

  • Home
  • Services
    • Background Remove
    • Clipping Path Service
    • Multi-Clipping Path
    • Ghost Mannequin Services
    • Car Photo Editing
    • Image Masking Service
    • Product Photo Editing
    • Image Masking
    • Drop Shadow
    • Color Changes
    • Photo Retouching
    • Vector services
    • Color Change Service
    • Photo Editing Service
  • About Us
  • Blog
  • Pricing
  • Contact Us
  • Free Trial
Home  »  Tutorial   »   Become A Master of Clipping Path In Photoshop Using CS5/CS6

Become A Master of Clipping Path In Photoshop Using CS5/CS6

  • Arafin Sardar
  • December 10, 2022
  •  
    • Tutorial

In the E-commerce sector, potential customers are attracted by lifelike product photos. And that leads to increased sales. So, the seller or manufacturer has to rely on clipping path in Photoshop to create vivid pictures. Its demand is so high that people end up hiring clipping path service providers.

Luckily for you, this article on how to create clipping path in Photoshop CS5 and CS6 can help you save some money as well as time. Get your Photoshop software installed and have a look at these steps before starting! 

Table of Contents

Toggle
  • How to Create a Clipping Path in Photoshop
    • Upload the Image
    • Enable Pen Tool
    • Select New Path
    • Start Outlining
    • Add Changes If Necessary 
    • Save Path
    • Create the Clipping Path
    • Create a Clipping Mask
  • Shortcuts for Performing Clipping Path in Photoshop
  • FAQ About How to Create Clipping Path in Photoshop
    • Is the magic wand tool better than the pen tool in Photoshop cs6?
    • Can you create multiple paths in Photoshop cc?
    • Are clipping path and clipping mask the same in Photoshop?
  • Final Words

How to Create a Clipping Path in Photoshop

Some of you might consider clipping path in Photoshop a tedious task to perform. But to create a clipping path, you just need to follow these 8 steps –

How to Create a Clipping Path in Photoshop


Upload the Image

First and foremost, you will have to launch Adobe Photoshop. From the File menu, choose the Open option for uploading your product image. 

Read more: Best Outdoor Product Shoot Ideas 
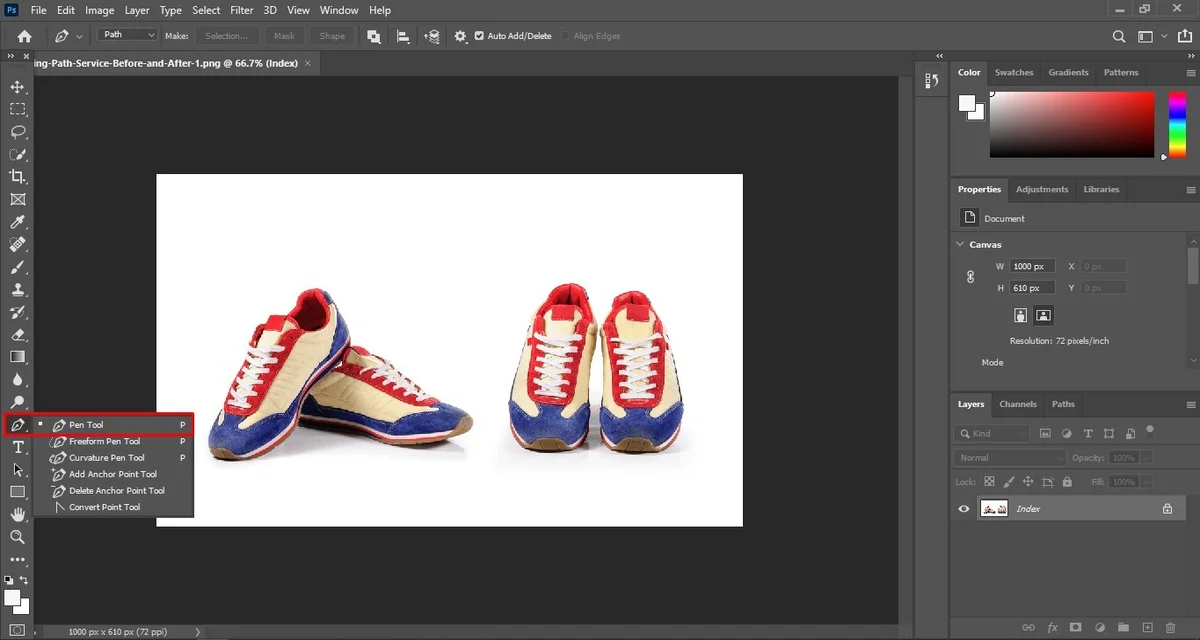
Enable Pen Tool

After uploading the image to photoshop, proceed to select the Pen Tool.  You can spot it in Toolbar, located on the left-side screen. 

pentool

Select New Path

The Path found on the options bar provides the users with various path selection tools. For selecting objects, freely choose the Combine Shapes option among the others. 

Select New Path

Start Outlining

This has to be the most time-consuming step. Use the pen tool to draw a path  surrounding the object. Zooming the object’s sides as you draw along the object will ensure that the paths don’t cross the edge. 

Add anchor points close to the sides until you have the object completely covered up. Sometimes, objects consist of inside paths, for instance, a handbag. In such cases, drawing the inside paths is a must. Doing this will produce lifelike image editing. 

Add Changes If Necessary 

Let’s be honest here; it is nearly impossible to get the paths right every time. Luckily, clipping paths in Photoshop cs5 do have their advantages, as you can adjust the paths to your liking. 

In that case, choose the Path Selection Tool which is located on the left side of the Toolbar. Now, move and stretch the paths as required. Do remember to close the path once you are done. 

Save Path

After all the hard work, it’s finally time to seal it off. From the Path Panel select the Work Path twice. Then save the path with any name you want. 

Select New Path

Create the Clipping Path

For this, open the Path tab under the Layers panel. From the drop-down menu, select the Clipping Path option. Now a dialog box should appear. 

Now, increase or decrease the Flatness to adjust the smoothness of your edges. Finally, clicking on the Ok will automatically create the clipping path. 

Create a Clipping Mask

Hold on to your horses, your task is almost over. The only task remaining is removing the isolated background layer.

To do so, open the Layers panel where you will notice a Layer Mask icon. Click on the icon twice to add layer mask to your photo. 

Now, your object will be completely isolated from the previous background. But before you forget, do save that image!

Shortcuts for Performing Clipping Path in Photoshop

For graphic designers who are mounted with loads of photos to edit, some shortcuts can save a lot of valuable time. We have stormed down some of the most useful ones for clipping path in Photoshop.

  • P: Press on P whenever you want to select the Pen tool.
  • H: Press on H to select the Hand tool. 
  • Control +: When you need to zoom into the picture for better path outlining, simply press the control button and + to get the work done for you.
  • Control -: Similarly, whenever you are done with the outlining task, press CTRL and – simultaneously to zoom out of the image. 
  • A: If you want to adjust your points created by the Pen tool, you can use A to select the Direct Selection tool. 
  • Shift and Click: In case you want to toggle the Layer Mask, just select Shift and click the right button to get it done easily. 
  • Shift + Control + N: For creating a new layer combining the Shift, CTRL, and N is the easiest option. 
  • F7: Sometimes, the Layers Panel can get in your way. So, to hide it, click on F7. The same step will work when you want to reveal the Layers panel. 
  • ALT + Click: When you want to create a corner at any point on the path you made with the Pen tool, simply select ALT and Click to get the work done quickly. 
  • Shift+ Click: You can press Shift and Click while toggling with Layer Mask. 

FAQ About How to Create Clipping Path in Photoshop

If you get the way to create clipping path in photoshop and solutions all commonplace questions then must follow the bellow section. here you will get all the confusing feedback.

The clipping path is necessary to remove any unwanted elements from an image, including logos, backgrounds, text, and other features. Here is a selection of frequently asked questions by users to help you before you master the Photoshop procedure.

Is the magic wand tool better than the pen tool in Photoshop cs6?

The magic wand tool is nowhere near providing the accuracy of the pen tool. It might seem like a good shortcut, but the result is not satisfactory. 

With some time and practice, you can draw perfect paths in the same time period to fix the mess left out by the wand tool. 

Can you create multiple paths in Photoshop cc?

Do the following steps to create multiple paths – 

  • Choose any path from the path palette. 
  • Again, click on another path from the palette to combine both paths. 
  • Carry on with steps 1 & 2 until all your paths are combined. 

Are clipping path and clipping mask the same in Photoshop?

No, the clipping mask and clipping path in Photoshop are not the same. Both of these perform the same task, but the process is certainly different. Pen tools are used to clip paths. 

But masking calls for other important tools such as the Refine Mask, Background Erase, etc. 

Final Words

To wrap things up, it’s safe to say that the clipping path in Photoshop cs5 and Photoshop cs6 is fairly easy. You will just have to get some practice done with the pen tool, as the other steps consisting of creating clipping paths and layer masks are not much complicated. 

Keeping all the steps on how to create clipping path in Photoshop in your mind, will surely help you obtain great results in less time. Now, select that pen tool and start editing masterpieces that will make your photos stand out from the crowd! 

(Visited 140 times, 7 visits today)

Post navigation

< Previous
Next >

Leave a Reply Cancel reply

You must be logged in to post a comment.

Top Services:

  • Clipping Path Service
  • Car Image Editing Service
  • Ghost Mannequin Service
  • Product Photo Editing Service
  • Multiple Clipping Path Service
  • Ghost Mannequin Service
  • Color Change Service
  • Drop Shadow Service
  • Color Change Service
  • Photo Editing Service
  • Image Masking Service

Popular posts:

  • How to Move Eyes in Photoshop and Online ToolsMove Eyes in Photoshop
  • See Through Cloth In Photoshop − Best PracticeSee Through Cloth in Photoshop Feature image
  • Easy Steps to Learn Clipping With Gimp [Easier Than…Clipping With Gimp
  • How to Reverse Video in Photoshop: Photoshop Hacks 2025How to Reverse Video in Photoshop
  • How to Create an Alpha Channel in Photoshop?clipping path service Feature
  • How to Export Photoshop Actions in 2025How to export Photoshop actions
  • How To Fix A Lazy Eye In Photoshop 2025Lazy Eye Problem Here’s What to Do,
  • 10 Professional Photo Manipulation Artists You Must FollowPhoto-Manipulation-Artists
  • How to Fix a Dark Polaroid Picture? Easy Solution to…How to Fix a Dark Polaroid Picture?
  • How to Swap Eyes in Photoshop? 2025 All-Inclusive Guide How to Swap Eyes in Photoshop

Recent Post

  • Car Background for Photo Editing – Tips and Tricks for Stunning Car Photos
  • The Benefits of Outsourcing Real Estate Image Editing USA: Smart Move
  • How to Swap Eyes in Photoshop? 2025 All-Inclusive Guide 
  • See Through Cloth In Photoshop − Best Practice
  • How Real Estate Photo Editing Increases Sales in the USA

Categories

  • Photo Editing
  • Tutorial

Archives

  • May 2025
  • December 2024
  • November 2024
  • October 2024
  • March 2024
  • February 2024
  • January 2024
  • December 2023
  • November 2023
  • October 2023
  • September 2023
  • August 2023
  • July 2023
  • April 2023
  • March 2023
  • February 2023
  • January 2023
  • December 2022
  • November 2022
  • October 2022
  • September 2022
  • August 2022
  • June 2022
  • April 2022
  • November 2021
  • October 2021
  • July 2018
  • May 2018
  • April 2018
  • December 2017
  • September 2017
  • August 2017
  • July 2017
  • June 2017
  • May 2017
  • March 2017

About CCI

Here, every pixel tells a story. We offer our unparalleled service and invest our most talented minds at your solution whether you are a photographer or an agency.
We are the gateway to exceptional photo editing services!

Get Your Quote

Quick Menu

  • About Us
  • Services
  • Blog
  • Terms and Conditions
  • Privacy & Policy

Payment Method


Get In Touch

+8801715-491890

hello@clippingcreationsindia.com

Canada Office: 1401-2900 Carling Ave. Ottawa, ON, K2B 7J6

+14168973175

India Office: C-20, Lajpat Nagar 3, New Delhi, Delhi 110024, India

Bangladesh Office: House 1, Main Road, Block G, Bnasree, Dhaka 1219

Copyright © 2012-2025 Clipping Creations India | All rights reserved.

  • Facebook
  • Twitter
  • Instagram
  • Pinterest
  • LinkedIn

Live Chat