How To View Clipping Path In Photoshop For Beginners
- April 22, 2025
In this age of digital media, who doesn’t need image editing tools these days, right? No matter if it’s for self-interest or business purposes, when it’s about photo editing software, Photoshop is undoubtedly one of the first choices for customers. And then there comes the clipping path option in Photoshop. This is one of the incredible tools that help cut, remove, or ‘clip’ any item or portion of the image to manipulate the image background as needed. However, viewing or creating a clipping path in Photoshop might confuse you. Well, no worries! In this article, we’ll walk you through the step-by-step procedures on how to view clipping paths in Photoshop. So, without further ado, let’s dive deep into it.
How Is Clipping Path Useful in Photoshop?
Among lots of advantages, the following are the most beneficial ones –

Image Part Extraction
Using a Clipping Path lets you easily isolate any object from its background in an image. And you can illustrate the photo with a variety of backgrounds and colours.
Further Editing Flexibility
Additionally, you can edit logos and illustrations to make them look more eye-catching, and web images and banners to stand out more. Plus, you can also create stunning architecture and interior designs in Photoshop.
Colour Changing Facility
With the help of the clipping path, you can not only change the colour of the clipped portion of the photo, but also the background of the photo according to the colour combination.
Placing a Photo in a Composite Photo
You can easily place your preferred product in the photo alongside numerous other products.
Photo Displaying with Transparency
One of the facilities you get is a transparent background for your photo. That’s how you can display the photo with proper transparency.
Read more : Why Photo Industry Need Clipping Path
10 Step Guide to View Clipping Path in Photoshop
Generally, creating and viewing clipping paths in Photoshop is quite simple once you understand the software’s interface. Here we’ve categorised the steps into four stages. So, let’s get to know how to view clipping paths in Photoshop.

Stage #1: Launch Photoshop & Understand the Interface of the Tool
Step 1: Upload the Image First
- First, open Adobe Photoshop
- Go to file > Open
- Select the photo
- Upload the selected photo
Step 2: Set Up the Pen Tool from the Toolbar Option
- Go to the Functions on the top.
- Find Toolbar
- Select the option ‘Photoshop Pen Tool’
- Press ‘P’ to automatically get the option
Step 3: Select the Option of a New Path
- Go to the application window
- From Pen Tool settings, select ‘Path’
- Select ‘Combine Shapes’ for the shape layer
Stage #2: Drawing the Path
Step 4: Draw the Image According to the Shape of the Uploaded Image
- Now, draw the path along with the edges of the image using your mouse with a click
- But don’t release the mouse, and click to the next point of the image edge
- Firmly fix the curve and release the mouse
Step 5: Now Draw the Clipping Path Around the Image and Apply
- Use ‘Direction Selection Tool’ for tweaking or modify the path
Stage #3: Save the Path
Step 6: Create the Selection from the Clipping Path
- Go to Windows > Paths; you’ll find Paths Panel
- Select the path with ‘Ctrl+Enter’
- Click on the Work Paths. Name the path to work with multiple clipping paths
- Go to the Panels menu and select save path
Step 7: Modify the Path and Smoothness
- For smoothness, Go to Select > Modify. Click on Feather.
- Or press ‘Shift+F6’ in order to get smoothness
Stage #4: Importing into Design
Step 8: Copy the Background Layer and Layer Panel
- Go to Windows > Layers; a dropdown menu will pop up
- Now go to the layer panel
- From there, make background layer duplicates before posting
- Copy the layer mask as well
Step 9: Select the Solid Color Layer and Save the Path
- After copying the background position, pick a medial position and select a solid color layer
Step 10: Consider Saving It As Photoshop EPS from the File Menu
- Go to the panel path
- Panel Path > Work Path
- Click on the four lines you’ll find on the upper right side of the panel
- Select Save Path
- Name the path and save it
Step 11: The image Is Ready to Use Now!
- Now, the image is prepared according to your preference. You can further work on it using other software like Illustrator, InDesign, Photoshop, etc.
Distinguishing Between Clipping Path and Image Masking
People often get confused between Image Clipping Mask and Clipping Path. Even though both tools are used to separate an image’s foreground from its background, there are differences in methodology.

Tool Function
Pen Tool is used for Clipping Paths to separate backgrounds. Image Masking is integrated with three different approaches: Layer Mask, Clipping Layer & Alpha Channel Mask Button. They are also familiar with Background erase, Refine, or Magic erase.
Image Detailing
Image masking is used for extracting exquisite details. In contrast, the clipping path is selected on easily adjustable images.
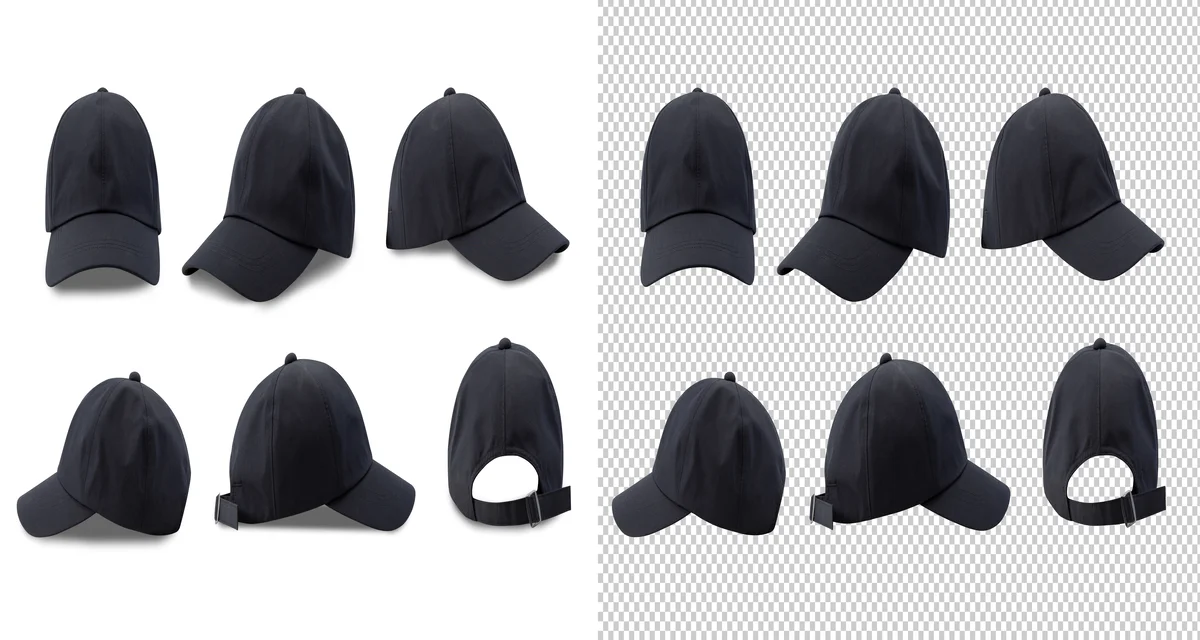
Background Adjusting Flexibility
Image masking is a colour-separation technique that controls background image transparency. On the other hand, the clipping path provides a transparent background in a checkerboard pattern for further editing.
Things to Consider While Creating Clipping Paths
If this is your first time creating a clipping path in Photoshop, the following info will help you do it more efficiently.
Quality Consideration of the Image
When creating a high-quality clipping path, no option beats the Pen Tool in Photoshop. But if someone tells you to use the Magic Wand Tool for creating clipping paths, don’t pay attention to that. Because no matter how many times people say about the usefulness of this shortcut technique, it will ultimately provide you with an unrefined outcome, like most other quick fixes.
Pro Tips: Touch-up on Cutout Edges
When you require a white background, you can soften the cutout edges and give the image a smoother finish. To do that –
- Select Layer > New Layer > Layer via copy.
- Select the background layer and set the transparency to White.
- Now, go to the Main Menu and click on Select > Feather.
- There, you provide a 1-pixel value and press Ok.
- Now select Add Layer, and the image’s edges will eventually soften.
Conclusion
Well, now you know the step-by-step procedure on how to view a clipping path in Photoshop. Clipping path tools will always be essential, no matter personal or commercial purposes. The more digital media advances, the greater the use of the tool will be. However, we hope you’re now familiar with the clipping path creation process in Photoshop CC, as well as in CS5 and CS6. Remember, you should be very subtle while clipping paths. That’s how you can obtain the most efficient result.