How to Edit Car Photos? Shiny Car Photos for Successful Sales Conversion
- October 22, 2023
Ever gazed upon those sleek, magazine-worthy car photographs and thought, ‘How on Earth did they do that?’ You’re not alone! These captivating images, with their perfect lighting and mesmerizing reflections, have left many in awe. So, how to edit car photos?
But guess what? With the right techniques and a dash of passion, you too can capture that same charm. So, whether you’re an aspiring photographer or just someone who loves cars, it’s time to rev up your skills.
Buckle up, because we’re driving deep into the world of automotive photography. Together, we’ll navigate through the essentials, from the best angles to the secrets of lighting.
By the end of this journey, you’ll be turning your ordinary car snapshots into dazzling works of art. Engines ready? Let’s get into the world of picture-perfect car photography!
Successful Tips to How to Edit Car Photos:

Car photography combines skill and art. After taking the picture, editing is key. Good edits can make the car look even better, highlighting its details and shine. Here’s a guide to how to edit car photos with editing tricks.
You Can Use?
Before you dive into the world of car photography editing, it’s crucial to have the right tools at your disposal. The right software can make or break the final look of your images, turning them from plain to phenomenal.
Advanced Software Options:
Adobe Photoshop: This is the titan of image editing. Its vast array of tools, filters, and plugins makes it a favorite for many professional photographers. Whether you’re looking to retouch minute details or make major compositional changes, Photoshop has got you covered.
Adobe Lightroom: Primarily known for its photo management capabilities, Lightroom also boasts a robust suite of editing tools. Perfect for color correction, exposure adjustments, and batch processing, it streamlines the editing workflow.
Alternative Software Choices:
Capture One: This software is praised for its color-grading prowess. Many photographers prefer its tethering capabilities and the control it offers over image details to how to edit car photos.
DxO PhotoLab: With its outstanding noise reduction technology and optical corrections, DxO PhotoLab is a gem for those aiming for technical perfection.
GIMP: Standing for GNU Image Manipulation Program, GIMP is a free and open-source choice. It might not have the glamour of the commercial options, but it comes packed with a powerful set of tools that can rival its counterparts.
Remember, the best software is the one that fits your needs and comfort level. So, it’s worth trying out a few to discover which one resonates with your style and requirements.
Why Should You Shoot Raw?
When jumping into the world of photography, one of the best practices you’ll come across is shooting in RAW format. It’s the primary need to learn how to edit car photos. Here’s why and how to make the most out of it:
Why Shoot in RAW?: Unlike JPEG or other compressed formats, RAW retains the maximum data from your camera’s sensor. This reservoir of information is a boon during post-processing, allowing for a higher degree of manipulation without degrading image quality.
Flexibility: With RAW, mistakes made during shooting, be it overexposure or an unwanted color cast, can often be rectified during editing without compromising the integrity of the image.
Exposure Adjustments:
The Importance: Proper exposure ensures your image is neither too bright nor too dark. It brings out the details, from the deepest shadows to the brightest highlights.
Utilizing the Histogram: This graphical representation of the tones in your image is an essential tool. Aim to have your histogram spread out, touching neither the extreme left (shadows) nor the right (highlights). This ensures a full range of tones without any loss of detail.
Mastering White Balance:
White Balance: The color temperature of your photo can be affected by the light source. Adjusting the white balance ensures colors appear as they should.
Adapting to Conditions: Different lighting scenarios impart different color casts to your images. For example, under tungsten lighting, photos might take on a yellow hue. Conversely, fluorescent lights can lend a cool, blue tone. Recognizing and adjusting for these conditions ensures color fidelity.
In summary, raw image processing is about harnessing the wealth of information in your photos and using it to produce images that truly resonate. With the right tools and techniques, every shot has the potential to be a masterpiece.
Composition Is the King
Ever looked at a photo and thought, “Something’s off,” or “Wow, this is captivating!”? Often, it’s all about how the picture is framed!
Cropping – The Art of Snipping:
What’s It About?: Think of cropping like giving your photo a haircut. You’re trimming away the extra bits that don’t quite fit the style you’re going for.
Why Do It?: Sometimes, there’s just too much going on in a photo. By snipping away the distractions, you can focus on what’s important.
Plus, by following guidelines like the “rule of thirds” (imagine your picture is divided into 9 equal segments by 2 vertical and 2 horizontal lines – now, try to place the most interesting parts of your photo along these lines or at their intersections), you can give your image that ‘wow’ factor!
Straightening – Keeping Things Level:
Why’s It Important?: Ever felt dizzy looking at a leaning tower or a sloping horizon? Photos can have that effect if they’re a bit tilted! This is your second step on how to edit a car photo.
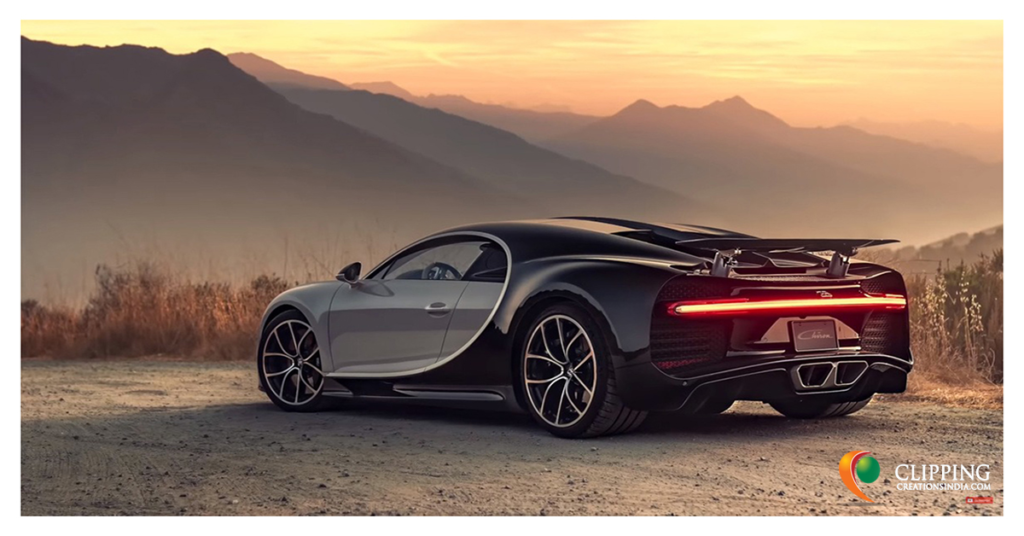
Cars & Symmetry: When shooting cars, symmetry can be a beautiful thing. Imagine the sleek lines of a sports car – they’d look odd if they weren’t parallel to the ground, right? So, ensuring that everything’s nice and level can make a world of difference.
So, next time you’re looking at your car photos, remember these tips. A little snip here and a slight tilt there can make your masterpiece come alive!
Depth Manipulation:
Photography is more than just capturing moments; it’s about bringing stories to life. One of the secret sauces behind those mesmerizing, magazine-grade photos is mastering the art of depth. Let’s explore how to edit car photos.
Depth of Field – The Art of Blur:
The Basics: Depth of Field refers to how much of your image is in sharp focus. Ever seen those dreamy portraits where the subject is crisp, but the background is a beautiful blur? That’s a shallow depth of field at play!
Post-Production: Maybe you didn’t nail that blur while shooting. No worries! Software tools, like ‘Tilt-Shift’ or ‘Lens-Blur’, are your backstage passes to recreate this enchanting effect. They allow you to strategically blur parts of your image, making the subject stand out.
Dodging & Burning – Painting with Light:
What Are They? Think of dodging and burning as the Yin and Yang of photo editing. Dodging is like adding a spotlight to brighten specific areas while burning is like casting a shadow to darken them.
Why Use Them? By controlling where the light and shadows fall, you can guide the viewer’s eyes, making them focus on the hero of your story – be it the sleek hood of a car or the reflection in a mirror.
Color Correction:
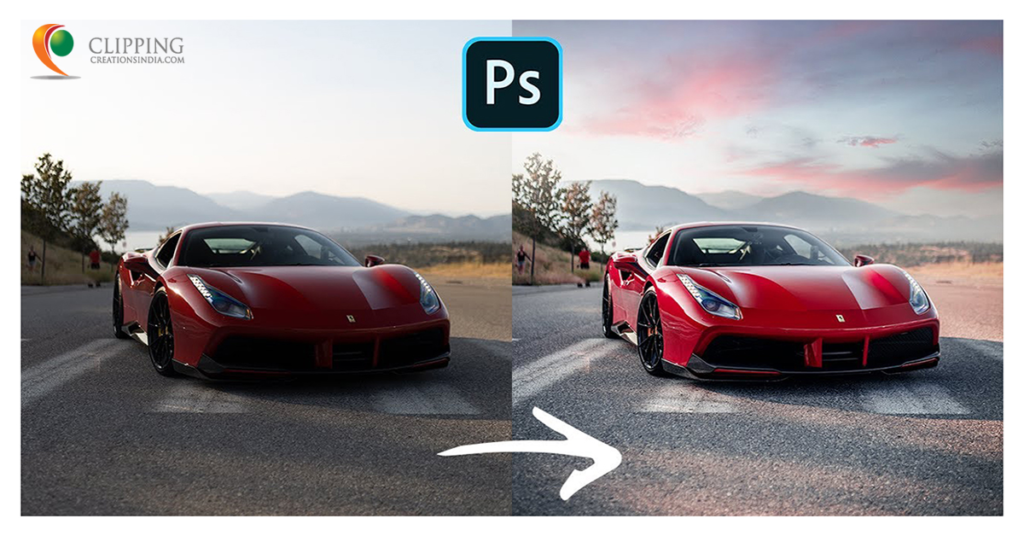
Colors have the power to evoke emotions, set moods, and tell stories. In the world of photography, especially when showcasing something as visually dynamic as a car, having accurate and impactful colors is paramount. Here’s how to truly get them to shine:
HSL (Hue, Saturation, Luminance) – The Triple Threat:
Why It’s Amazing: Imagine being a maestro, directing each color in your orchestra to play just the right note. The HSL panel lets you do just that for your photos. Whether you’re in Lightroom or Photoshop, this tool grants you the magic wand to adjust individual colors.
Precision Editing: Let’s say the car in your image has a royal blue that’s not quite popping as you’d like. With the HSL panel, you can enhance its vibrancy without turning the sky into an unnatural shade of blue. It’s all about that pinpoint accuracy!
Split Toning – A Symphony of Shades:
Setting the Stage: Split toning is like adding mood lighting to a room. It lets you infuse different colors into the highlights (bright areas) and shadows (darker areas) of your photo.
Showcasing the Car: By carefully choosing colors that complement the car’s design, split toning can amplify its appeal. For instance, a golden hue in the highlights can bring out the metallic sheen of a classic car, while cooler tones in the shadows might highlight its sleek curves.
Color correction is like fine-tuning a musical instrument. It’s about ensuring every shade sings harmoniously, making your car photo not just a visual treat but a storytelling masterpiece. Dive in, experiment, and let your creativity run wild!
Additional Tips:
Eliminating Distractions:
Cloning & Healing: Tools like the Clone Stamp or Spot Healing Brush in Photoshop are invaluable for erasing imperfections or distractions.
Frequency Separation: A more advanced technique, especially useful for larger imperfections on the car’s surface.
Car’s Details:
Sharpening: Use masks to selectively sharpen areas like the car’s badge, rims, or intricate design elements.
Clarity and Texture: Add depth and detail to the car’s surface without overemphasizing blemishes.
Global and Local Adjustments:
Adjustment Layers (Photoshop): These allow for non-destructive edits. You can modify specific parts of an image without altering the base layer.
Gradient Filters: Particularly useful in car photography for editing the sky or foreground without affecting the car.
Stylizing and Final Touches:
Presets & LUTs: These provide predetermined adjustments that can give an image a specific mood or look. Customize them further to match your unique vision.
Noise Reduction: Especially for shots taken in low-light conditions.
Vignetting: Subtly focuses the viewer’s attention toward the center.
Exporting and Storage:
File Formats: For most purposes, JPEG offers a balance between quality and file size. However, if preserving quality is paramount, consider TIFF.
Backup: Always maintain a backup of the original RAW files and edited versions. Cloud storage or external hard drives are reliable options.
In Summary,
Editing car photos isn’t just about making a picture look good; it’s about capturing the spirit and beauty of the vehicle.
With the right tools and a touch of patience, you can transform a regular snapshot into a stunning showcase of the car’s design and character.
Remember, the key is to highlight the car’s best features and let its unique personality shine through. So, keep experimenting, trust your artistic instincts, and most importantly, have fun on this creative journey!
And, if you need help, we are here to help you get it done in an affordable and reasonable tier! Check out our car photo servicing here.