Cartoonize in 6 Simple Steps – How to Create Cartoon Effect in Photoshop?
- February 10, 2023
Want to see what your cartoon version would look like? Or do you want to turn scenery into a beautiful oil painting? With Photoshop, you can do them in minutes. So, want to know how to create cartoon effect in Photoshop?
The process is rather simple and almost identical for all sorts of effects. In most cases, the filter applied is what gives the effect its true appearance. The general process involves desaturating the image, adjusting its appearance, applying a posterize effect, and using filters and brushes to obtain the final touch.
Give this article a read to learn how to create cartoon effect in Photoshop . You’ll also learn some tips and know what things you should avoid while applying this effect.
What Does Cartoonizing Mean in Photoshop?
The idea is pretty simple, as we are familiar with cartoons. By cartoonizing, we just want to make an image look like the cartoon shows on TV.
But if you carefully think about it, cartoonizing gets complex because the probable pool of outcomes can be literally infinite.
You can make a funny cartoon-like illustration of a portrait, or you can turn it into a mysterious oil painting. The possibilities are endless, and it solely depends on the designer.
So, I’d suggest you learn the basic process of it first and then try to find your own place with it.
Trial and error can not only give you a good grasp of what filters result in what photo effects but also, teach you a lot about editing photos in Photoshop, in general.
Creating Cartoon Effects in Photoshop in 6 Steps
There is no one absolute way to add a caricature-type look to your photos. Here I am providing a straightforward way to achieve such an effect.
This method has much room for adding personal touch and experimentation.
Step 1 – Setting Up the Document

First, let’s take care of the premise where you’ll work on. Set up your document by the following steps.
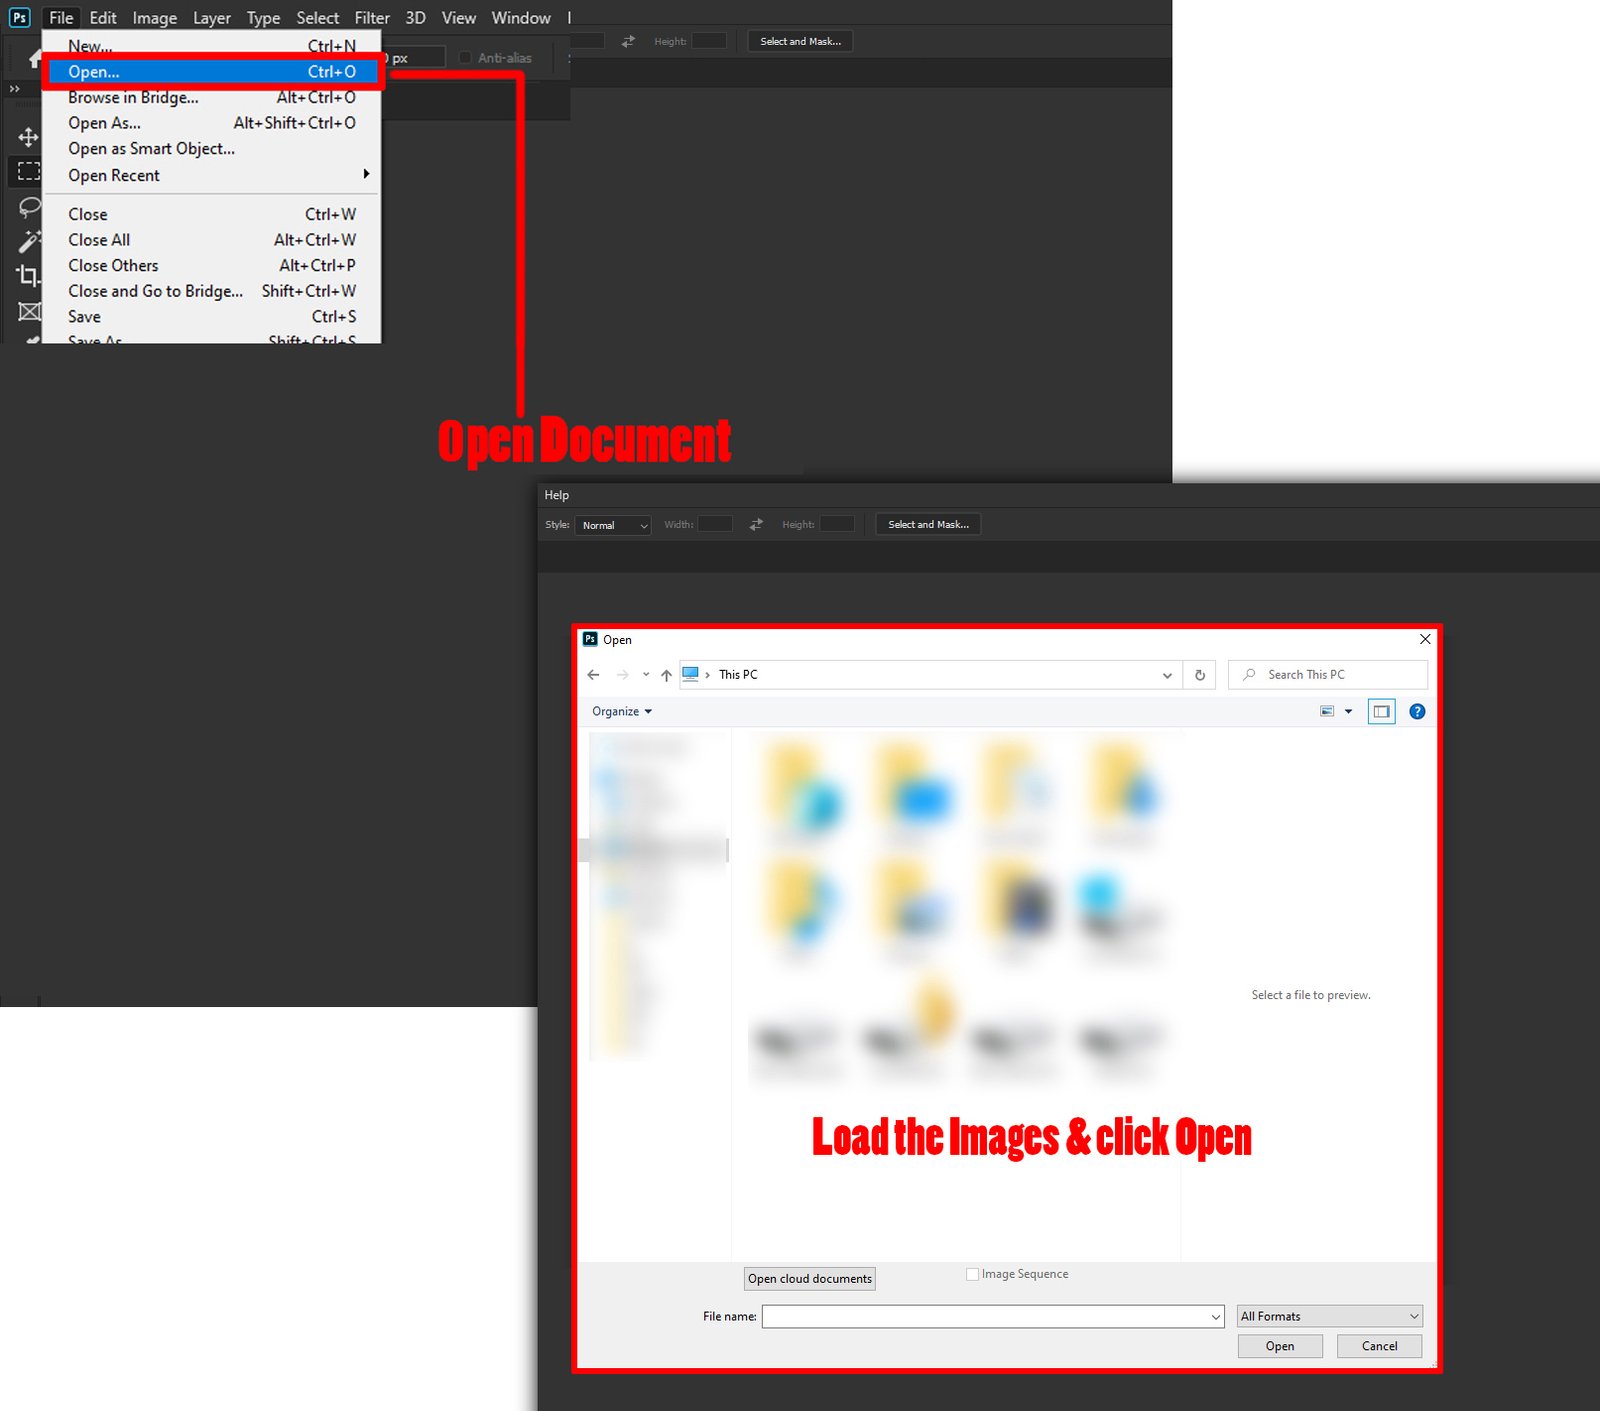
- Open a new photoshop document and go to File>Open. You can also drag your image and drop it on the Photoshop workspace to import it.
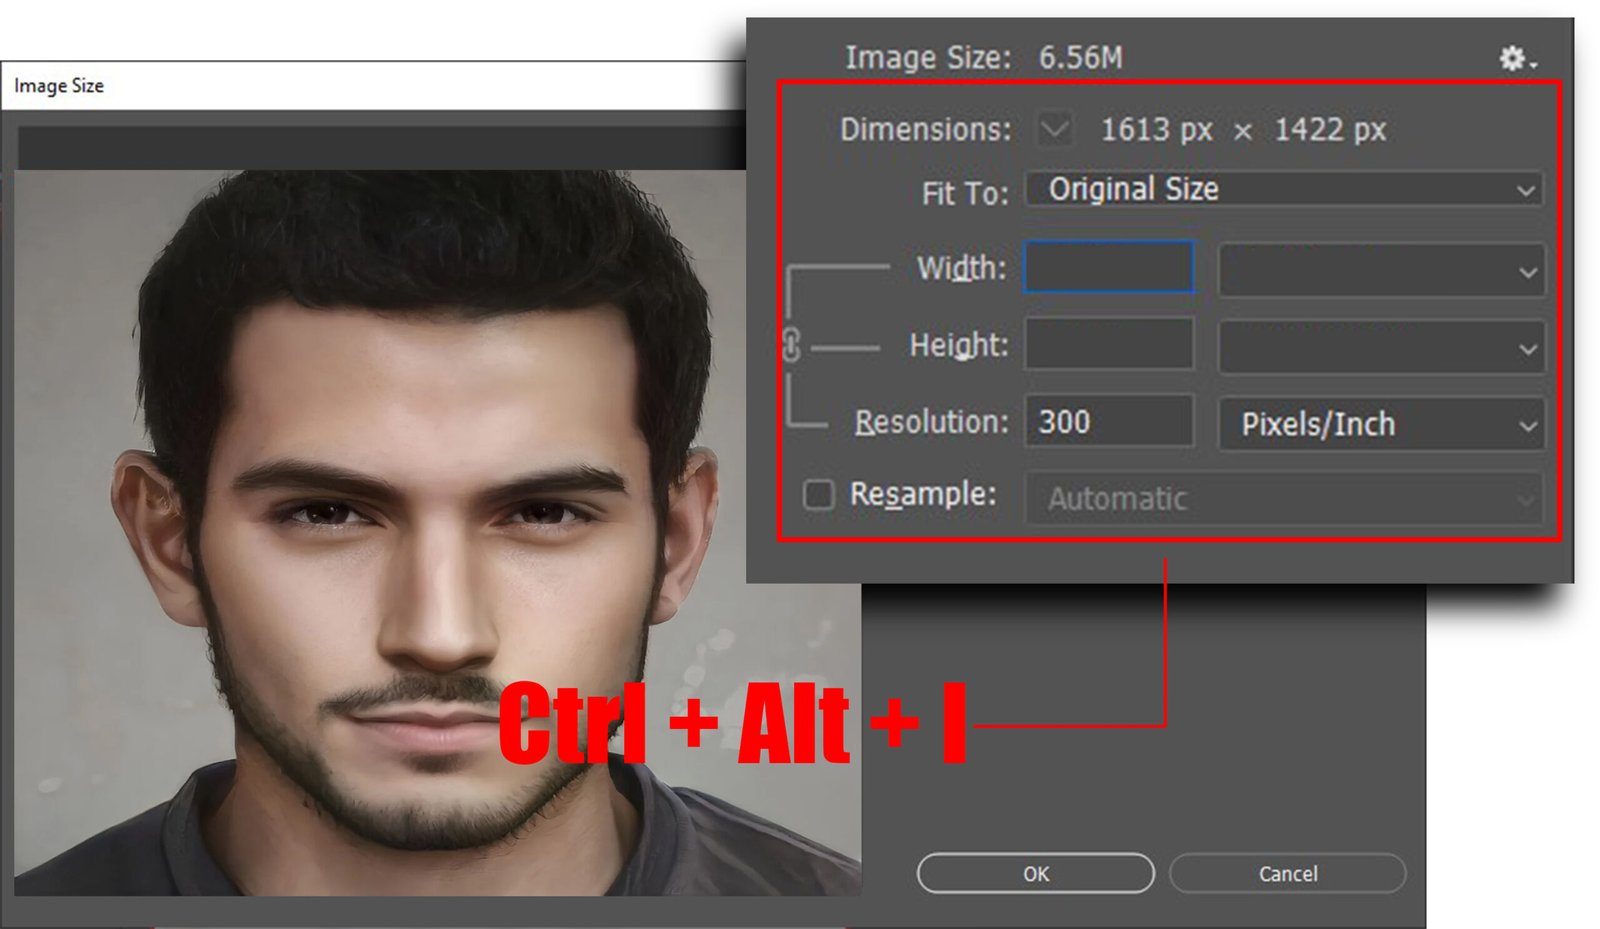
- If your image is of high resolution, you might want to resize it a bit for a faster and smoother workflow. To resize, go to Image> Image Size and reduce the given height or width. Changing one of them will adjust the other proportionally.
- Above these settings, you’ll find the original size of your image and the reduced sized. Once done resizing, click OK to apply the settings.

Step 2 – Creating a Mask
Doing this is not mandatory. Going through it will give you improved control over your art. You’ll be able to enhance or edit specific features of your portrait, change the background, and do many other actions to enhance your effects.
Masking is actually a method for selecting and cutting out a particular object. Let’s look at the steps.
- To begin, go to Quick Selection Tool> Select Subject. This will create a rough outline of the subject in the picture using the Smart Object algorithm of Photoshop.
- Refine the selection with the Direct Selection tool and the Lasso tool.
- Now choose Select and Mask in the layers panel and set the view mode to be in Overlay. This should do the job.
Step 3 – Refining the Cutout

You need to process your masked cut-out before you can move on with your edit. To refine it, follow these:
- Select the Refine Edge Brush and set it to a manageable size depending on your subject’s edge thickness.
- Now brush over the edges of your cutout to remove excess background parts. Your cutout is now ready.
- You can change the background and add quirky features to your cutout if you wish. To change the background, just create an adjustment layer with the Solid Color option.
You can work on this background on your own, but let’s leave it in a plain color of your choice for now.
Step 4 – Preparing the Layers

This is where smart filters come in the process. You can easily make a cartoonized photo using specific filters from Photoshop’s stock filter gallery. Let’s see how to use them.
- The first step is duplicating layers that contain your subject. Keep the duplicate layer hidden for now.
- Locate Filter > Sharpen > Smart Sharpen in the filter menu and adjust the values.
- For now, set the Amount slider to 300 and Radius to 3.0.
- Right below, you’ll see the Remove option. Click on it and select Gaussian Blur from the drop-down menu.
Step 5 – Applying the Filters

You can choose between a lot of options when applying filters. But let’s try to create an oil painting vibe now by following the steps below.
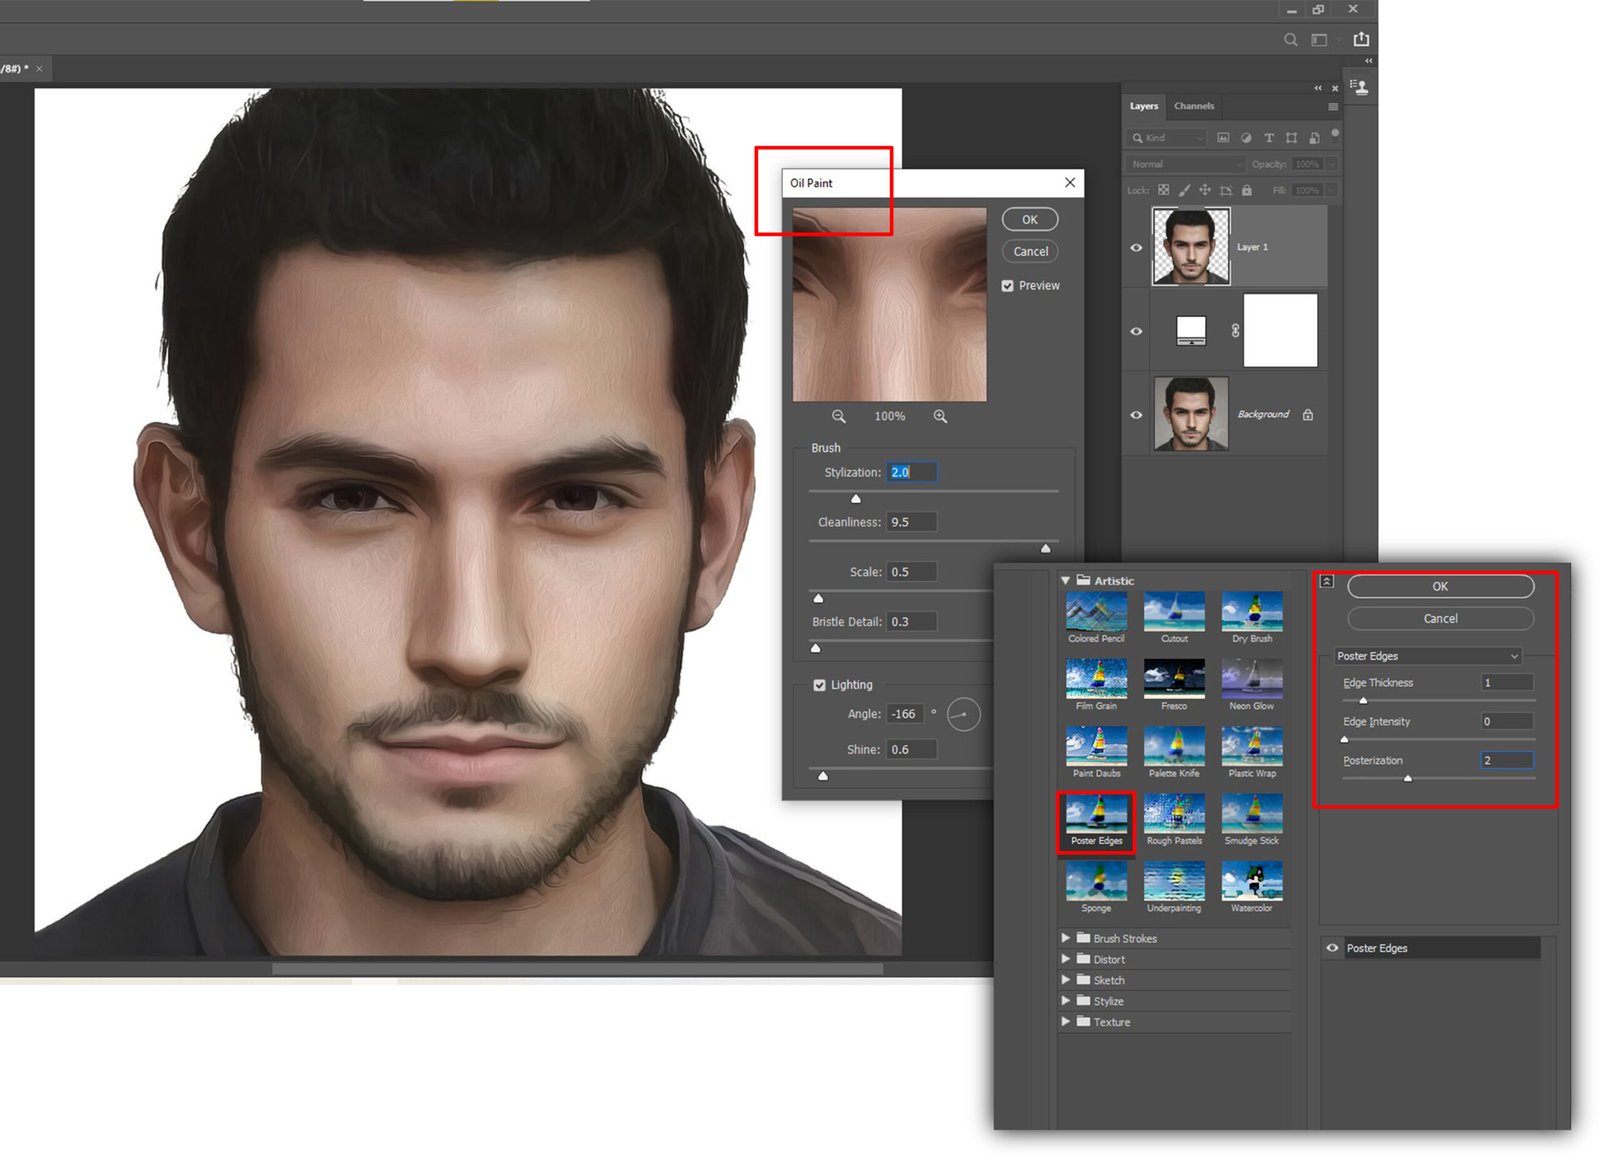
- To give your subject an oil painting look, navigate to Filter> Stylize> Oil Paint. Here you’ll see some sliders to fine-tune your effect.
- For now, keep the Scale value to 0.1 for a finer appearance.
- Set both Stylization and Cleanliness to 4.0.
- Your photo should already have a cartoonized look by now. Add the poster edges effect by going to Filters> Filter Gallery and clicking on Poster Edges.
- Here, keep the Edge Thickness and Intensity slider to 0 and set the Posterization slider to 2.0. This should bring a more dramatic look to your picture.
Step 6 – Finalizing the Image

Remember the layer we copied to use later? Select that layer and unhide it. Now select the Overlay blending mode and set the opacity to around 40-50%.
You can now add an oil paint filter and poster effects to this layer with increased slider values. This will enhance some features of the portrait.
Things to Avoid When Applying Cartoon Effects in Photoshop
The process of applying a caricature look mostly depends on the filters you’re using and how you’re using them. Although applying filters seems very straightforward, there are certain things to avoid to make your image not look weird.
Let’s take a look at the don’t-dos when it comes to creating cartoon effects in Photoshop.
Overuse of Filters
You don’t want your images to look over-processed and too dramatic. So, be careful when adding a filter to your image.
Overusing a filter can also hide important details of your image.
Applying a Filter Without Understanding It
Each filter comes with sliders that let you tune its effects of it. While understanding what each slider means is impossible, you can definitely grow an intuition of it.
Before applying a filter, make sure to be familiar with what that filter is supposed to do. Applying the filter on different images and tweaking the slider should give you enough understanding.
Inconsistent Styling
It’s important to maintain the same style throughout your created cartoon effects. This includes using the same line weight, cohesive color tones, etc. You can do creative variation but that shouldn’t look like distinct parts on your image.
Overcomplicating Your Image
When applying filters, we all get tempted to crowd our image by applying too many different effects. Avoid doing this. You’ll be amazed at how only a few effects with just the right settings can make your image look!
Why Photoshop Is the Right Tool for Cartoon Effects?
It’s true that Photoshop is a complex photo editor to learn as it has many tools and features to master and combine.
So, to achieve an easy cartoon effect, shouldn’t we have chosen software that is simpler?
Not really! Actually, Photoshop is likely to be the most perfect tool for creating this effect. Let’s see the reasons below −
Easy Process
As I stated earlier, you can create a diverse range of cartoon and painting effects in Photoshop while keeping 90% of the process similar. This makes Photoshop one of the easiest yet most diverse tools for creating amazing cartoon effects.
Huge Collection of Filters
The diversity of achievable cartoon effects in Photoshop is quite unfathomable.
Countless adjustable settings with a massive collection of filters offer an infinite number of possible effects.
Wide Community and Resources
Photoshop is one of the most used image editing tools in the world. Also, most professionals utilize Photoshop to complete their gigs.
That’s why it has an exceptionally strong, helpful, and knowledgeable community.
You can easily get help no matter how complex your target design might be. This is one of the very reasons why Photoshop is so appreciated for any editing task.
Flexible and Suitable Tool Set
Photoshop has some very intuitive tools that allow you to generate clean cuts and precise lines. Tools like the pen tool, and masking are highly suitable for making easy cartoon effects.
Color Correction and Adjustment Settings
Very few photo editors can offer you as much control over your image as Photoshop does. With its diverse color correction settings for hue, saturation, tones, etc., you can create masterpieces.
Bonus: Learn to create amazing effects with Photoshop here.
FAQs on How to Create Cartoon Effect in Photoshop
The following most asked questions about “how to create cartoon effect in Photoshop” may be able to help you. Be sure to give them a read.
Is there any shortcut to adding cartoon effects in Photoshop?
Unfortunately, no. But Photoshop offers you a feature called Action. You can save a particular procedure as an action and load it later to apply the same procedure to another image.
To create a new action, go to the Actions panel, and select New Action. Give a name to your action and then tap Record. Now complete your procedure and stop recording. Your action is now ready.
Why shouldn’t I use a filter in isolation?
Filters should be used as part of a larger editing process because they should not be relied upon as the sole means of post-processing an image.
Especially if you want to be a professional editor, avoid using filters in isolation because they can’t correct issues like exposure problems or improper lighting. Also, using filters in isolation can provide an artificial and over-processed look rather than a natural and polished final image.
What are the limitations to applying cartoon effects in Photoshop?
There are a few limitations to creating cartoon effects using Photoshop. Firstly, the image must be of relatively high brightness and contrast. If your image lacks these, make sure to increase them before applying filters. Also, the more intricate details your image will have, the harder it’ll be to apply certain effects effectively.
Can I get actions online for cartoon effects?
Yes, you can. There are plenty of pre-recorded actions available online. Some are even free. But not all of them will be compatible with your image. So, you might need to tweak a bit after applying the action.
Conclusion
Using the available tools and filters in Photoshop, you can make thousands of different cartoon effects for your image.
To properly master the method, just learning how to create cartoon effect in Photoshop won’t be enough. You’ll also need a lot of practice.
Actions found online can also be a great source of learning for this technique. I advise you to keep playing with the filters and understand how they affect your image.
