How to Smoothen Lines in Photoshop? + 4 Useful Tips for Perfection
- October 25, 2023
Are you retouching a photo? Or, creating digital art? or simply working on a graphic design project? The quality of your lines can make a significant difference. This is why, you must learn how to smoothen lines in Photoshop.
We all know about Photoshop. It is versatile for graphic designers, photographers, and creative professionals. One of the essential skills in Photoshop is the ability to smoothen lines effectively. In our guide, we’ll explore various techniques to master line smoothing in Photoshop.
Smooth Lines in Digital Design
Smooth lines are crucial in digital design for several reasons. First and foremost, they enhance the aesthetics of a design. Clean, smooth lines create a sense of fluidity and elegance, making the visual elements more visually appealing. This can help in conveying a sense of professionalism and sophistication in office-related content, which aligns with your desire for engaging and user-friendly materials.
Moreover, smooth lines contribute to user-friendliness. They guide the viewer’s eye, making it easier to follow the content or navigate through a digital interface. This is especially important for office purposes, as it can improve the user experience and help convey information more effectively.
They also play a role in readability. When text or icons are created with smooth lines, they are less likely to appear pixelated or distorted, ensuring the content remains clear and easy to understand. In presentations, reports, or any office-related materials, this is essential for conveying information accurately and professionally.
In summary, smooth lines are vital in digital design because they enhance aesthetics, improve user-friendliness, and ensure readability. These elements collectively contribute to creating engaging and user-friendly content, aligning with your specific needs for office purposes.
How Does Line Quality Affect The Final Output?
Line quality has a significant impact on the final output of any design or visual content. Here are some key ways in which it affects the outcome:
Aesthetics: High-quality lines contribute to a more visually pleasing and professional appearance.
Clarity: Clean, well-defined lines make the content easier to understand and interpret.
Readability: Line quality influences how legible text and icons appear in the final output.
User Experience: In user interfaces, smooth lines enhance the overall experience, making navigation and interaction more enjoyable.
Professionalism: High-quality lines convey a sense of expertise and attention to detail in office-related materials.
Emphasis: Different line qualities can be used to draw attention to specific elements or information in a design.
Consistency: Maintaining line quality consistency throughout a project ensures a cohesive and polished final result.
Print Quality: For physical materials, good line quality is essential to ensure the content looks sharp and clear when printed.
Impact: The quality of lines can enhance or detract from the overall impact of the content, making it more or less memorable.
Line quality plays a multifaceted role in determining the visual appeal, functionality, and overall effectiveness of the final output in any design or office-related content.
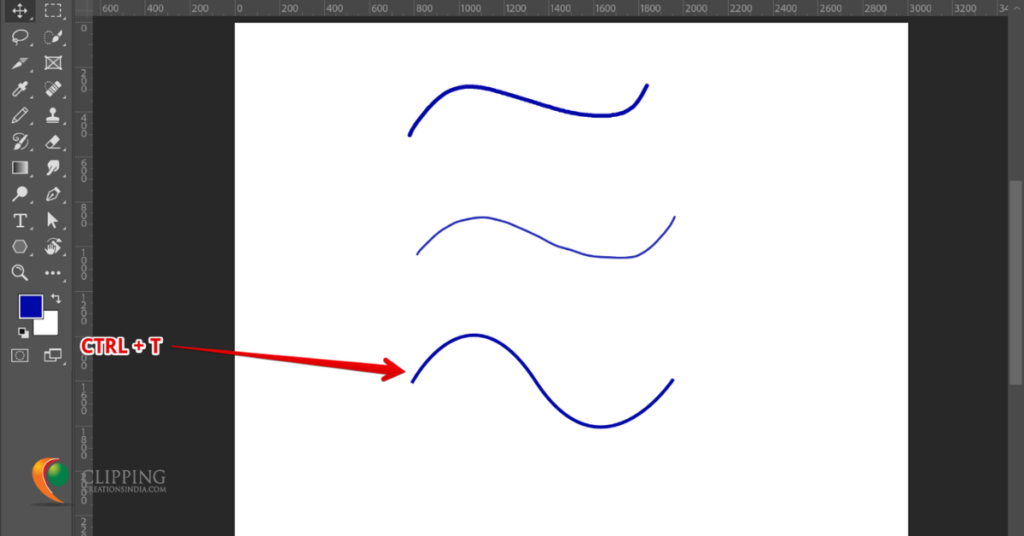
How to Smoothen Lines in Photoshop?
Smoothing lines in Photoshop is a common task in digital design and image editing. Here’s a detailed process on how to achieve this:
Step 1: Open your Image
Launch Adobe Photoshop and open the image or file you want to work on.
Step 2: Create a New Layer
To maintain the original image, it’s good practice to create a new layer to work on. Click on the “New Layer” icon at the bottom of the Layers panel.
Step 3: Select the Brush Tool
Choose the Brush Tool from the Tools panel on the left. You can also press the “B” key to select it.
Step 4: Adjust Brush Settings
At the top of the screen, you’ll see the Brush settings. Adjust the following settings for smoother lines:
Brush Size: Choose an appropriate brush size depending on the lines you want to smooth.
Hardness: Set this to a lower value (0% for the softest edge).
Opacity: Typically, you want this at 100% for full coverage.
Flow: This controls how the brush applies the color. For smooth lines, keep it close to 100%.
Step 5: Use the Brush to Smooth Lines
With your new layer selected and your brush settings adjusted, use the brush to go over the lines you want to smooth. Make sure to use smooth, steady strokes. If you make a mistake, you can undo or erase this layer.
Step 6: Fine-tune with Blurring
If necessary, you can further smooth the lines by applying a Gaussian Blur. Go to Filter > Blur > Gaussian Blur and adjust the radius to your preference.
Step 7: Merge Layers
Once you are satisfied with the smoothed lines, you can merge the layers by selecting them in the Layers panel and right-clicking to choose “Merge Layers.”
Step 8: Save Your Work
Finally, save your edited image as a new file to preserve the original image. Remember to experiment with brush settings and practice to achieve the desired level of smoothness for your lines.
You can apply the process to various design elements in Photoshop, such as drawings, sketches, or any digital art where smooth lines are crucial.
Automatic Brush Tools

In Photoshop, Automatic line smoothing tools are features designed to streamline the process of smoothing out lines and curves in digital designs. You may have to work with,
Pen Tool:
Think of the Pen tool as a digital pencil. It’s a tool that helps you draw very accurate and neat lines and shapes on your computer. You can use it for making drawings, creating clear shapes, or selecting things with precision.
Curvature Pen Tool:
The Curvature Pen tool is like a special version of the Pen tool. It’s even better at making smooth lines and curves because it’s good at guessing where to put points. This is useful for making sure your lines and shapes are extra neat and don’t have any wobbles.
Smooth Tool:
The Smooth tool is like a magic wand for your lines. When you use it, it automatically fixes any shaky or messy lines you’ve drawn. It makes your lines look much cleaner and more professional.
Quick Selection and Magic Wand Tool:
Quick Selection and Magic Wand are like digital highlighters. They help you choose specific lines or parts of your picture. Quick Selection lets you paint over what you want to select, and Magic Wand can find things that are the same color or shade. These tools are great for picking out certain lines or objects in your design, so you can work on them separately.
These tools are like your helpers when you’re drawing or designing on a computer. They make sure your lines are smooth, your shapes are just right, and you can select things easily. This way, you can create nice and user-friendly designs for your office work.
Tips for Smoothing Lines in Different Projects
Here are a few tips to improve your lines with Photoshop and learn how to smoothen lines in Photoshop better. Follow them and bring the best output possible.
Smoothing Lines in Portrait Retouching:
When you’re editing portraits, you often want to make the person’s skin look smoother and more polished. To do this, you can use tools like the “Blur” or “Smudge” tool.
Be gentle and don’t overdo it, as you want to maintain a natural look. These tools help remove tiny imperfections and give the skin a softer appearance. This makes your portraits look more appealing and professional.
Line Smoothing in Digital Painting:
In digital painting, you might want to create smooth lines for your artwork. To do this, use brushes with a low hardness setting and experiment with different brush sizes. Drawing with a steady hand is important.
You can also use the “Stabilize” feature if your software has it, which assists in drawing smooth and even lines. This helps you achieve precise and polished artwork.
Graphic Design Applications:
In graphic design, smooth lines are crucial for creating logos, icons, and other visual elements. That’s why it’s even more important to learn how to smoothen lines in Photoshop. The “Pen” or “Curvature Pen” tool is your best friend. They let you draw precise shapes and lines. Adjust the tool’s settings to create sharp lines or curves.
Make sure your design software has a “Snap to Grid” feature to ensure everything lines up neatly. This way, your graphics look professional and clean.
Preparing Line Art for Print:
When you’re getting your artwork ready for printing, it’s important to have crisp and smooth lines. Use vector-based software like Adobe Illustrator, which ensures your lines remain sharp, no matter the size.
Remember to set your document to a high resolution for a clear print. Additionally, convert your artwork to the appropriate color mode (CMYK for print) to ensure the colors and lines look as intended on paper.
In all these scenarios, the goal is to make your lines look clean and polished. Whether you’re retouching photos, creating digital art, designing graphics, or preparing line art for print, these tips help you achieve professional and visually appealing results in your office-related projects.
** Note:
For those interested in refining their portrait retouching skills, books like “Portrait Retouching Essentials” by Christy Schuler and “Adobe Photoshop CC for Photographers” by Martin Evening offer in-depth guidance. They cover techniques, tools, and best practices for achieving smooth and professional-looking portraits.
Last Words
By exploring these additional resources, you can continue to learn, grow, and refine your skills in the context of portrait retouching, digital painting, and preparing line art for print.
Our article ensures that your work remains engaging, and authentic for your office-related projects. Follow the steps right, and you got this!
Plus, it’s really not that hard to smoothen lines in Photoshop after you know how to smoothen lines in Photoshop with our comprehensive guide. We will be back soon with another article. Till then, take a look at other articles we write.