Drop Shadow Effect Photoshop Explained for Beginners: Pro Tips Included
- October 15, 2025
Do you want to make your designs really pop? Well, one of the coolest tricks is adding a drop shadow effect in Photoshop. It might sound fancy, but it’s easy and can turn a plain image into something amazing. Let’s get started!
Think of a picture of a flower that looks a bit flat. That’s where the magic of a drop shadow comes in. This trick adds a shadow behind your object, making it look like it’s popping off the page. It’s like giving your image a 3D makeover!
Here’s the hint. First, select your object. Then, go to the Layer Style menu and choose Drop Shadow. You can adjust the shadow’s size, colour, and distance. Play around with these settings until your image looks just right.
Adding a drop shadow adds depth and life to your design. So, go ahead and try it out in Photoshop. You’ll be amazed at how it can transform your creations! We are here to assist you. Let’s begin.
Drop Shadow Effect Photoshop:
Ever seen a picture or some text that looks like there’s a little shadow behind it? That’s called a drop shadow. If you have a flashlight and you shine it on a toy, the toy will cast a shadow, right? That shadow makes the toy stand out and look more real, like it’s not just stuck on a flat surface. The drop shadow does the same thing for pictures or text on a computer screen.
Now, here’s a fun fact: drop shadows are pretend shadows. They’re not made by real light; designers create them to give their designs a little extra topping! Think of them as the special sauce that makes everything look tastier.
Why are drop shadows so cool? Well, they can make things super clear. For instance, if you have white text on a light-colored background, it might be hard to read.
But add a drop shadow, and voila! The text stands out, making it easier to see. It’s like when you’re at a concert, and the main singer steps into the spotlight—you can’t miss them!
With just a few clicks, they can make things go from “meh” to “wow!” So, next time you see a shadow behind text or a picture, you’ll know a designer sprinkled some of their expertise on it.
How to Create a Drop Shadow in Photoshop?
We tried to keep it as simple as possible and suitable for beginners. Follow our points serially and make it your own.
Open Your Image: Launch Photoshop and open the image you want to work on.
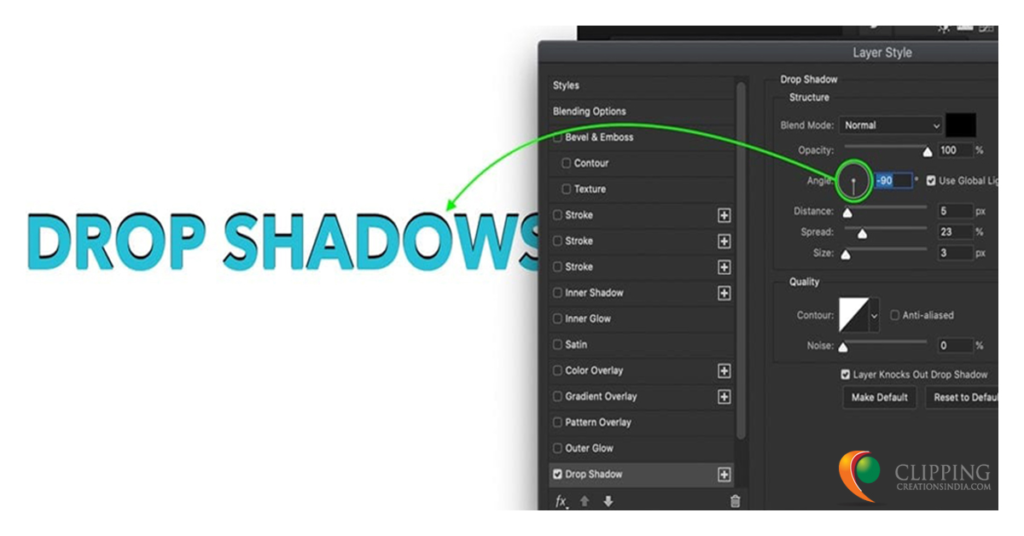
Choose Your Layer:
Click on the layer that has the object or text you want to add a shadow to. If your image is a single layer (like a JPEG photo), you might need to right-click it in the Layers panel and choose “Layer from Background” to make changes.
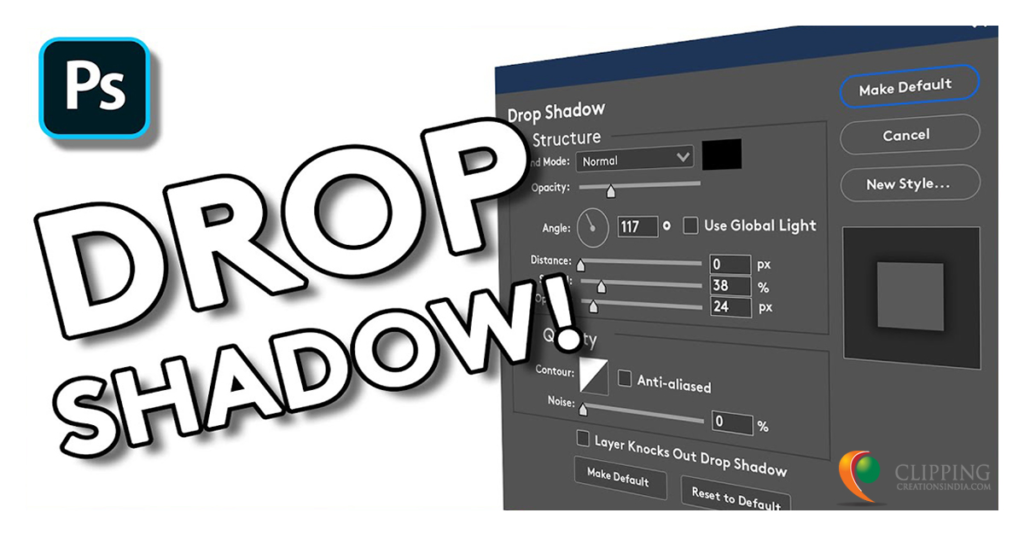
- Layer Style: At the bottom of the Layers panel, there’s a small ‘fx’ button. Click on it, then select “Drop Shadow” from the list that pops up. This will open a new window with all kinds of options for your shadow.
- Setting the Shadow: In the Drop Shadow window, you’ll see a bunch of sliders and options:
- Blend Mode: This controls how the shadow blends with what’s behind it. Usually, ‘Multiply’ is a good choice for shadows.
- Colour: Click the colored square if you want a shadow that’s a colour other than black.
- Opacity: Slide this to make your shadow more transparent or more solid.
- Angle: This slider represents where the light is coming from. Move it around to change the direction of your shadow.
- Distance: This controls how far away the shadow appears from your object. Slide it to the right for a bigger gap, and to the left for a smaller one.
- Spread: This controls how hard or soft the edges of your shadow are.
- Size: Increase or decrease this to make your shadow fuzzier or sharper.
- Play Around: Now’s the fun part! Play with the settings. Sometimes, the smallest changes can make a huge difference.
Finalize & Save: Once you’re happy with how the shadow looks, click “OK”. Don’t forget to save your image after adding the shadow!
And that’s it! Now you have a cool drop shadow that makes your design pop off the page. Remember, sometimes less is more, so it’s usually best to keep the shadow subtle. But feel free to experiment and have fun – after all, it’s your design masterpiece!
The Don’t of Drop Shadow Effect Photoshop
It’s not uncommon to misuse this tool, and even a small oversight can make a project look less professional. Here’s a detailed look at common mistakes to steer clear of:
1. Mismatched Shadows
Consistency in shadow direction is essential. Having shadows cast in different directions suggests multiple light sources, which can be jarring to the viewer.
Before applying shadows, decide on a single light source direction for your design. Ensure that all shadows are consistent with this direction.
2. Overusing the Effect
Drop shadows can become addictive. However, over-reliance on this effect can result in a cluttered design and diminish the overall impact.
Use drop shadows with intention. Prioritize which elements need emphasis. Not everything requires a shadow.
3. Ignoring Real World Physics
Even in digital design, adhering to some natural rules can make a design more appealing. Shadows that don’t mimic real-world behaviours can appear off to viewers. Observe natural shadows. They tend to be softer and fade out as they get further from the object. Adjust the shadow’s size and fade to mimic this effect.
4. Using Extreme Opacity
A shadow that’s too dark can be distracting. Often, designers make the mistake of setting opacity too high, which makes the shadow dominate the design.
Adjust the opacity to make the shadow more transparent, so it complements rather than overpowers the primary element.
5. Ignoring Colour Dynamics
Shadows aren’t always pure black. Depending on the environment and lighting, they might have a hint of colour. You can use colours from your design for the shadow, especially in vibrant designs or those with a specific light source that might tint the shadow.
6. Relying Solely on Default Settings
Photoshop’s default drop shadow settings aren’t one-size-fits-all. Relying solely on them can result in a generic look. Adjust settings such as distance, spread, size, and blend mode to meet the specific needs of your design.
7. Inconsistent Depth Perception
Sometimes designers apply the same shadow size and blur to every element, regardless of its perceived distance from the viewer. This can flatten the design.
Elements that appear closer should have sharper and darker shadows than those in the background. Adjust shadow settings based on each element’s perceived depth in the design.
In short, while drop shadows are an invaluable tool in a designer’s toolkit, they should be used carefully and with a keen eye for detail. The goal is to improve your design’s depth and focus, not to detract or distract from its primary elements.
Summary
Remember, like all tools, it’s not just about knowing how to use them but also when to use them. So, as you go forward with your newfound Photoshop skills, you can develop more skills further.
Hope our article helped you learn the details of the drop shadow effect in Photoshop. With practice, you can be more creative and add more drama to your photos. But for professional help, feel free to contact us onward.