How To Remove Wrinkles From Clothes in Photoshop [4 Flexible Steps]
- March 28, 2024
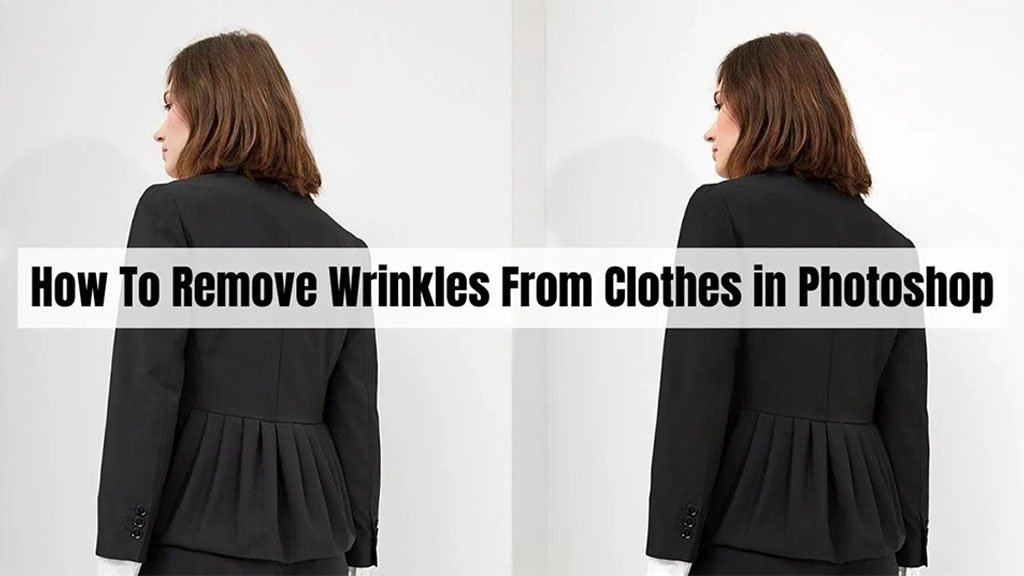
Oh No! Wrinkles! How to remove wrinkles from clothes in Photoshop?
Don’t wait a single moment if you have wrinkled clothes and need to take a picture urgently! Because a professional photo editing service like ours can remove wrinkles from your clothes in post-processing.
It will only take a moment before you can finally lavishly show off your beautiful photos with a clean slate cloth. If you can’t do it yourself, no need to worry at all! We are here to help you.
We can make your clothes wrinkle-free in a few minutes. And today we will learn how to remove wrinkles from clothes in Adobe Photoshop. We will show you our secret tips with you, so you’d better have a good hold till the end of our article.
How to Remove Wrinkles From Clothes in Photoshop?
Wrinkled clothing may ruin an otherwise crisp, professional-looking photograph. Photoshop can help you fix creases on clothes after you’ve taken pictures.
Follow the next few steps carefully, and for better results, practice with us.
Step 1: Use the Spot Healing Brush Tool
Although there are other ways to learn how to remove wrinkles from clothes in Photoshop, utilizing healing brushes is the most often used technique.
The Spot Healing Brush Tool is a useful Photoshop tool for ‘ironing’ clothes or removing wrinkles from pictures. This quick-fix tool simply helps to ‘heal’ a photo by mixing pixels from the surrounding areas to match the colors and lighting to the pixels being mended.
You don’t have to do it yourself; the tool automatically selects the best pixels from the sample area and makes a seamless and smooth result. Use the keyboard shortcut J to activate the Spot Healing Brush Tool, or click the toolbar icon to access it.
Step 2: Switch to Painting Mode
After you’ve picked the Spot Healing Brush tool, navigate to the top options bar and select Painting Mode. Normal is the default setting, but there are different modes to select from, including Replace, Multiply, Screen, Darken, Lighten, Color, and Luminosity. For example, if a crease color is darker than the cloth around it, you must use the opposite mode, Lighten, to lighten it.
Try several paint modes to see which one gives you the desired effect. In order to create a clean, ironed appearance for this lesson, I started with Mode: Screen.
Step 3: Use the Heal Tool
The next step is to select a healing type using the top options bar. You may also play with three alternative settings: Content-Aware, Create Texture, and Proximity Match. Every choice produces a different outcome. If you want to mimic the content and texture of the sample area, choose Type: Content-Aware.
Once you’ve chosen the Paint Mode and Healing Type, you may modify the brush attributes, including Hardness and Size, by navigating to the options bar beneath the brush symbol.
It’s usually a good idea to adjust the size of your brush based on the size of the area you want to correct. The simplest and quickest method is to use the default hotkeys: Click to increase the brush size and click to reduce the brush size. I began by setting the brush size to 500 px, hardness to 70%, and spacing to 25% to cover the main creases.
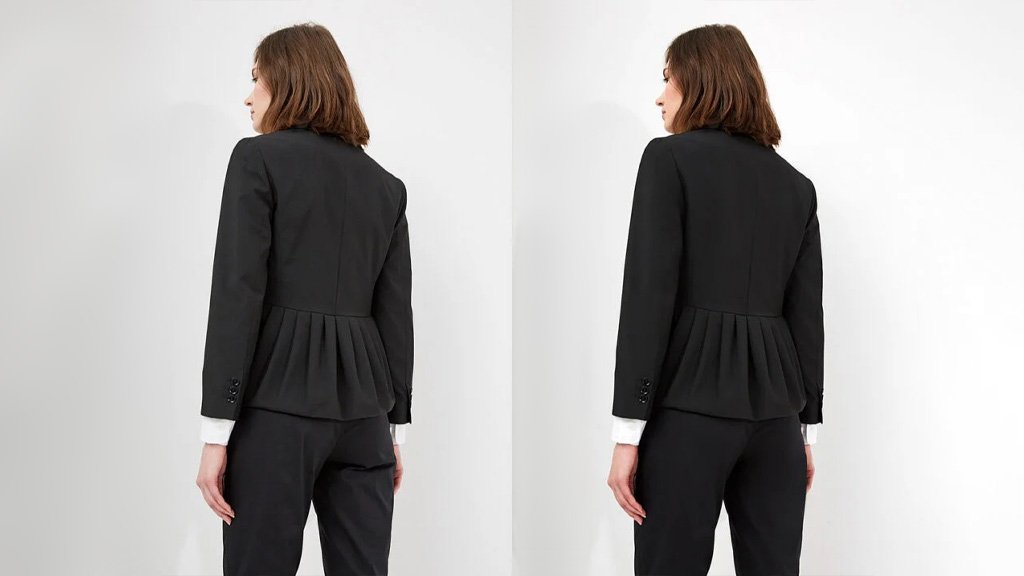
Step 4: Final Touch
Now let’s use the modified Spot Healing Brush Tool in Photoshop to smooth out creases. After you’ve set the brush, zoom in on the wrinkle and brush over it. Begin with the most noticeable wrinkles and paint out the creases from the edge in. Begin by painting over individual wrinkles, then go to bigger areas.
When filling huge areas, it might be difficult to get natural results; you may need to go back and forth to tweak the brush settings. Avoid overbrushing; otherwise, the brushing area may flatten and discolor.
 Final Words
You now know how to remove wrinkles from clothes in Photoshop. You may get comparable results by experimenting with different tools, but the Spot Healing Brush Tool is a wonderful alternative for removing creases from textiles and clothing.
Make sure to check out Clipping Creations India for our large collection of photo editing services if you’re searching for T-shirt mockups or clothes pics. One membership grants you access to millions of materials, making it the ideal resource for designers and creatives.
Want more? Feel free to browse through our blog for immersive knowledge of Photoshop and pro photo editing skills. Be back for more.