Step by step guide: How to Change Brush Color in Photoshop 2024
- November 13, 2024
Mastering the Brush Tool is essential for anyone aspiring to become a phenomenal graphic designer or photo editor. And, changing the brush color in Photoshop is a fundamental skill that any newbie should understand how to harness the full potential of the Brush Tool.
By changing brush color you can create variety in artwork, highlight specific areas and match the overall design. It helps add depth, set the desired mood, and correct any mistakes in the composition. By adjusting colors, you can enhance realism, define contrast, and make the artwork more visually engaging.
Table of contents
- What will you learn from this blog?
- Understanding the Brush Tool
- Step-by-Step Guide to Change Brush Color
- Step 01. Select the Brush Tool:
- Step 02. Open the Color Picker/Box:
- Step 03. Choose Your Color:
- Step 04: Adjust the hue, saturation, and brightness with the sliders.
- Step 05: RGB/Hex Values: Input specific RGB or Hex values for precise color control.
- Step 06: Brush Settings for Color Customization
- Step 07: Saving and Exporting Custom Brush Presets
- Common Brush Color Issues in Photoshop
- Keyboard Shortcuts to Speed Up Your Workflow
- Show creativity with Brush Tool
What will you learn from this blog?
1. Brush Tool Basics: You are able to know from the very basics like how to access and use the Brush Tool for painting and adding textures with shortcut keys available.
2. Selecting Brush Color: You can select and choose colors using the Color Picker via the color wheel, RGB/Hex values, or sliders.
3. Advanced Settings: Then you will be capable of adjusting opacity, flow, blending modes, and color dynamics to enhance brush strokes.
4. Layering and Blending: Use layers and blending modes for better color interaction and depth.
5. Troubleshooting: You can fix common issues like stuck colors or layer problems.
6. Shortcut Keys: You can know all the necessary Keyboard shortcut to work in Change Brush Color
Understanding the Brush Tool
Much like real life painting brushes Photoshop has Brush tools for graphic painting on its digital interface. Here you can select, choose, change sizes according to your design preferences.
Typically, there are four fundamental types of brushes for painting, each of which can be further categorized based on aspects like size, shape, and application.
This tool is your creative companion, perfect for painting, drawing, and crafting stunning textures in your projects! Here are some functions that can be done with the Brush tool:
- Paint/Color
- Erase (in certain contexts)
- Blend
- Smudge
- Dodge (lighten)
- Burn (darken)
- Adjust opacity
- Apply texture
- Clone (in combination with other tools)
- Create masks
- Apply effects (e.g., blur, sharpen)
What can you do with the Brush tool in Photoshop?
Creative Freedom: First thing first, The Brush Tool is so flexible to work with that you cannot finish its endless possibilities. It lets you draw free hand on any layer, empowering you to create sketching, coloring, or enhancing, you have the freedom to create stunning visuals.
Custom Settings: It offers various custom settings that enable you to adapt your brushes to suit any creative scenario. If you want bold, thick, light or any strokes or delicate lines, you may change it in any size, shape using exact numerical value and measurement to determine your choices.
Precision and Control: This tool having an unbelievable accuracy and control, helps to correct flaws and elevate your images with amazing accuracy.
Color Filling/ Color Your World: The Brush Tool is excellent for filling colors in your artwork. Simply select your desired color from the color box and apply it to the canvas. Bring your drawings to life with vibrant hues!
So, are you ready to paint your imagination? Let’s get started!
Step-by-Step Guide to Change Brush Color
Step 01. Select the Brush Tool:
To start painting with a brush tool, first you have to open your document where you paint your subject.
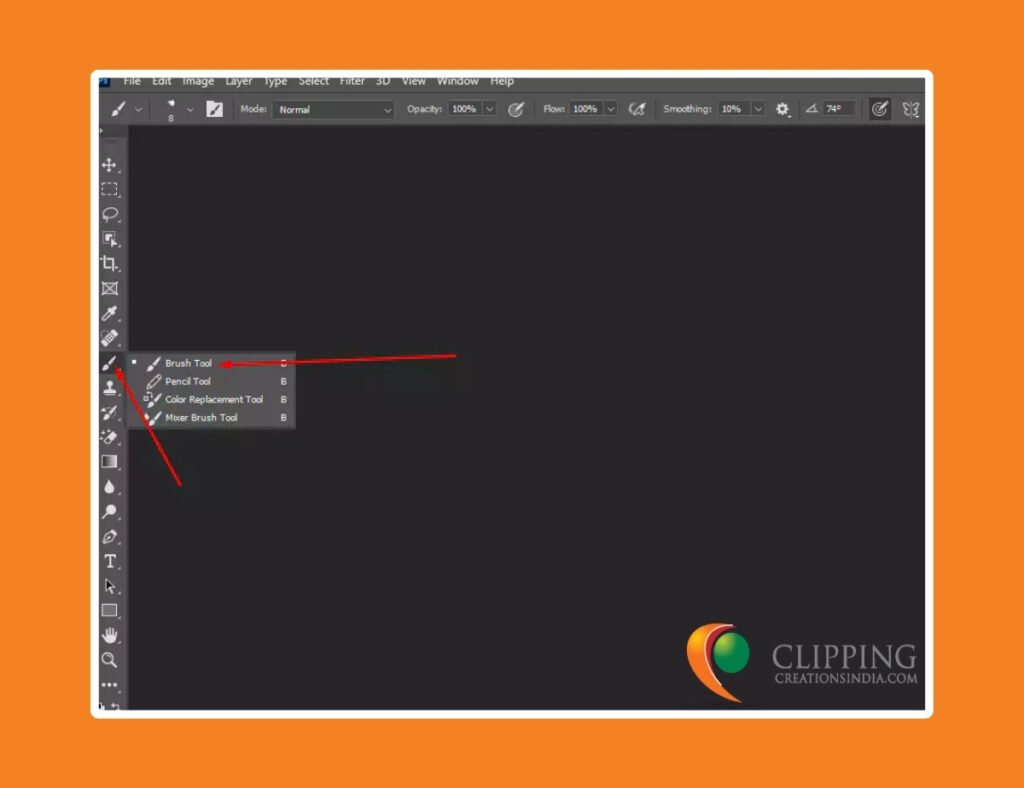
You can easily find it in the toolbar located on the left side of your screen with a symbol of a brush and click to select it.
Shortcut: Press keyboard shortcut key B. You will have your Brush Tool active right there. Then simply drag it with your mouse in the document window to paint.
Step 02. Open the Color Picker/Box:
Our next task is to go to the color boxes and to pick the color of the toolbar. At the bottom of the toolbar, you’ll see two overlapping squares. Here the front part is the foreground swatch, and the back part is the background swatch.
Click on the top square (foreground color) to open the Color Picker dialog box.
Step 03. Choose Your Color:
In the Color Picker box or interface/window, choose your color of choice.
To change the brush color, click the top-most color of the Color Picker Tool (this is called the Foreground Color), and then choose your desired color from the dialog box that opens. First, double-click the Foreground Color on the toolbar to select a color of your choice. A Color Picker window will pop up. From here select any color of your choice and click OK.

Shortcuts: Press the X key to swap the colors of the Foreground and Background. To temporarily switch to the Color Picker, hold Alt/Option with the Brush tool active. Choose a color and once you let go of Alt/Option you will automatically switch back to the Brush tool. This option is great for digital painting and for retouching.
Color Wheel: You can choose and select your color from color wheels in photoshop also.
01. To find your hue in the color wheel, Select the Brush tool from the toolbar just as described.
02. In the top toolbar, select the Brush Preset Picker option.
A window will appear, select the option Colors at the top left corner.
03. In the center of the window, a circular Color Wheel will appear with color settings.
Shortcut:
With the Brush Tool selected, hold Alt Shift Right-Click (Windows) or Ctrl Option Command Click (macOS). Press Ctrl K (Windows) or Command K (macOS) to open the Preferences window. From the General tab, select Color Wheel under the HUD Color Picker drop-down.
Step 04: Adjust the hue, saturation, and brightness with the sliders.
Elevate Your Color Combinations with HSB
This time is to elevate your color combination. By adjusting HSB, standing for hue, saturation and brightness, three important options to color correction. It is a user-friendly color model that helps you customize colors for your designs.
Hue: This represents the color itself, measured in degrees from 0 to 360. For example, 0° is black, while moving up the scale reveals different colors. At 120°, you get a vibrant green.

Saturation: This indicates the intensity of the color. High saturation means vibrant colors, while low saturation results in duller shades. For instance, if saturation is set to 93, the color appears very dark and muted.

Brightness: This measures how light or dark a color is. A higher brightness value means a lighter color. For example, if brightness is set to 23, the color will be slightly dark.
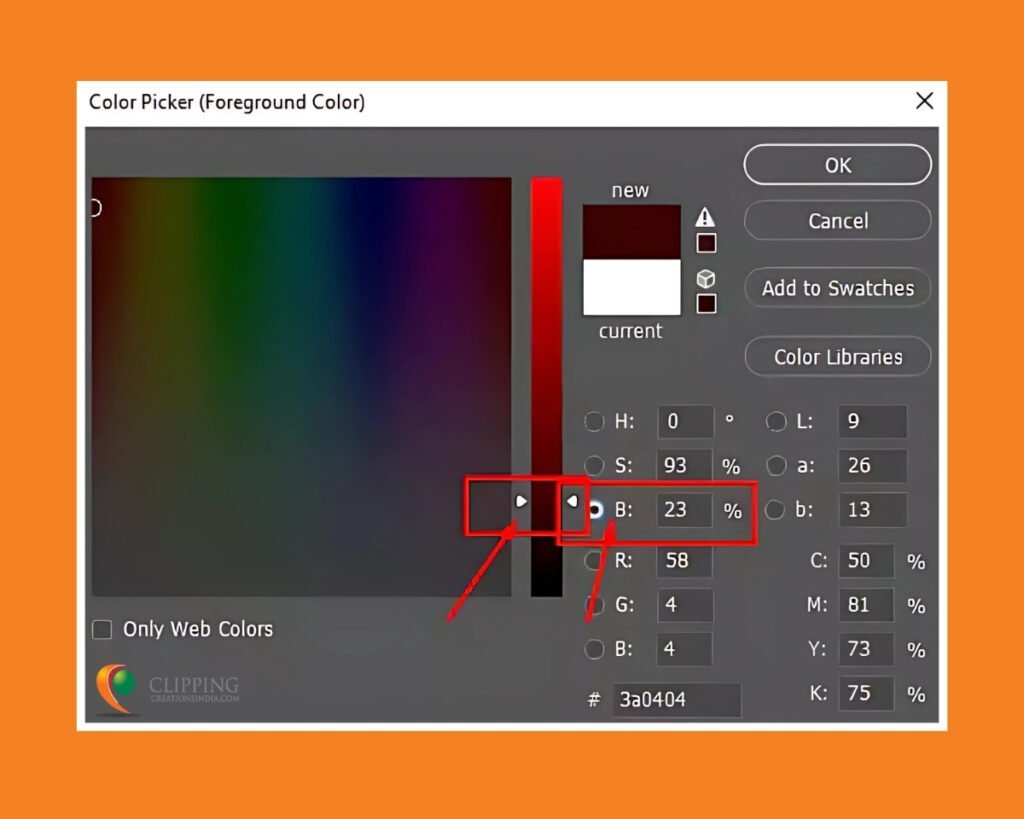
For an Example:
If you want a bright green color for your design, set the HSB values to:
Hue: 120° (green)
Saturation: 100% (vibrant)
Brightness: 75% (light)
This combination will give you a bright, eye-catching green for your project!
Step 05: RGB/Hex Values: Input specific RGB or Hex values for precise color control.
As graphic designers or photo editing tasks, there are two color models or color spaces, RGB and CMYK. A color model is a mathematical representation of colors as numbers, which correspond to the intensity of different color components. We discuss RGB only as it is found in the Color Picker Dialog Box.
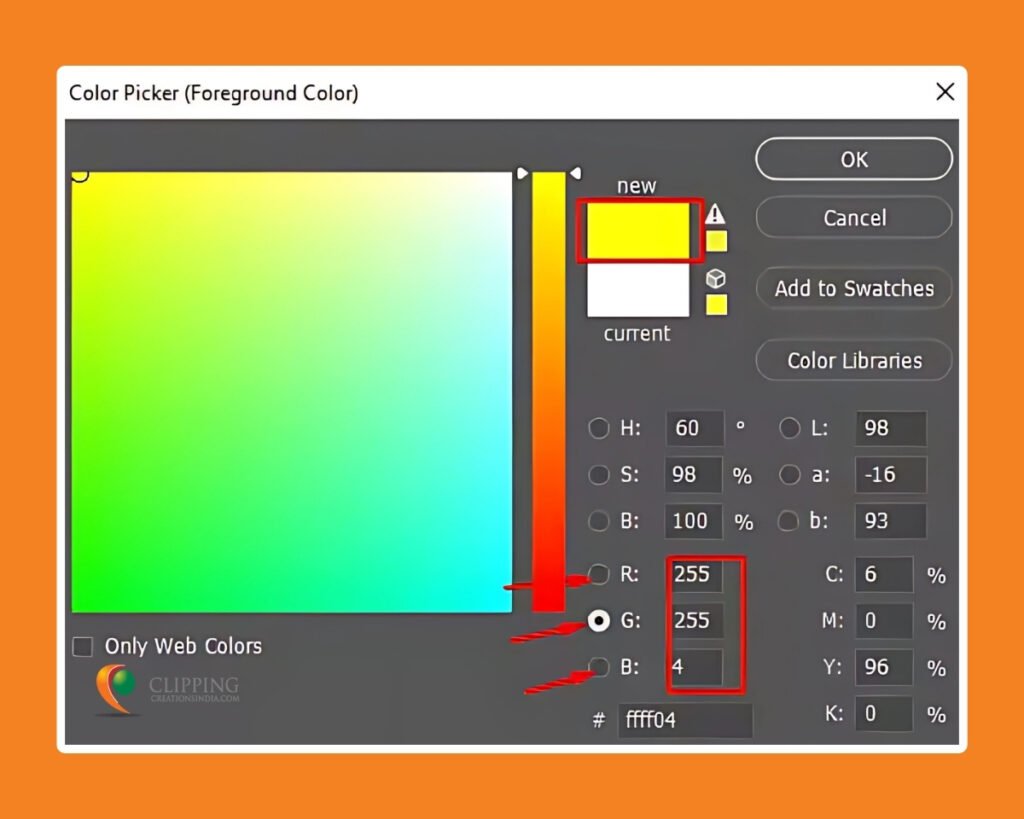
The RGB color model is primarily used for Digital Media, Web and presentation. It allows us to create a vast spectrum of colors on digital screens. Each color component can range from 0 to 255, where higher values yield brighter colors.
For example, if you set the RGB values to:
- R: 255 (full red)
- G: 255 (full green)
- B: 4 (a hint of blue)
This combination produces a vibrant yellowish hue.
While calculating RGB values manually can be tricky, I recommend using an online RGB color generator for accuracy and efficiency.
Quick Tip: For web use, you can also convert RGB values to Hex format. The above RGB (255, 255, 4) translates to the Hex code #FFFF04.
Step 06: Brush Settings for Color Customization
Now that you’ve chosen your brush color, it’s time to fine-tune your brush settings for the best results in your design. Here’s how to customize your brush effectively:
Key Brush Settings to Adjust:
- Brush Size: To change the size of your brush, click the Brush Picker drop-down in the Control panel and adjust the Size slider. For a quick adjustment, use the bracket keys [ ] to increase or decrease the size instantly.
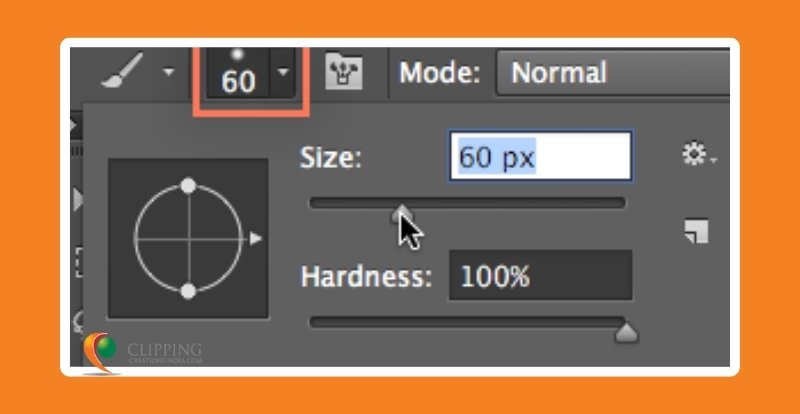
- Hardness: When you need to control the hardness or softness of your stroke, e.g. or whether it will be deep or light, you have to adjust the hardness of your brush edges from the same drop-down menu.
A harder brush creates sharp edges, while a softer brush gives a blurred effect. For most designs, a hardness setting of 50% or less is ideal to keep brush strokes subtle.
- Brush Tip: In order to create a unique and variety of effect in your design work, try to use various brush tips. These tips of brushes can mimic real-life tools like pens and markers.
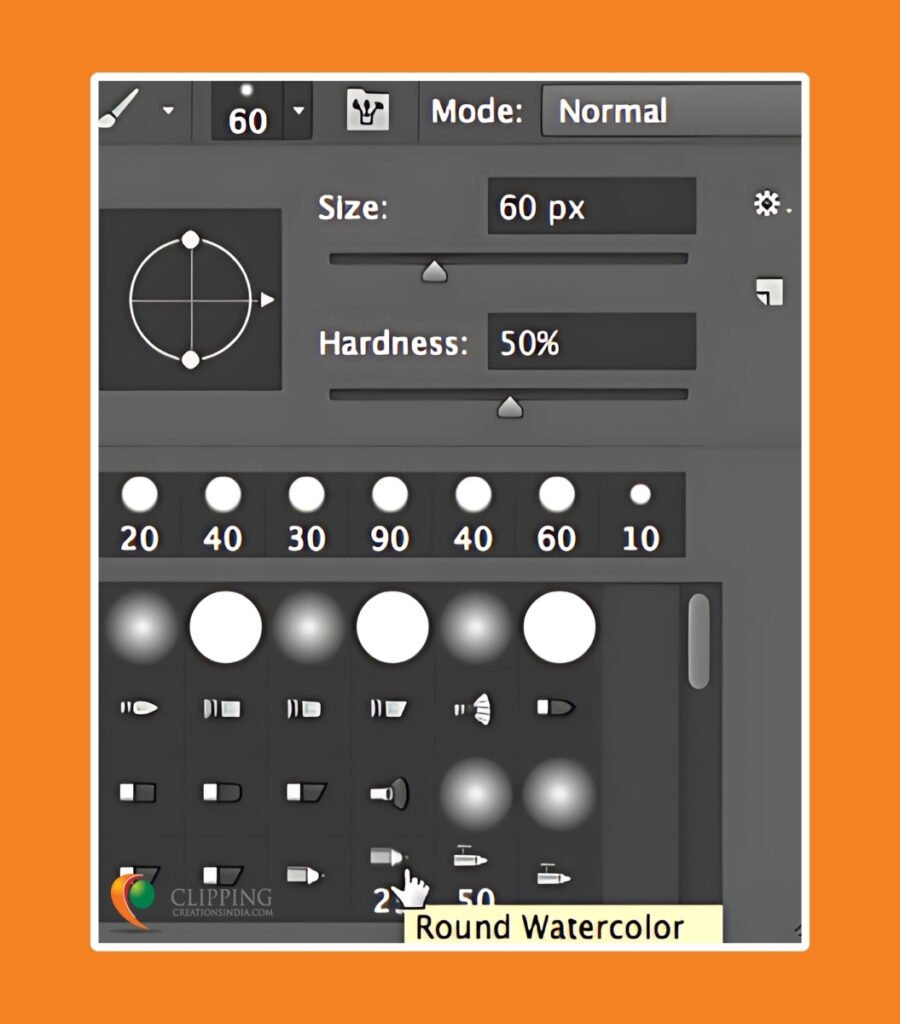
- Opacity: Opacity control is a very basic thing but so important to utilize in image editing services correction. This controls the transparency of your brush strokes. By default, opacity is set to 100%, but lowering it will make your strokes less intense.
You can find this setting in the top control panel or under Window > Brush Settings. - Flow: This setting determines how quickly paint is applied, allowing for smoother transitions between strokes affecting the intensity of your brush strokes.
Navigation: Control Panel at the top > Flow slider (usually next to Opacity)>
Adjust the slider to your desired flow rate. - Blending Modes: Experiment with blending modes like Multiply, Overlay, or Screen to see how colors interact on different layers.
Navigation: In the Layers Panel, find the dropdown menu at the top that says “Normal”.
Click the dropdown to see blending mode options like Multiply, Overlay, and Screen.
You can cycle through blending modes by holding SHIFT and pressing the PLUS ‘+’ or Minus ‘-’ Keys.
Customizing Other Tools
Many tools in Photoshop have similar brush settings. For instance, when using the Eraser tool, you can click and drag to erase parts of your layer. Adjust the Eraser’s size, hardness, opacity, and more from the Control panel to suit your needs.
Step 07: Saving and Exporting Custom Brush Presets
After, you’ve adjusted your brush to perfection, it’s time to save your settings:
Edit > Presets > Preset Manager,
Select your brush and save it for future use.
How to Export Brushes in Photoshop
Exporting brushes in Photoshop allows you to save your custom brushes for future use or share them with others. Here’s a step-by-step guide on how to export your brushes after saving, choosing, or selecting them:
01. Open the Brush Panel:
- Go to Window > Brushes or press F5 to open the Brushes panel.
- Select the Brush: Click on the brush that you want to export in the Brushes panel to select it.
02. Export the Brush:
- Click on the hamburger menu (three horizontal lines) in the upper right corner of the Brushes panel.
- From the dropdown menu, select Export Selected Brushes.
Common Brush Color Issues in Photoshop
Graphic designing is much like ‘threading the needle’ type work. It requires precision, finesse, and a steady concentration to bring every detail together. Through the whole design process with Brush tool, you may face many issues, especially changing the color of brush tool and paint with it. These issues are not large but if you do not become careful enough that might hinder your work process.
Problem 01: The brush color being stuck on black or white
Sometime you may find, your brush color is stuck on black or white or two images are blended and color is not changing.
Solution: Foreground Color Settings:
The most common reason for this problem is that the foreground color is set to one of these colors. This can happen accidentally when you click on the color swatches or use keyboard shortcuts.
- Check the foreground color and ensure you’re not on a layer mask. Use D to reset colors.
2. Problem: The brush color isn’t showing correctly.
Solution: Layer and Masking Issues
Check Layer: Make sure you are on the correct layer. If you’re on a layer with a blending mode that alters color (like Multiply or Screen), it can affect how your brush color appears.
Blending Modes: Review the blending mode of the layer in the Layers panel. Switch to Normal if necessary to see the true color.
Toggle Layer Visibility: Confirm you’re on the correct layer and check blending modes. Use Ctrl +, (Windows) or Command + , (Mac) to toggle layer visibility.
3. Problem: The brush tool isn’t painting in the selected color.
Solution: Resetting Brush Tool Settings
Reset Tool: If all else fails, reset the brush tool settings. Right-click on the brush icon in the options bar and select Reset Tool. This will restore the brush to its default settings.
Keyboard Shortcuts to Speed Up Your Workflow
I have listed all the keyword shortcuts options in a sequential order list. It will be convenient for you to work with the Brush Tool and colors in Photoshop.
- B – Brush Tool: Switch to the Brush Tool to start painting or drawing on your canvas.
- I – Eyedropper Tool: Select the Eyedropper Tool to pick a color directly from the image. You can use this color as the brush color.
- X – Swap Foreground and Background Colors: Quickly swaps the foreground and background colors. Useful when working with multiple colors.
- D – Default Foreground and Background Colors: Resets the foreground color to black and the background color to white.
- Alt + Backspace (Option + Delete on Mac) – Fill with Foreground Color: Fills the selected area with the currently chosen foreground color.
- Ctrl + Backspace (Cmd + Delete on Mac) – Fill with Background Color: Fills the selected area with the background color.
- Alt + Shift + Right-Click (Option + Shift + Right-Click on Mac) – HUD Color Picker (Color Wheel): Open the color wheel directly on the canvas for quick color selection. Drag to choose a hue and shade.
- Shift + Alt + Right-Click (Shift + Option + Right-Click on Mac) – Quick Brush Color Change: Opens a temporary color picker while using the brush tool, allowing you to change the brush color on the fly.
Show creativity with Brush Tool
Now I hope you must have an in-depth idea about the procedure of the ‘Change Brush Color‘ after reading this blog carefully. By following these steps and tips, you’ll be able to be a better designer and editor in Photoshop. This skill not only enhances your creative expression but also allows for more dynamic and visually appealing designs. Remember, troubleshooting is a key skill in design, and understanding the common problems described above will make you a more efficient Photoshop editor! You can also quickly solve the problems when applying the solutions corresponding to the issues.
Mastering how to change the brush color in Photoshop would no longer be a tough case for anybody who reads and follows this blog by heart. So, let’s go for a design that represents your artwork more aesthetically.
Or, if you are overwhelmed with quality in Clipping Path Services for your business growth, please don’t hesitate to contact us. Get a free quote and you can judge our work and then place order at a very affordable price in the world.
